Mending - Tumblr Posts
What do you suggest to mend ribbed cuffs on hoodies? I have plenty of hoodies and unfortunately there are holes on my cuffs. I have no idea how it happened either.
Honestly? Whenever that happens to mine, I never know how it happened, either.
Mending ribbed cuffs:
It might not seem like it because the knitting's often very small, but ribbed cuffs are usually knitted cuffs. This means they stretch, something we'll have to take into account when mending them.
There's a few ways you could mend these cuffs. Let's take a look:
Techniques:
If it's a small hole, get some matching thread and fix up the hole with a ladder stitch. You could leave it like that, or hide your mend by embroidering over it.

(Image source)
You could also sew a patch over the hole. Note that big patches may make your cuff less stretchy.

(Image source)
If the cuff's edge is fraying badly, you could also embroider over the edge, or sew on a new strip of fabric (note that these fixes may stop your cuff from stretching).

(Image source)

(Image source)
Another option is to darn your cuff. Use matching thread to minimise the visibility of your mend, or contrasting thread to make your mend a design element.
If you use a woven darning technique, the cuff will look nice but you'll lose some of your stretch. If your cuffs' knitting isn't too tiny, you can avoid this by using Swiss darning or a duplicate stitch instead, depending on the type of damage you're trying to repair.

(Image source)
If all fails, you'll have to replace the cuffs.
You'll find ribbed fabric or even replacements cuffs at most craft stores. Of course, you could also remove a cuff from a different hoodie and sew it onto the one you're trying to repair, or try to find a worn-out ribbed garment that could be cut up for a new cuff. Old socks are great for this.

(Image source)
If you're a knitter, you could also knit your own cuff! Remove the damaged cuff from your hoodie (with a seam ripper if possible, but just cutting them off is an option too). Either pick up stitches on your existing sleeve and knit a new cuff in the round, or knit a separate cuff (either in the round, or straight and sewn together) and sew it onto your sleeve once it's finished.

(Image source)
Conclusion:
Holes in cuffs happen a lot. They're near our hands, and we use our hands all the time, so they get snagged easily. If my suggestions seem a little daunting, just stick to a good old ladder stitch and you'll be fine. If not: be as creative as you want!
Visible Mending
Introduction:
Visible mending is a decorative way to fix up an item. Instead of trying to make your mend as invisible as possible, the idea is to make it part of the garment's design.
Visual mending is not a single technique: it's more of a mindset. If you've got an item you love, it deserves to be mended, and if you're going to put that love into stitches, why not show them off?
That being said, there are some specific techniques that are popular with visible menders. Let's take a look!
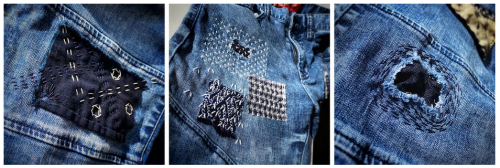
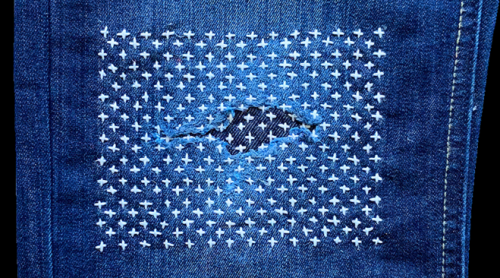
Sashiko:
Sashiko is a type of traditional Japanese embroidery that is used to both decorate and reinforce fabric. In visible mending, sashiko is often used to cover up holes with patches or to reinforce thinning fabric. This technique uses a variation on the running stitch.
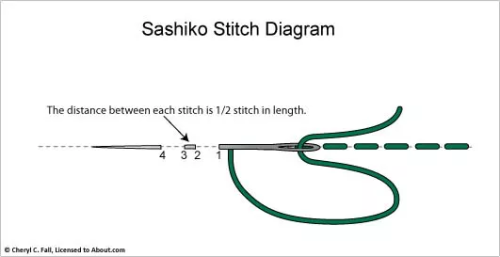
(Image source)
Some resources on sashiko:
SashiCo on YouTube: sashiko livestreams and information on the cultural aspect of sashiko.
Written tutorial by Upcycle Stitches.
Free sashiko templates by TheSpruceCrafts.
Fixing jeans with sashiko by Soluna Collective.
(Image source)
(Image source)
Embroidery:
Regular embroidery is also a popular technique to accentuate your mends. Check out my embroidery 101 post to learn how to get started. You can embroider patches, or use embroidery to hide or accentuate any stitches you've made to fix holes. Embroidery's also a great way to cover up stains.
(Image source)
(Image source)
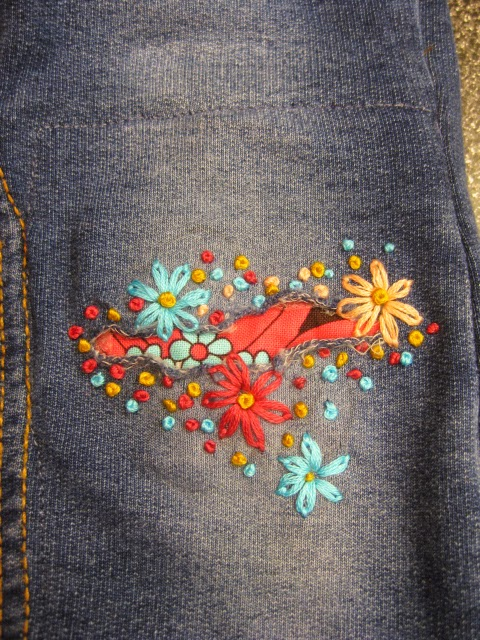
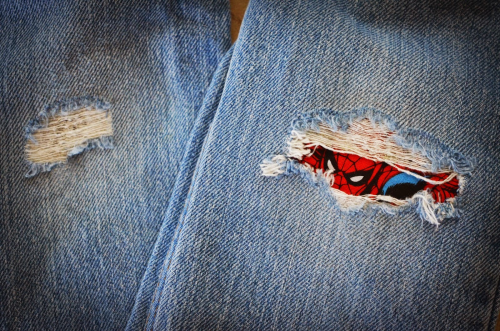
Patches:
There are many ways to add patches to a garment. My tutorial on patches is a good place to start if you want to make custom-shaped patches to sew on top of your fabric. You can also sew your patch on the inside of your garment and have it peek out from beneath the hole you're trying to fix. Fun ideas for this are lace or superheroes.
(Image source)

(Source)
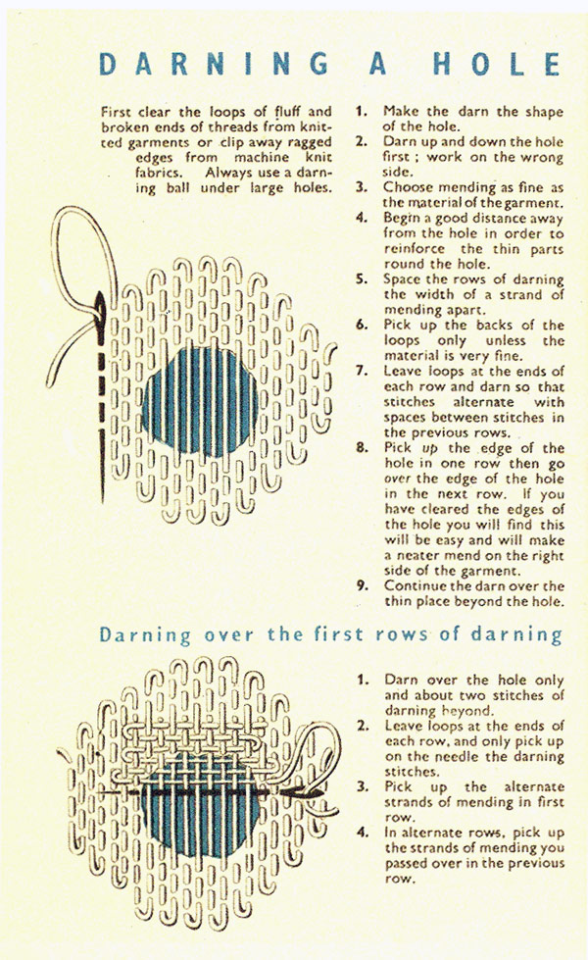
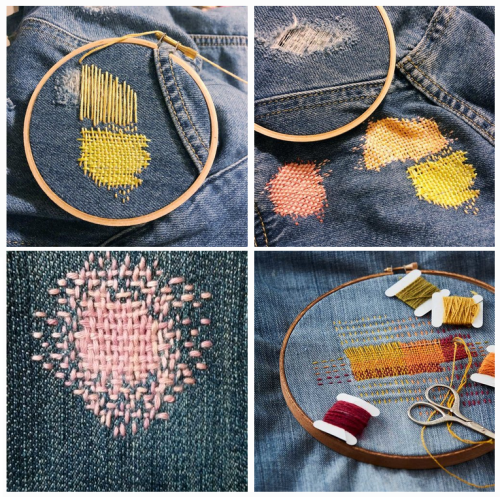
Darning:
Darning is a technique used to repair holes in fabric by using running stitches to weave extra fabric over the hole as to fill it up again. While traditionally darning is done in an invisible way by using the same colour of thread as your fabric, you can also use contrasting colours to accentuate your fix. Check out this written tutorial on darning by TheSpruceCrafts.
(Image source)
(Image source)
Conclusion:
Visible mending is a creative way to fix up your clothes and give them some personality at the same time.
You should be proud of the fact that you took the time and learned the necessary skills needed to mend your clothes! Show off what you did!
A fun side effect of wearing these obvious mends is that people will notice them. They'll remember your fixes the next time they're faced with a hole in their wardrobe, and it will make them more likely to try it for themselves.
These are just a few ways to visibly mend your garments. Want more inspiration? Check out Pinterest or r/Visiblemending on Reddit.

A couple patches that’ll be going on some patch pants, I bought the global warming patch at a pride event and made the rest


I'm more sad and hurt today. I did something and I knew it was stupid but I did it anyways. I lurked and saw something that caused me more pain and heart ache. I hate this feeling, I hate that another person caused me this pain and hurt. I hate that someone who was my best friend for years would be so cruel and cold towards me towards the end. They claimed to cared and they never wanted to hurt me but that was a lie. If you truly cared and didn't wanting to hurt someone than you should have been truthful. You should have kept your words and you should have been a man about it.
Gone! All those memories of us are now tainted and ugly to me. Maybe one day I can look back and find the good in it again. For the time being those memories just reminds me of the person whom I loved and cared for hurting me.
I'm broken 💔😢
But I'm not letting a POS ruined me or keep me down!! This shitty situation will make me stronger. I'm worthy of love. I'm worthy of having a partner that cares for me. I'm worthy of friendship. IM WORTHY.
From today on I choose to let go and forget. They acted like I didn't exist I'll return the favor. Those years are gone.
I didn't wish them the best because that would be a lie, I didn't wish them the worst either. I simple wished them what they deserve, whether it's good things or bad things, that's between them and karma.
I believe in karma. What you put out is what you'll get in return. I choose to let go and forget. But I'll never forget the feeling they put me through. That stays with you.
My person will come when it's the right time for me. I have faith my forever person will come. This event is only a short, brief chapter in my life.
"Don't just throw ripped jeans away, you can repair them using these 10 cute Visible Mending techniques!!" unfortunately my friend the first point of failure for every single pair of jeans i have owned in my life has been the Crotch and Ass. Knees: fine, cuffs: fine; but 3 years in, and all that stands between the world and my astronaut-patterned taint is 0.5µm of denim worn so thin that every squat threatens to tear it to shreds like wet toilet paper. If the Tiktok craft community could figure out a way to resurrect jeans afflicted in such a way that doesn't involve adding a whole ass buttpatch like some sort of inverse assless chaps situation then that'd be great
OwO what's this? A high effort post from me, who could've seen that coming.
So I'd like to share how I made this repair to an old bag of mine in prep for college starting again this year to avoid having to swap bags and to hopefully help with or inspire anyone to repair their old things.
The finished result:

So instead of buying a new bag in prep for year 2 of college I thought I'd just fix up my old bag that I've had for a few years now. Generally it is just a little scuffed up and any holes or tears were easy sewn shut again however there was this big hole in the netting that used to be a pocket.

Given that I wanted to be able to use my pocket again I decided that'd be my main task after fixing the few holes.
To repair it I cut some paper in the shape of the pocket. (I'm sure there better ways to do this but I just put a pin at each corner and then connected the dots with a pen before cutting on that line)

From there I drew around it on some spare material (in my case a really old pair of jeans that had alot of holes and were too small for me).

Now here's where you could just cut it out and then skip ahead to where I sewn it on however to make it stand out more and to make the bag feel more personal I decided to embroider a design to it before cutting it out.
The design I chose was (as you seen) a flower pattern since I had recently ordered thread and so had a bunch of colours which made me want to make each flower a unique colour.
Step 1 to the embroidery was to mark it out and similar to when drawing the outline I'm sure I could have used something that wasn't Sharpie however it was what was at hand. For my design I made each flower 2 cm apart from eachother and every row alternates in height by 1 cm.

Next I started embroidering the design. For the flowers I'm using a lazy daisy design which consists of a french knot with the petals stitched around it. I'll make a tutorial on this at some point however they're nothing new and there are alot of tutorials online about how to make them. I know some people don't use the knot in the middle so just a heads up if you make something similar that it's not necessary.
It took way longer to get all the knots tied but once I finally did, it looked like this.

Next was to add the petals, this was in my opinion the best part of this project since, as I mentioned, I had ordered lots of new thread so basically had like one bundle of every colour to play with. Because of that I made each of the flowers a unique colour. Overall this part was the longest and took me a few days on and off but it was so worth it and made an end result of a lovely mess of flowers.

Finally all that was left to cut it out and sew it in place. I'll be honest I did all this last part in a night and was excited to just get going with it so I took less pictures of the process.
All I have is how it looked when it was finished but I'll atleast explain the process.

So once I had it all cut out I sized it with the bag and then pinned each corner in place, from there I got a curved needle out and used some yellow sewing thread to fix it in place. To sew it on I put the patch under the seems of the bag and then used a whip stitch to keep in place. Since my bag has a zip at the top of this pocket I just sewn it right the way around since it'd still be accessible.
After it was sewn in place that was me finished, I'm super happy with the result and it's really helpful as I've been dedicating this pocket to my earphones so when I take them out they don't pull anything else out with them. If you have any questions regarding doing a repair like this yourself feel free to ask them and I'll do my best to help out.
Happy mending!


Computer Numerically Controlled Sewing Machine
It's a 3d printer for sewing and embroidery.
Tally Ho!
hey, i need to fix up a hole in a (wool/ knit) sweater. the lady at the store i bought the right sort of yarn for it at said i needed to secure/ „catch“ all the stitches/ loose parts so the sweater doesn‘t end up unravelling over time. can you explain how best to do this or do you have any resources for it? i feel very overwhelmed and i don‘t wanna ruin my sweater by doing it wrong
Mending holes in knit fabric
The thing about knitting is that it's basically a collection of loops. If one loop gives in, the rest of the fabric risks unravelling, too. That's why this person mentioned "catching" all the stitches: if you miss one, your sweater might continue unravelling.

(Image source) [ID: a woven fabric (plain weave) versus a knit fabric (stockinette stitch).]
That probably sounds super stressful, but don't worry! There's different ways to fix knitting. Some are easier, and some are harder. Let's take a look.
Swiss darning:
The cleanest and most invisible fix is Swiss darning. This type of mending requires you to thread through the loops of the hole, and use those to knit new stitches. Swiss darning is probably the trickiest way to mend knits mentioned in this post.
If you've got a really small hole, you could also try duplicate stitch which doesn't require threading. This technique can also be used to reinforce worn-out spots in knitting, or even for embroidery.
Check out Patty Lyons' written guides on Swiss darning and duplicate stitch to see how it's done, or these YouTube guides on Swiss darning and duplicate stitch by Heather Storta and Stuart Moores Textiles.

(Image source) [ID: a black and white image showing how to do Swiss darning on a piece of knitting with a hole in it. Threads have been threaded between the loose knit loops, and a tapestry needle is weaving new knit stitches along these threads. Text: "Fig.3."]

(Image source) [ID: example of a hole in a gray piece of knitting that's been mended with the duplicate stitch. Six stitches have been mended with yellow yarn. Text: "Ta Da, a brand new section of knitting with no bulk - Swiss Darning Magic. PattyLyons."]
Woven darning:
If you don't feel like recreating knit stitches, you can also do woven darning on knit fabrics. The technique's the same as you would use for a woven item.
Note that a darned patch like this is not stretchy, unlike its surrounding fabric. You can somewhat remediate this by darning diagonally, but it'll still be less stretchy than actual knit fabric.

(Image source) [ID: close-up on a hole in a swatch of beige knitting that's been patched with a woven darn in light blue, dark blue, red, pink, and yellow yarn.]

(Image source) [ID: vintage instructions on how to darn a hole.]
Knitting over the hole:
You can also knit a patch and sew it across the hole, or pick up stitches around your hole and knit over it. Don't forget to finish off the loose stitches at the edge of the hole on the wrong side. Loop your yarn through them, making sure to catch them all, and secure them.
This YouTube video by VeryPink Knits will show you how to knit across a hole. If you're more of a written tutorial person, take a look at this Berroco article on knit patches.

(Image source) [ID: a gray sweater on which a red knit patch has been added to cover up a hole.]
Crochet:
If you're an avid crocheter, crochet's also an option to fix holes in knits.

(Image source) [ID: close-up on the shoulder of a blue knit sleeveless top with a hood. A hole has been mended with crochet, using red and brown thread. Text: "Cucicucicoo".]
Picking up dropped stitches:
If just one line of stitches was damaged, you could try picking up the dropped stitches with a crochet hook.
Fabric patches:
If you'd rather not knit or crochet anything, you could just sew a patch over the hole. First sew around the hole to stabilise the stitches, then sew a piece of fabric over or under the hole. Sandwich the hole between two pieces of fabric for extra security.
Use stretchy fabric and a stitch that allows for stretch to retain the stretch of the original knit material. If you do use a patch of woven fabric, note that this will effect the material's stretchiness.

(Image source) [ID: close-up on the neckline of a gray knit sweater. A hole has been mended with a green patch of fabric and sashiko stitching in yellow thread.]

(Image source) [ID: close-up on the elbow of a black and white knit sweater. The elbow has been patched with a heart-shaped scrap of red fabric with white polkadots and sewn on with a whipstitch.]
Conclusion:
This list is not exhaustive, but will give you some ideas on how to get started. You can go as visible or invisible as you want with these techniques.
Remember to use a yarn that's similar in weight and fibre as your sweater! If you darn a polyester sweater with real wool, you risk the wool patch felting in the wash, for example.
Resources for Mending Clothes

We toss out over 80 pounds of textiles each year. These textiles are often made of plastic materials (polyester, nylon), made in unethical conditions, dyed with harsh dyes that often get put into the rivers, etc. Even a single cotton shirt releases carbon emissions and uses tons of water.
So the best thing to prevent the unsustainable growth of the fashion industry is to make sure that your clothing lasts as long as possible. To do so, mending clothing is a must. So here are some resources to help you learn how to do various things, such as sewing a button, to tailoring clothes, or even upcycling old clothing into new styles.
* How to sew on three different types of button
* How to hand sew on a patch on a torn pair of jeans
* How to sew up a hole in an old shirt
* How to sew a simple T-shirt
* How to upcycle old clothing into new clothing
* More upcycle and sewing techniques
* How to repair a damaged sock
* How to do an invisible stitch
* 3 different stitches to work with for different results
* How to make a T-shirt smaller so it fits you better
* How to make repairs to your shoes
These are just a few of the things that you can do in order to make sure that your clothing lasts for a long time. Nobody wants to keep buying new clothing, as it is expensive and wasteful.
So making alterations to your clothing, or fixing small holes hen you see them can be hugely beneficial to your wallet, to garment workers, and to the environment in the long term.
Upsizing clothes! There are a million upcycling tutorials for clothes that are too big, but so few on how to make too small clothes you still love bigger!
Thank you for your suggestion! We all go through weight fluctuations in life, so it stands to reason our clothes should be able to fluctuate with us.
Resizing your clothes used to be a very common practice before the advent of fast fashion. Fast fashion sizing is extremely flawed, especially when it comes to plus size fashion, and we're stuck with a lot of vanity sizing, so it's a good skill to have regardless of whether you're looking to mend something old or buy something new.
How to upsize clothes:
Introduction:
There are many different ways to make a garment larger. The following list is not exhaustive, just a few ideas to get you started.
Grading patterns:
If you're making your own clothes, it's always useful to know how to modify a sewing pattern. The easiest way to adjust a pre-existing pattern to your size is slash and spread grading. First, you need to define which spots on the pattern need extra space. You then cut your pattern in that spot, and slide the resulting pattern pieces away from each other until you've got the size you need. Use paper to fill in the gaps. To ensure the resulting pattern makes for well-fitting clothes, make a mock-up and add, move, or remove darts where necessary to adapt it to your body type.
The image below shows potential slashing lines on a set of standard pattern blocks. Each line is a spot that allows you to add extra space. To read more about this process, check out the corresponding article by Threads Magazine.

(Image source) [ID: a diagram of slashing lines on a pattern block for a dress, bodice, skirt, sleeve, and a pair of pants.]
To make your clothes easier to let out in the future, make sure to provide ample seam allowance when cutting out your pattern pieces. This surplus fabric has several different uses, including giving you some wiggle room for when you need to size up your garment.
Now, let's take a look at pre-made garments.
Lengthening clothes:
A garment that's too short on you is easy to modify. Just add more material!
If it's a skirt or a dress, add ruffles to the bottom. Ruffles are easy to make by hand or with a sewing machine. You could also add lace, or wear the item with an underskirt.
For pants, let down your hem or sew on a new cuff. If this isn't enough, maybe consider turning your trousers into capri pants or shorts.
As for shirts, sewing an extra layer to the bottom edge is the easiest way to go, too. You could even combine two shirts into one to get an extra long shirt.
Another option is to cut your item in two and insert extra fabric between your separated garment parts.

(Image source) [ID: a pair of blue pants with cuffs sewn onto the bottom of the legs to lengthen them. The cuffs are made out of a fabric with a blue and brown geometric print.]

(Image source) [ID: a before and after picture of a red t-shirt that was lenghtened by adding in a patch of colourful fabric at the waist.]
Letting out seams/darts:
Remember how we made sure to have ample seam allowance earlier? When a garment has surplus fabric in the seams and you only need a little extra space, you can undo the seams of your garment and sew them back together again, this time with a smaller seam allowance than before. The Spruce Crafts has a pretty good tutorial on how to let out seams. You won't be able to make major size changes using this technique, but if you only need a few centimetres, this is a good way to go.
A lot of garments also have darts. Darts are fabric folds that are sewn down in strategic places to help the fabric follow the body's curves. If a dart doesn't fit you the way you want it to, then unpick the dart and try on the garment. Either leave the dart open, or pin the dart in place however you want it, then take off the garment again and sew the dart back together.
Be careful not to rip the fabric when using a seam ripper. Also note that removing entire darts may change the garment's fit.
You can also add custom darts to achieve a better fit, but that's a topic for another time.

(Image source) [ID: twelve different types of darts on a feminine bodice block.]
Adding extra fabric to your garment:
If we need to add more room than seam allowance or darts can provide us with, we need to add extra material. Remember those slashing lines we looked at earlier? If you're working with a pre-existing garment rather than a pattern, those are the perfect places to chop up your clothes and add in extra fabric.
Check your sewing stash for fabric that's similar in weight and material to your original garment, or go thrift shopping for an item you could use to upsize your garment. Long skirts and maxi dresses are a great source of fabric for alterations like these!
Lace inserts are also a fun choice to add some room, and if you're working with a knit item, you could even knit or crochet your own custom insert.
Define the area where you want to add extra fabric on your item, and measure how much you need. Draw a straight line on your garment with chalk/soap. Make sure the line doesn't cross any important structural or functional parts of your garment like darts or button holes: refer to the slashing diagram we saw earlier if you're not sure what spot to pick. Cut the line open (or unpick the seam if it's situated on a seam), and add in your extra fabric. Finish off your new seams so they don't unravel later on, and you're done!
You can add straight strips of fabric for extra width or length, or you could use flared panels or even godets to make your item flair out.
Want to see this technique in action? Check out this video by Break n Remake:
Some ideas:
This Pinterest user cut a straight line down the front of a t-shirt and inserted a lace panel to add extra width in the front of the garment.

(Image source) [ID: a blue t-shirt with a panel of dark blue lace added in at the centre front.]
Busy Geemaw cut open the side seams of a shirt and used flared panels to add some extra width in the bust and hip area.

(Image source) [ID: a green and white long-sleeved shirt with a striped flared panel in matching colours inserted at the side seam.]
This person added a panel to the sides of a pair of jeans to give them more space in the hip area. You could easily use a long straight panel or a panel that flares at the bottom to resize the entire garment instead of just the hips, or use a wide piece of elastic for extra stretch.

(Image source) [ID: a side view of a pair of light blue jeans with a dark blue wedge-shaped denim insert running down from the waist and ending above the knee.]
This person added a godet in the back of their shirt in order to get more space in the back.

(Image source) [ID: a blue and white plaid shirt with a white lace godet inserted in the back.]
Blue Corduroy enlarged a pair of shorts by opening up the side seams and adding in strips of fabric.

(Image source) [ID: blue denim shorts with a floral fabric insert at the side seams.]
You don't need to resize the entire garment if you don't want to. For example, One Brown Mom turned this ankle-length skirt with a too small waistband into a well-fitting knee-length skirt by taking advantage of the skirt's flared shape.

(Image source) [ID: a woman wearing a black shirt and a brown tartan knee-length skirt.]
Conclusion:
Throughout our lives, our weight will fluctuate and our bodies will change. There's no shame in this: it's just a fact of life. Therefore, knowing how to upsize an item that is too small for you is a useful skill to learn.
If you want more inspiration, check out these projects by Confessions of a Refashionista, One Brown Mom, and Thriftanista in the City.

I have mended my sweater because I'm getting somewhat tired of the almost year long project I've been doing.


my sister asked me to fix a sweater for her and as I am still sick and forced to the realm of my room I actually got to it.


as you can see in the pictures. parts of the zipper broke off. so a new one was needed. first I had to take the old one out though. it involved picking a lot of seams -> very annoying

then came the part were I put in the new zipper. took me a few minutes to wrap my head around which way to put it and what to sew first. managed to get it right on the first try (big win! no more seam picking!).

voilà! finished product. looks not nearly as neat as I'd wanted it to buty sister is content.
So I've had this joke in my head for a couple months (at least), but hadn't found the right spot to make it. Today it is complete.

A hole in my jeans?

Hmm? What's this?

A Patchypus?

REPAIRRY THE PATCHYPUS!!!?!!!
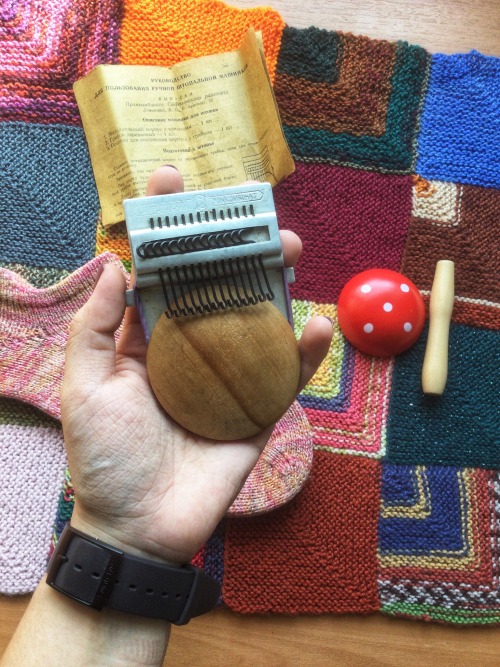
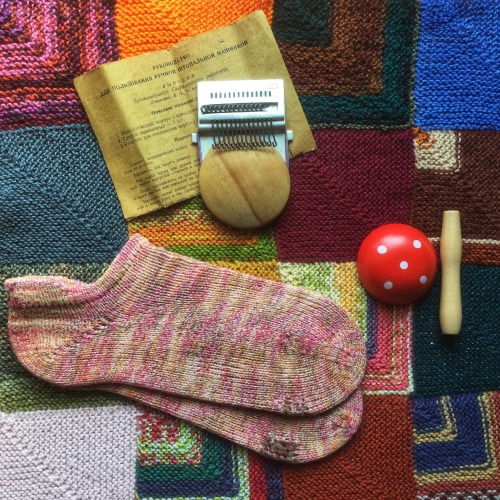
Got myself darning loom or speedweve. Mine is made back in Soviet days, and has already helped me darn 2 pairs of socks 🧦