Art Tutorials - Tumblr Posts
Saving for future reference!
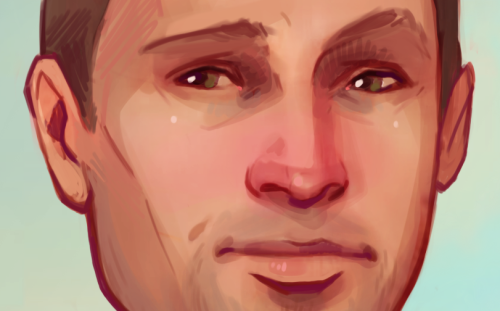
FACES
Drawing a face (the circle thing)
How to draw faces
Heads in profile
Drawing heads
A face tutorial
Avoid same facing
Diversify your faces
Face shapes
To make your drawing look like the person you’re drawing
Make your faces look like the person
Expressions
More about expressions
Drawing lips
Lip tutorial
Drawing ears
Drawing eyes
Realistic eyes
Drawing a nose
Drawing kisses
Drawing glasses
Drawing hoods
BODIES
Guide to human types part 1
Guide to human types part 2
Guide to human types part 3
Different kinds of athletic body types
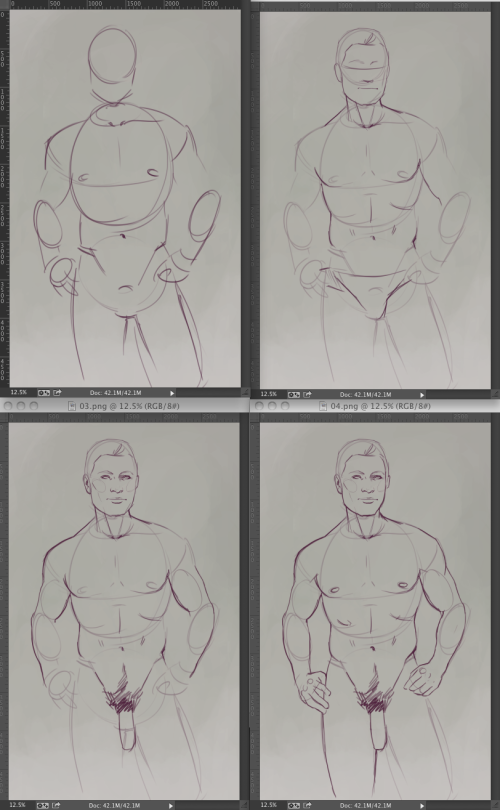
Ladies tutorial (nudity)
Fellas tutorial
Curves on girls tutorial
How to draw necks
Drawing shoulders
Drawing arms
Drawing hands
Hand tips
More hands
Hands tips and techniques
Hands, arms, legs and feet
Legs, torso and expressions
Drawing boobs
How to boob
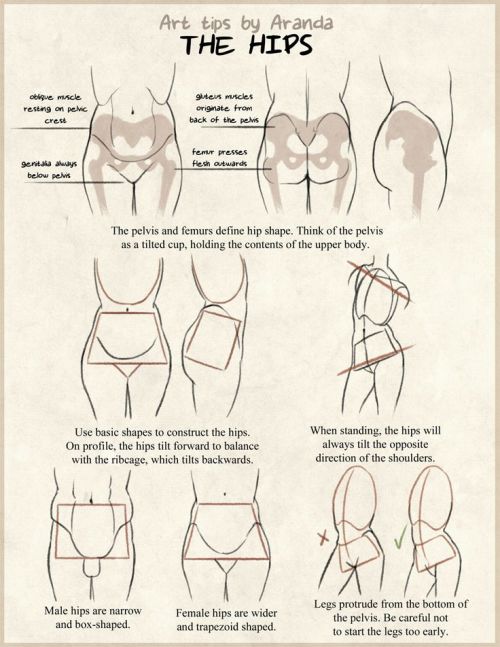
Boobs and hips
Drawing abs
Beer belly tutorial
Drawing backs
How to draw back views
Legs reference
Drawing knees
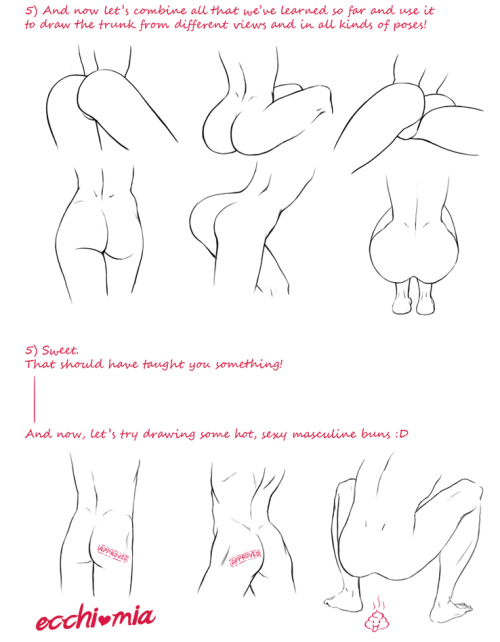
How to draw butts
Penis tutorial (nsfw)
Drawing feet and shoes
Sitting reference
Realistic woman body shape chart
Hair
Drawing hair
Hair tutorial
Drawing curls
Drawing braids
ANIMALS & CREATURES
Canines vs felines
Drawing cats
Drawing cats tips
How to draw big cats
Drawing rats
Basic deer tutorial
Deer sketching
Dog anatomy
Dog anatomy tutorial
Dog nose tutorial
Dog paw tutorial
Basic wolf tutorial
Horse tutorial
Sheep vs goats
Drawing giraffes
Basic owl tutorial
Bird wing tutorial
Drawing bird beaks and faces
Butterfly tutorial
Drawing animal legs on humans
Winged people anatomy
Dragon tutorial
Drawing dragons
Dragon wing tutorial
Fur tutorial
Drawing sharp teeth
OTHERS
Drawing clothes
Clothing folds tutorial
Collars, vests and pants reference
Hats reference
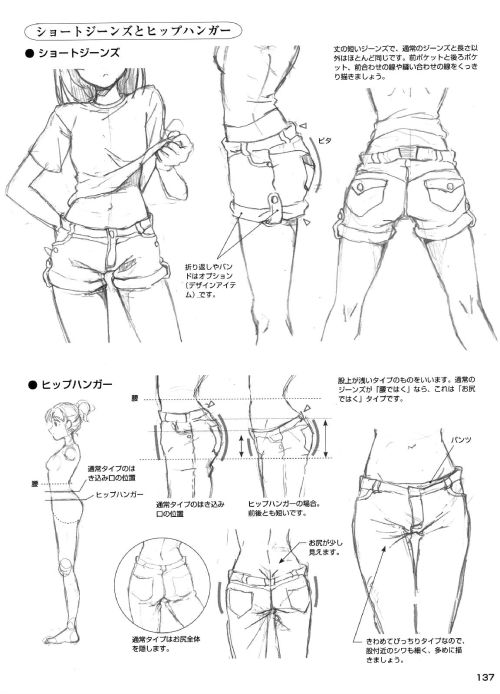
Drawing jeans
Drawing bows
Drawing trees
Tree tutorial
Drawing water
Water tutorial
Drawing crystals
Ice
Clouds
Creating form
Perspective tricks
Character design reference
How to draw better (video)
Learn how to draw better
Art reference & tutorials blog
Tutorial masterpost
How to draw anything
hot artists don't gatekeep
I've been resource gathering for YEARS so now I am going to share my dragons hoard
Floorplanner. Design and furnish a house for you to use for having a consistent background in your comic or anything! Free, you need an account, easy to use, and you can save multiple houses.
Comparing Heights. Input the heights of characters to see what the different is between them. Great for keeping consistency. Free.
Magma. Draw online with friends in real time. Great for practice or hanging out. Free, paid plan available, account preferred.
Smithsonian Open Access. Loads of free images. Free.
SketchDaily. Lots of pose references, massive library, is set on a timer so you can practice quick figure drawing. Free.
SculptGL. A sculpting tool which I am yet to master, but you should be able to make whatever 3d object you like with it. free.
Pexels. Free stock images. And the search engine is actually pretty good at pulling up what you want.
Figurosity. Great pose references, diverse body types, lots of "how to draw" videos directly on the site, the models are 3d and you can rotate the angle, but you can't make custom poses or edit body proportions. Free, account option, paid plans available.
Line of Action. More drawing references, this one also has a focus on expressions, hands/feet, animals, landscapes. Free.
Animal Photo. You pose a 3d skull model and select an animal species, and they give you a bunch of photo references for that animal at that angle. Super handy. Free.
Height Weight Chart. You ever see an OC listed as having a certain weight but then they look Wildly different than the number suggests? Well here's a site to avoid that! It shows real people at different weights and heights to give you a better idea of what these abstract numbers all look like. Free to use.

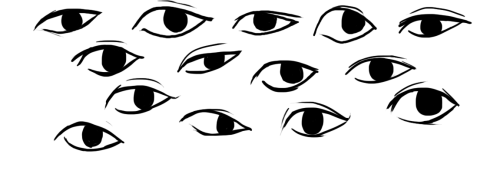
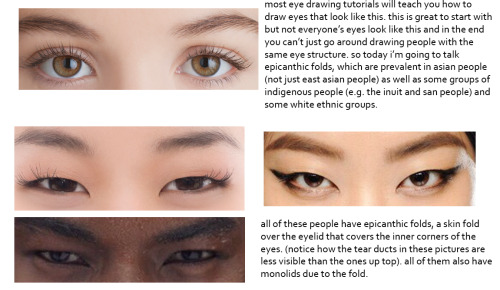


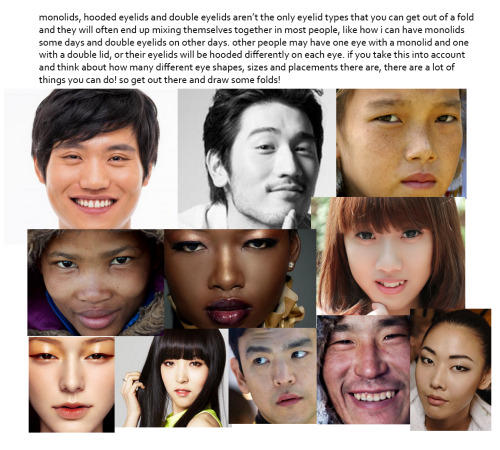
this was gonna be a tutorial and i guess it still is but if anything it’s just a really long and drawn out “essay” on drawing people with epicanthic folds. one of my biggest pet peeves is people drawing asian people exclusively with the same type of eye they’d give white people or anyone else who typically doesn’t have the fold! however i know that most people are taught with the standard white person eye (google image search for “eye” and it’ll all be pictures of white people’s eyes) so learning to draw epicanthic folds is a consciously learned thing.
therefore i bring you this, which attempts to break the mechanics of epicanthic folds down into something that’s a bit easier to digest and implement in your own art!
style can be argued i guess but it’s not that hard to stylize eyes with folds if you do proper observation and research. eyes with epicanthic folds are as diverse as eyes without so it’s not like you have to adhere to a strict model for them (although many people think that you have to) and all it takes to distinguish the two in stylized art (and even in semi/realism once you think about it) is a few lines! like i said this is a learned process but it’ll make your asian characters (and characters of other races even) a bit more interesting and believable.


i’ve had so many ask me for tutorials on these kinds of things. I hope this helps!!
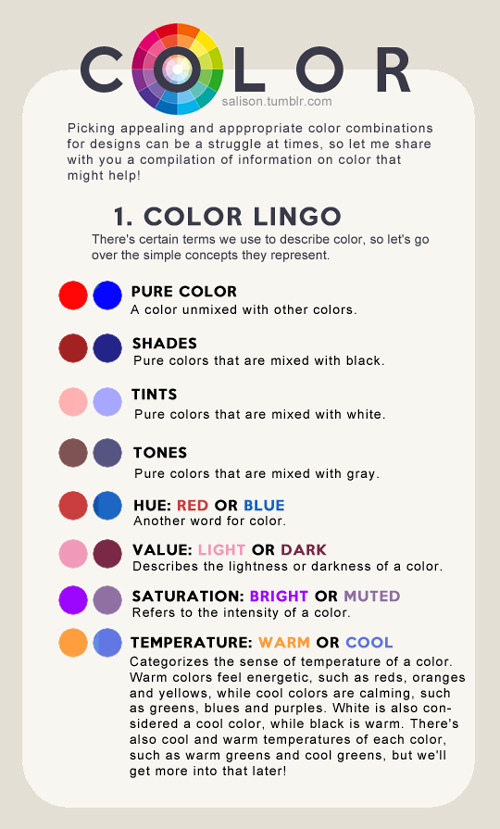
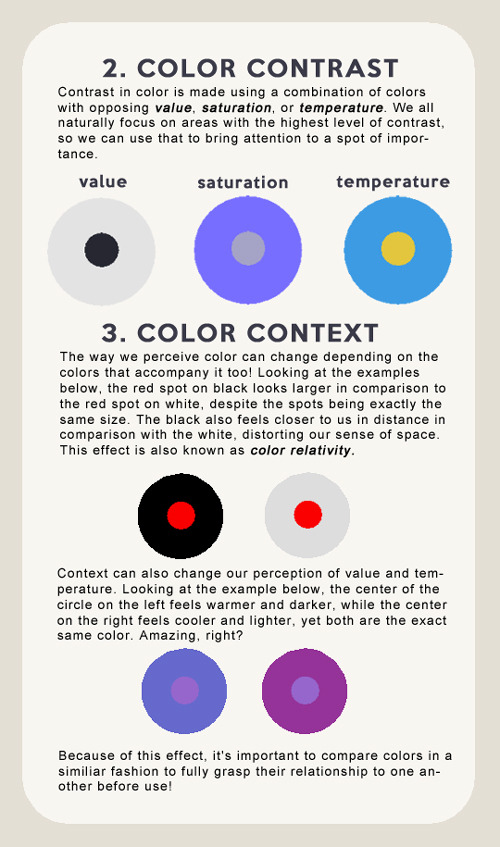


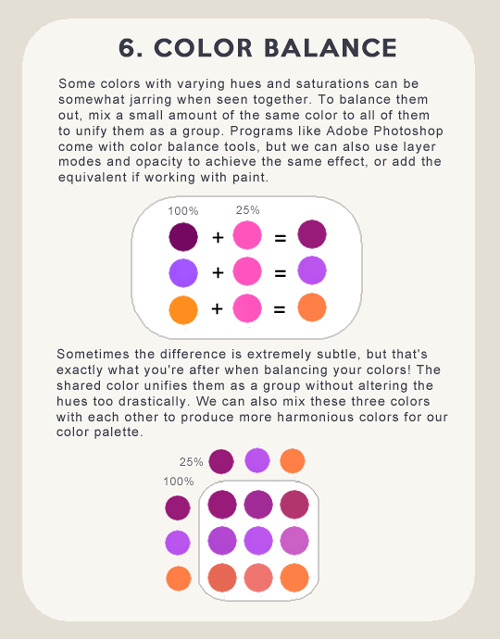
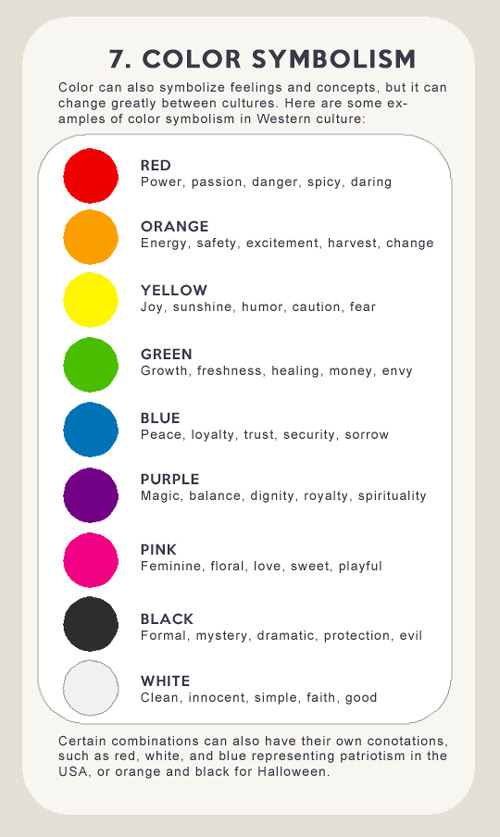

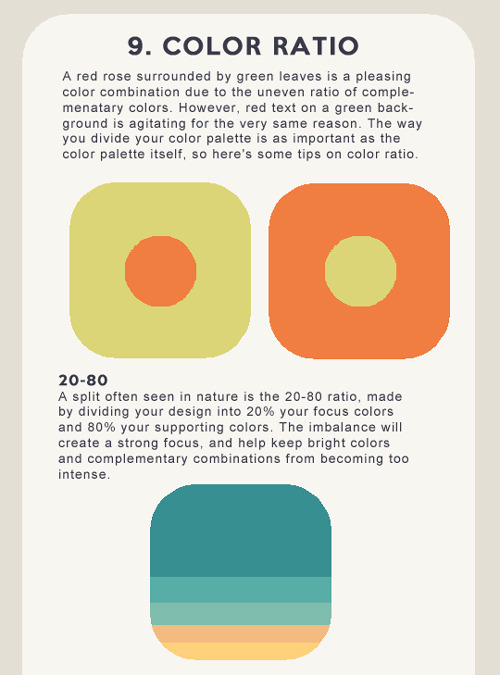


There is no right or wrong in color and design, and everyone works differently, but hopefully these tips of mine will help you find the colors that make you happiest!
I know you probably get these asks a lot, but I've really been trying to try drawing comic pages. I really admire how free and flowing your style is! I've seen your little tutorials and tips and idk what's wrong but I just can't seem to wrap my head around panel composition? Like I do wonderful painting comps, but I can't seem to break out. Do you have any resources or help to get started?
thank you very much!!!!! im just using this ask as an excuse to draw random comic tips i hope thats okay and that you’ll get something out of it
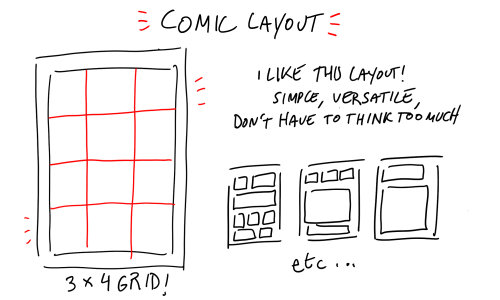

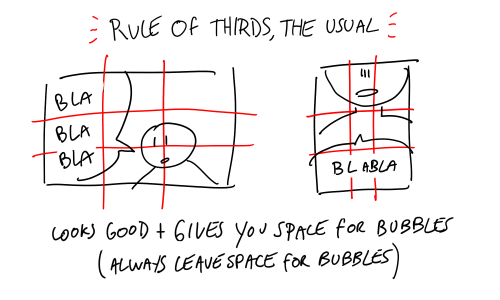
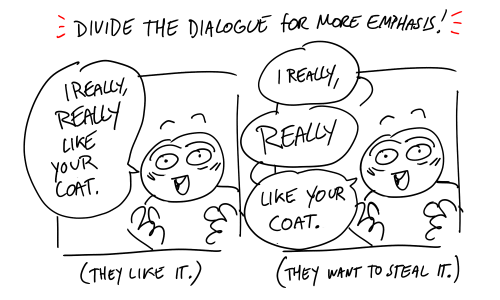
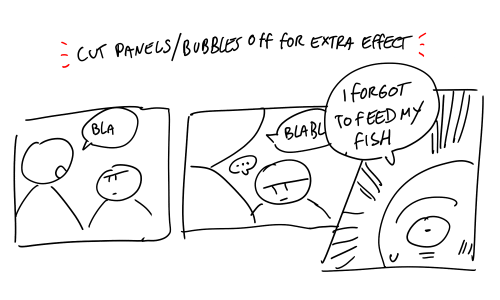
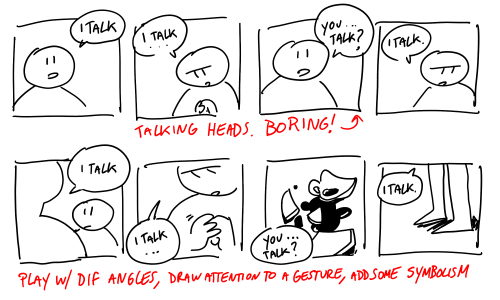
did that help…


Nekkid Alastair tutorial
I work in Photoshop, and I draw insanely large. Tumblr won’t even let me post a photo as large as I work. Painting big means that when you shrink the image down, it tends to give the illustration a more rendered look.
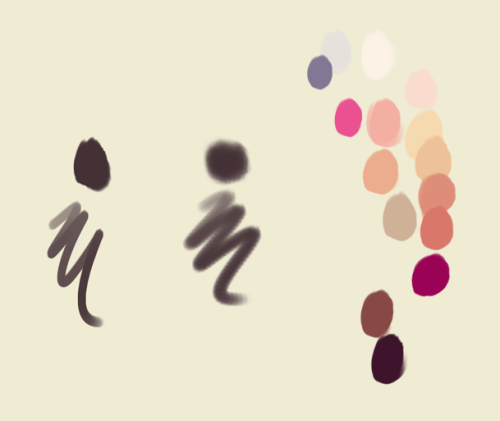
Brushes & Color Palettes
I only every use two brushes. An amazing, tactile organic shaped brush that I use for 99% of the work, and a softer, (still organic shaped) brush for blushes & form shadows. When I paint, I tend to do so on various opacities, so I layer the color on slowly. It tends to give me more color variation and control over the colors, but it’s a balancing act because you can also loose form that way.
Skin is basically one core color, with a lot of variation of other really strong colors layered on top. It goes pinker in the places that have more blood vessels, like tips of the ears, the nose, lips, cheeks, fingers, elbows, knees; or places where you blush, like your chest or neck. It goes more yellow in places where the bone is very close to the surface, like your forehead, cheekbones, or shins. There’s blues under the eyes, and blue-green in men along the jaw where you see 5 o’clock shadow. Dark Pinky-purples are great to use for slowing depth with colors. Use them around the lids of the eyes, for the nostrils, and as the deepest part of the ear-hole.
Sketching & Linework
Honestly, this is where most of the “work” is done. For me, the rendering & coloring process is fun, while sketching can be torture. The key is to stay loose. Do something quick, and gestural. You can knock back those lines – lower the opacity and refine the sketch on another layer – and just keep refining the forms. Don’t worry about the detail, just try to lock the large forms. Don’t be afraid to literally pull apart the sketch, and enlarge and shrink pieces of it to make it fit. One of the most important things I learned was to not get too precious with my work. (I literally had an art teacher that made me walk on my figure drawings at the end of each class.) Basically, don’t fall in love with a line so much that you’re not willing to erase it, if it’s wrong. PS I always use many, many references. And anyone who says you shouldn’t deserves a swift punch in the nads, for spreading art lies.
Keep reading
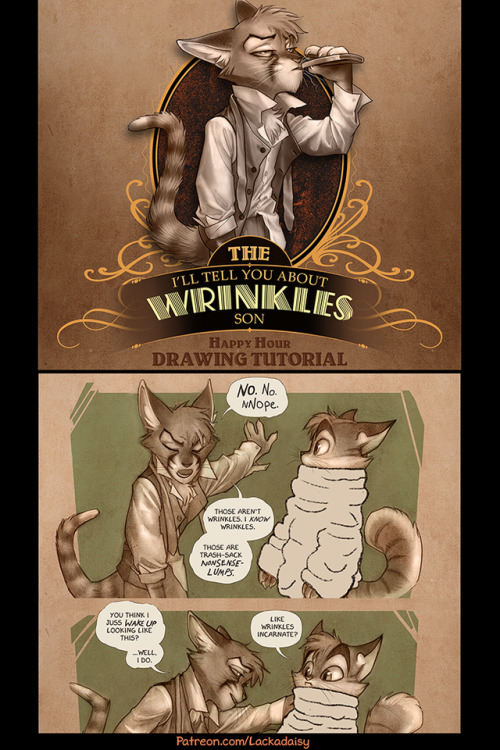
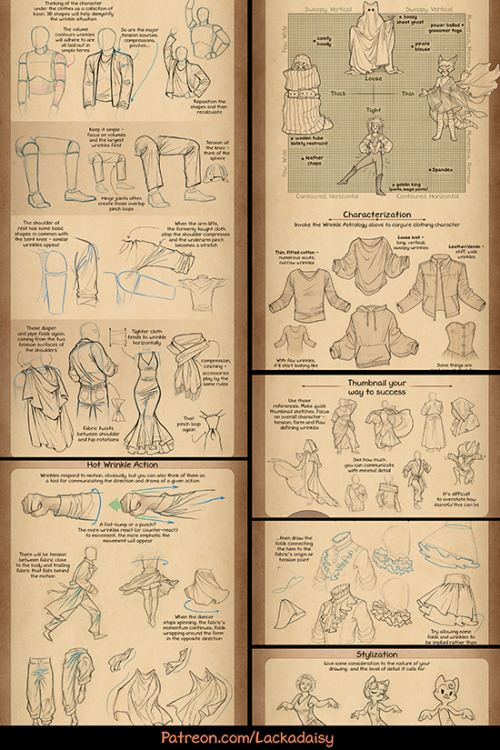
Drawing Wrinkles
I made a tutorial-thing about drawing clothing wrinkles - something I’ve had a few requests for. For all the banality of wrinkles, they’re an expansive topic. Anyway, these are some previews. The full tutorial is available to all $1+ Patreon supporters. You can find it here!
teach me?? how to draw?? the action of kissing????


Step 1. yearn
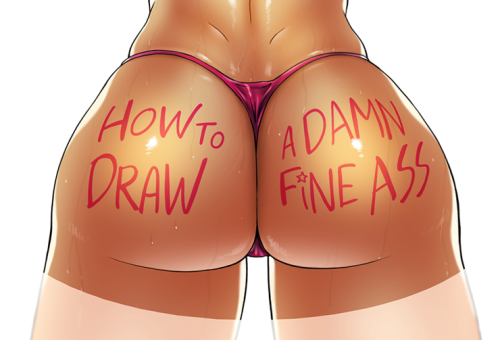

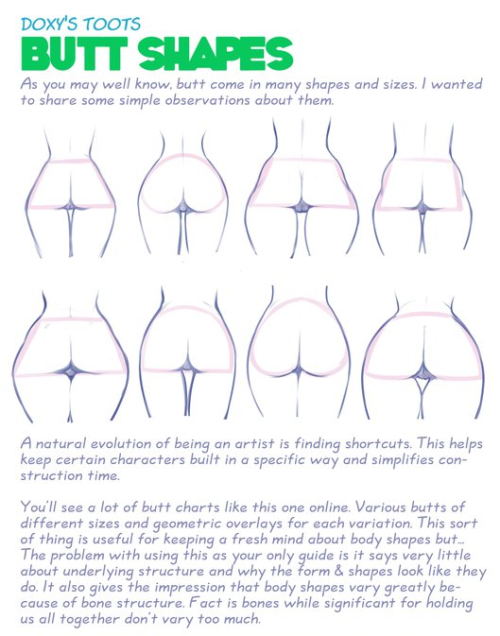

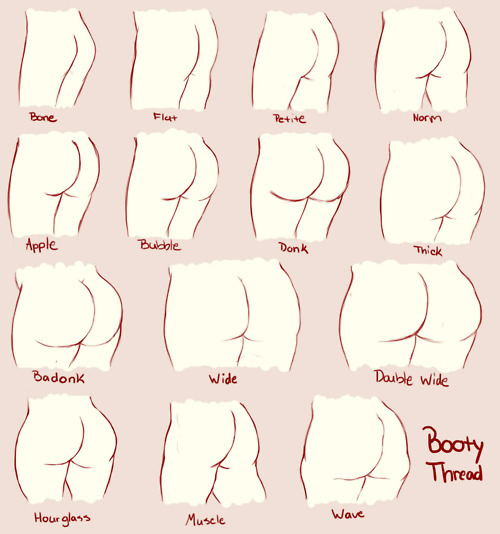


How to Draw a Damn Fine Ass Top Image, Row 5 & 6 Row 2: Drawing People by Barbara Bradley Row 3 Row 4 Row 5 Bottom Image
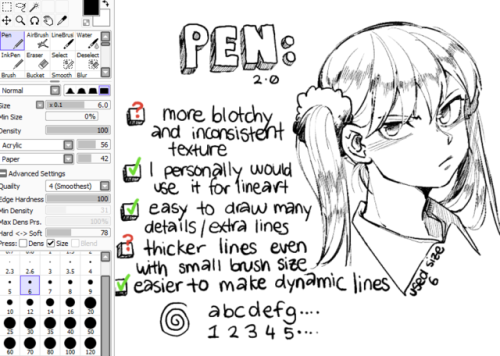
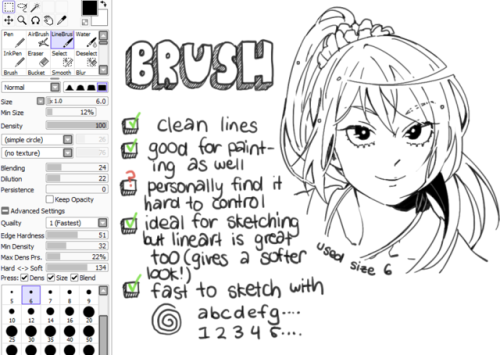
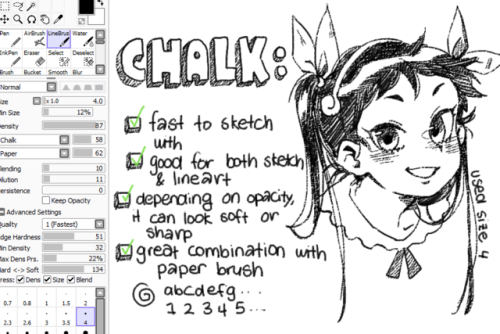
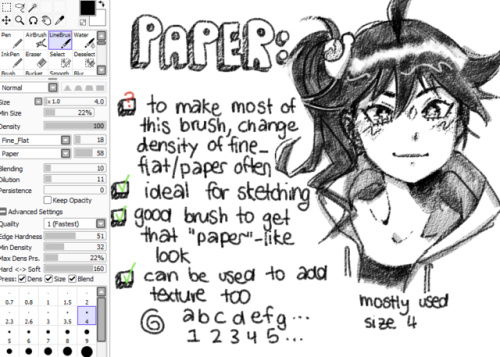
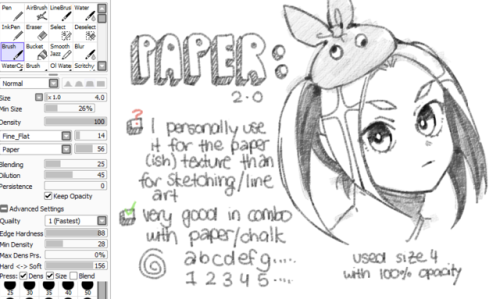
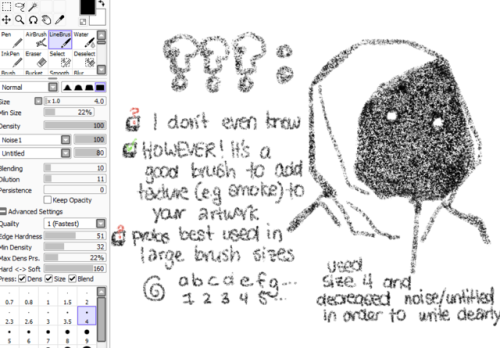
Brush settings
If you’re not sure where to find [insert texture], then this link should answer your question
Some Photoshop Tips
I’ve been getting quite a few asks about the process for the patterns in my stylized artworks, so I decided to put together a couple of tips regarding them.
Firstly, what you need are
— CUSTOM BRUSHES —
Most of the patterns I use are custom brushes I made, such as those:

For the longest time I was convinced making brushes must be super extra complicated. I was super extra wrong. All you need to start is a transparent canvas (2500px x 2500px max):

This will be your brush tip. When you’re satisfied how it looks, click Ctrl+A to select the whole canvas and go to ‘define brush preset’ under the edit menu

You will be asked to name your new glorious creation. Choose something that describes it well, so you can easily find it between all the ‘asfsfgdgd’ brushes you’ve created to be only used once

This is it. Look at it, you have just created a photoshop brush. First time i did I felt like I was cheated my whole life. IT’S SO EASY WHY HASN’T ANYONE TOLD ME

Time to edit the Good Boi to be more random, so it can be used as a Cool Fancy Pattern. Go into brush settings and change whatever you’d like. Here’s a list of what I do for patterns:
- under Shape Dynamics, I increase Size Jitter and Angle jitter by 5%-15%
- under Brush Tip Shape, I increase spacing by a shitload. Sometimes it’s like 150%, the point is to get the initial brush tip we painted to be visible.
- If I want it to look random and noisy, I enable the Dual Brush option, which acts like another brush was put on top of the one we’ve created. You can adjust all of the Dual Brush options (Size, Spacing, Scatter, Count) as you wish to get a very nice random brush to smear on your backgrounds

The result is as above. You can follow the same steps to create whatever brush you need: evenly spaced dots that look like you painted them by hand, geometric pattern to fill the background, a line of perfectly drawn XDs and so on.
BUT WAIT, THERE’S MORE
— PATHS —
But what if you want to get lots of circles made of tiny dots? Or you need rows of triangles for your cool background? Photoshop can do all of that for you, thanks to the magic of paths.
Typically, paths window can be found right next to Layers:


Draw whatever path you want, the Shape Tool has quite a bit of options. Remember, paths are completely different from brush strokes and they won’t show up in the navigator. To move a path around, click A to enable path selection tool. You can use Ctrl+T to transform it, and if you move a path while pressing Alt it will be duplicated.

Now, pick a brush you wish really was in place of that path you’ve drawn and go to layers, then choose the layer you want it to be drawn on. Then, click this tiny circle under the Paths window:

Then witness the magic of photoshop doing the drawing for you while you wonder how tf have you managed to forget about this option for the past 2 years

You can combine special brushes and paths for all sorts of cool effects. I mostly use them in backgrounds for my cards, but you can do whatever you want with them.

I hope that answers the questions for all of the people who were sending me inquires about the patterns. If you have any questions regarding this or any other Photoshop matter feel free to message me, I’m always up for complaining about how great and terrible Photoshop is C’:


Armour Study by Astri Lohne
Support the artist on Patreon!


tutorial for drawing characters with cleft lip! sorry that it's mostly unilateral-centric but it makes up the vast majority of resources and photos. still tried to get tips for drawing bilateral clefts in though.
please keep in mind that this is an introductory drawing tutorial and has some generalizations in it, so not every “X is Z” statement will be true for Actual People : )
if you draw any characters using this feel free to tag me!!


A master post of Thomas Romain’s art tutorials.
There’s not enough space to post all of them, SO here’s links to everything he has posted (on twitter) so far : 1 2 3 4 5 6 7 8 9 10 11 12.
Now that new semesters have started, I thought people might need these. Enjoy your lessons!
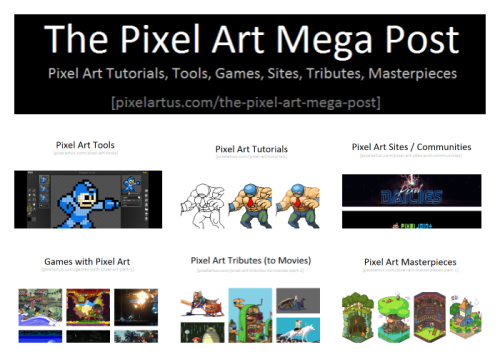
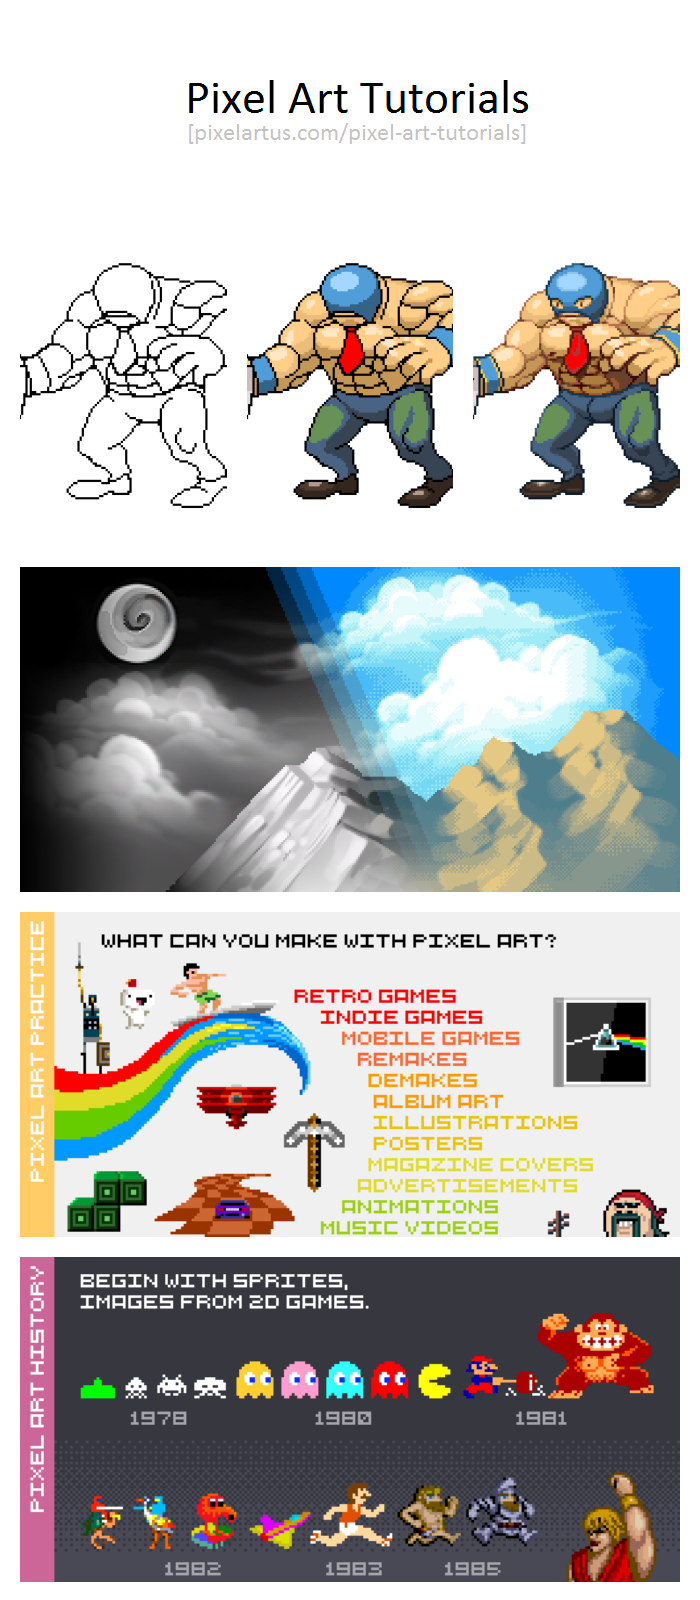


The Pixel Art Mega Post
Pixel Art Tutorials, Tools, Games, Sites, Tributes, Masterpieces
1.) PIXEL ART TUTORIALS
Pixel Art Tutorial (by Derek Yu)
HD Index Painting in Photoshop as Article and Video (by Dan Fessler)
No Bullshit Pixel Art Tutorial (by Retronator)
Pixel Art Knowledge (by various Pixel Artists)
Pixel Art Tutorial (by Cure)
Pixel Art Tutorial (by Android Arts)
Pixel Purism: Process vs Results (by Dan Fessler)
Pixelation Knowledge Repository (by Helm)
6 Pixel Art Drawing Techniques as Video (by GDQuest)
What the Heck is Pixel Art (by Pix3M)
Pixel Art Process - or 8 steps to a polished result (by Cyangmou)
Perfect Pixel Art with Specular and Bump Lighting in Unity (by Anton Kudin)
ISOmetric Pixel Art Cheat Sheet (by Dennis Busch)
GIMP Pixel Art Tool Setup Tutorial as Video (by Retronator)
Run Cycle Tutorial (by Glauber Kotaki)
Pixel Art Tutorials (by finalbossblues)
A Little Guide to Pixel Art (by Simon Hunter)
Secret Weapons and Tactics for Better Pixel Art (by 2D Will Never Die)
Pixel Art Tutorials (by drbubu)
Pixel Art Tutorial (by Studio Purloux)
Pixel Art Academy (by Retronator)
2.) PIXEL ART TOOLS
Free Pixel Art Tools:
Piskel [Windows/Mac + Browser]
Pixel Art Editor [Browser] -with collaborative editing mode-
Asesprite 0.95 [Windows/Mac/Linux]
Grafx2 [Windows/Mac/Linux]
Paint.NET [Windows]
GIMP [Windows/Mac/Linux]
Paint [Windows]
Pixly [Android]
Commercial Pixel Art Tools:
Photoshop [Windows/Mac]
Pro Motion [Windows]
Pyxel Edit [Windows/Mac]
Asesprite [Windows/Mac]
GraphicsGale [Windows]
Pixaki [iPad]
Sprite Something [iPhone/iPad]
Sprite Lamp [Windows/Mac/Linux]
Pixel Art Tutorials:
Collection of Pixel Art Tutorials
Other related Tools:
Voxel Art Tools:
Qubicle [Windows/Mac] -Commercial-
MagicaVoxel [Windows/Mac] -Free-
Hexel Tools:
Hexels [Windows/Mac] -Commercial-
GIF Creation Tools and Tutorials:
Ways to create animated GIFs
Game Making Tools:
The Big List of Game Making Tools
3.) PIXEL ART SITES / COMMUNITIES
Pixel Dailies
Pixel Joint
TIGSource Tumblr and TIGSource Forums
Retronator Magazine and Retronator Tumblr
PixelArtus
Pixelation
DeviantArt Groups (Pixel Artists and G-Pixel)
2D Will Never Die
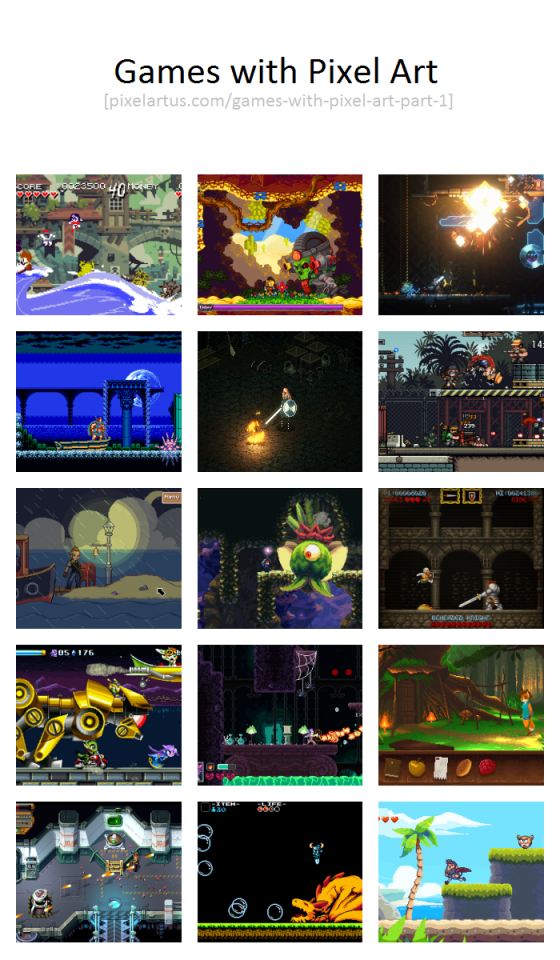
4.) GAMES WITH PIXEL ART (PART 1)
Curses N Chaos
Odallus: The Dark Call
Tick Tock Isle
Freedom Planet
Tower57
Iconoclasts
Eitr
Heart Forth, Alicia
Olympia Rising
Shovel Knight
MegaSpehre
Mercenary Kings
Maldita Castilla
Foxtail
Beard Blade
More Games with Pixel Art can be found here
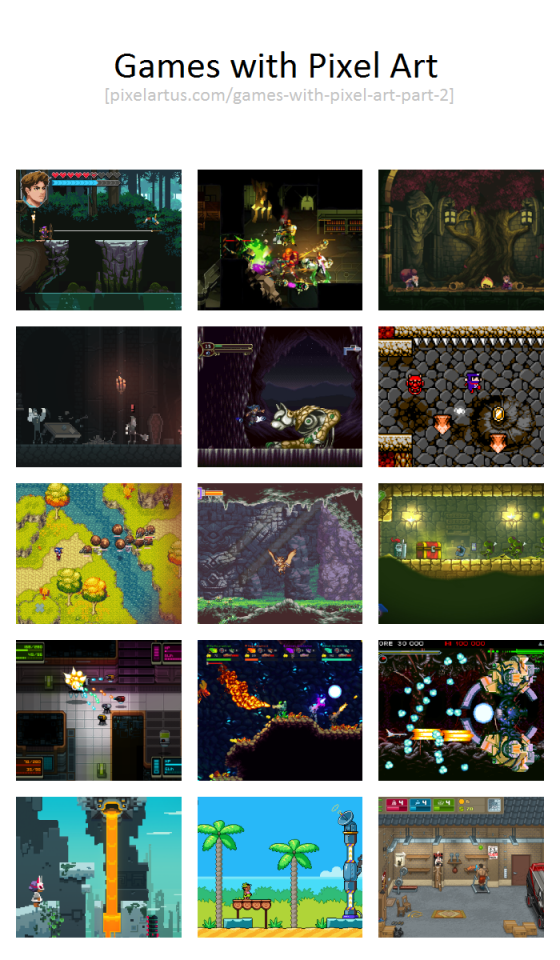
5.) GAMES WITH PIXEL ART (PART 2)
Into The Rift
Witchmarsh
CrossCode
NeuroVoider
Cerulean Moon
Dungeon of the Endless
Timespinner
Owlboy
Hive Jump
Leilani’s Island
Chasm
Ninja Senki
CoinOp Story
Starr Mazer
VHS Story
More Games with Pixel Art can be found here
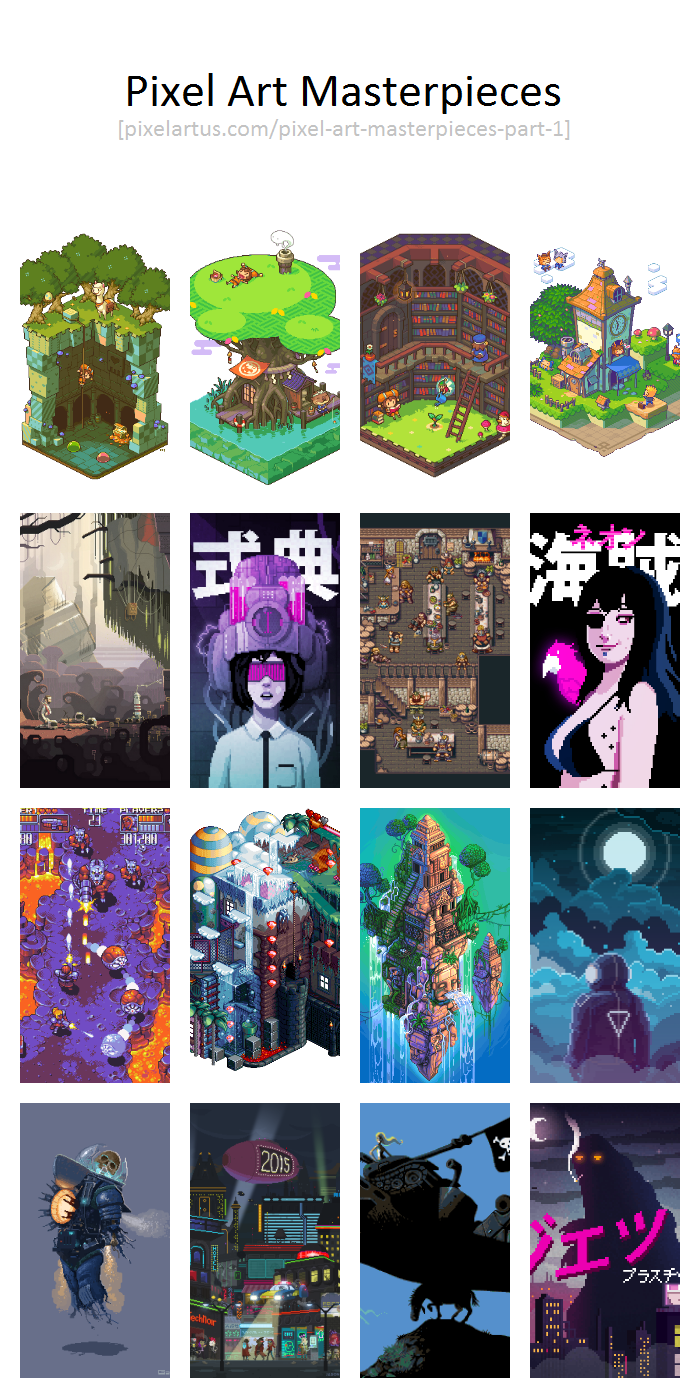
6.) PIXEL ART MASTERPIECES (PART 1)
Pixel Art Diorama - Treasure (by cocefi)
Pixels, Huh - Scene #14 ‘Ben’ (by Octavi Navarro)
Level 4 - Hell! (by vierbit)
Autonomous Space Suit (by Oncle Gab)
Pixel Art Diorama - Fishing Spot (by cocefi)
Neo(n) Pixel Art I - Ceremony (by valenberg)
Platformer House (by bugpixel)
Cyberpunk Pixel Art (by Jason Tammemagi)
Pixel Art Diorama - Bookkeeper’s Garden (by cocefi)
Vikings Tavern (by albertov)
Panduranga Temple (by Socnau)
A Donkey’s Life (by iLKke)
Pixel Art Diorama - (Re)Drawn to Life (by cocefi)
Neo(n) Pixel Art II - Neon Bounty Hunters (by valenberg)
zero (by valenberg)
Neo(n) Pixel Art II - Jet Plastic (by valenberg)
More Pixel Art Masterpieces can be found here
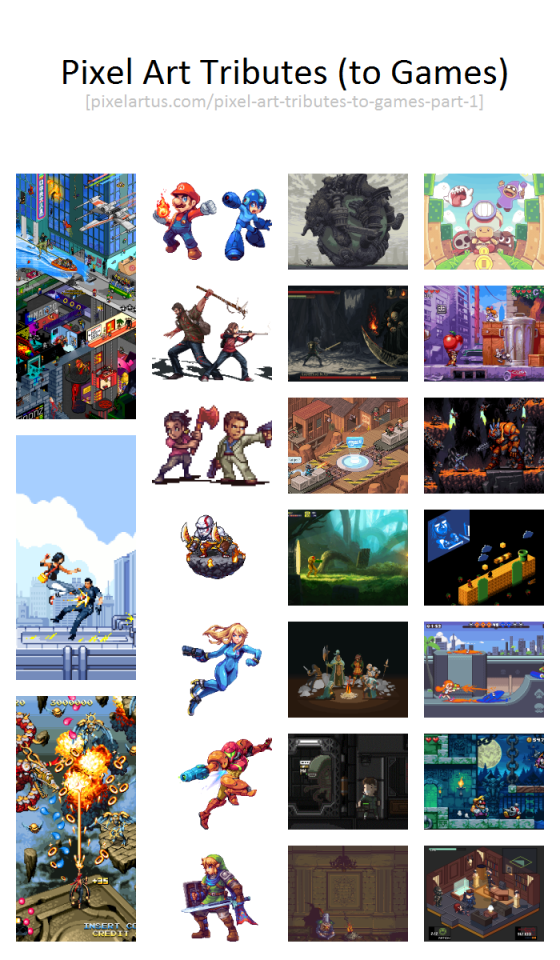
7.) PIXEL ART TRIBUTES TO GAMES (PART 1)
Tribute (by retronator)
Mirror’s Edge (by junkboy)
Bayonetta (by junkboy)
Smash Bros. - Mario and Mega Man (by AbyssWolf)
The Last of Us (by pwang)
Left 4 Dead 2 (by AbyssWolf)
God of War (by pwang)
Smash Bros. - Samus in Zero Suit (by AbyssWolf)
Smash Bros. - Samus in Power Suit (by AbyssWolf)
Hyrule Warriors - Link (by AbyssWolf)
Colossal Katamari (by snakepixel)
Dark Souls - Beat Them All Demake (by Mr_HK_)
Isometric TF2: Badlands (by gas13)
Metroid - Mockup (by Robin Wouters)
Dark Souls II - Bonfire (by Bandygrass)
Alien Isolation (by jonroru)
Dark Souls (by zedotagger)
Captain Toad (by Paul Robertson)
Chip and Dale 3 - Mockup (by snakepixel)
Turrican II (by junkboy)
Super ISO Bros: The Other Side (by Emperor_Pixel)
Splatoon (by Davitsu)
A New Wario Land - Mockup (by snakepixel)
Metal Gear Solid - Psycho Mantis Battle (by tenpoundpixel)
More Pixel Art Tributes to Games can be found here
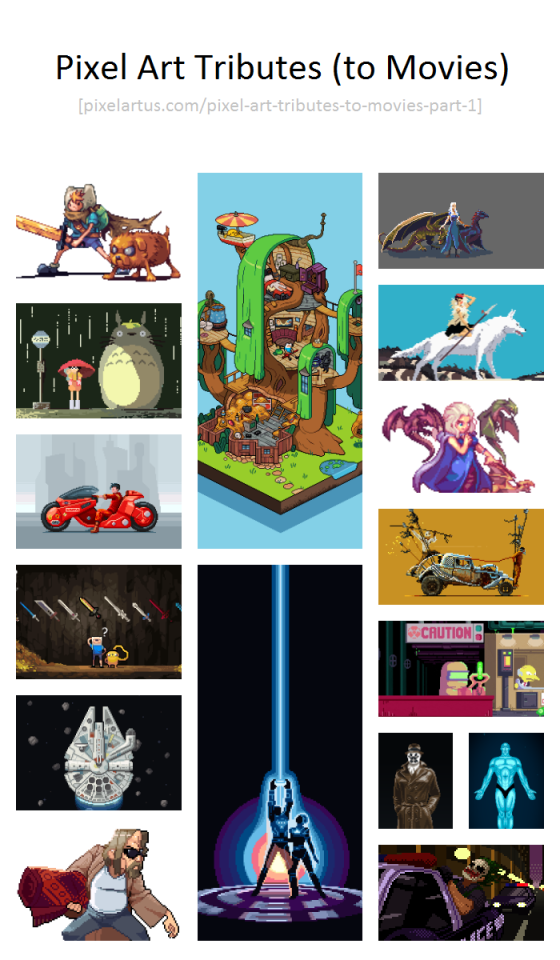
8.) PIXEL ART TRIBUTES TO MOVIES (PART 1)
Adventure Time - Finn and Jake (by AbyssWolf)
8-Bit Ghibli: My Neighbor Totoro (by Richard J. Evans)
Akira (by mazeon)
Adventure Time - Swords (by Luciana Nascimento)
Star Wars - Millenium Falcon in Asteroid Field (by mazeon)
The Pix Lebowski (by Spiddrelli)
Adventure Time - Treehouse (by Gengar)
Tron (by mazeon)
Game of Thrones (by Czarek Luczynski)
8-Bit Ghibli: Princess Mononoke (by Richard J. Evans)
Game of Thrones (by Orkimides)
Mad Max: Fury Road (by Mazok Pixels and Misha Petrick)
Simpsons Pixels (by Paul Robertson and Ivan Dixon)
Watchmen: Rorschach (by mazeon)
Watchmen: Dr. Manhattan (by mazeon)
The Dark Knight: Joker’s Car Chase (by Bruno Moraes)
More Pixel Art Tributes to Movies can be found here
@icequeenabby and @pageofheartdj sorry this got long and I had to make a whole new post >.<
ok so! first of all here's the site I mentioned (highly suggested, you won't regret the hard work).
then for a small tutorial (I hope I make sense)
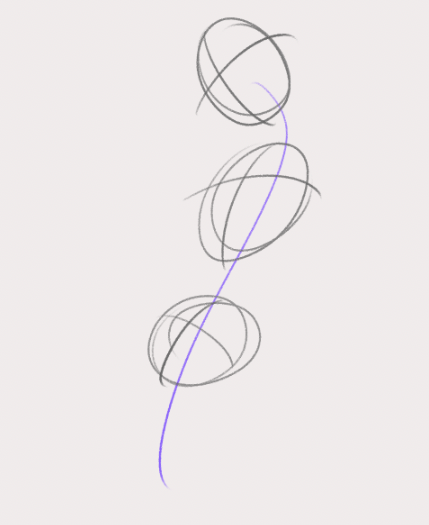
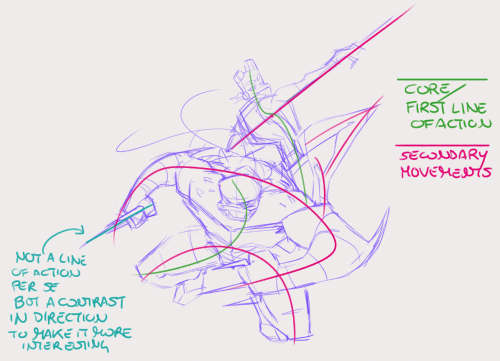
The line of action is not the curve of the spine, but the path of the movement of the body. More like a guide of the force and movement of an action. You can use more than one on a single pose of a figure, eg for the torso and for the arms or one for an arm and one for the rest of the body.
First thing you wanna do is find the movement in the pose you wanna create. every pose has movement, even "static" ones like sitting, sleeping etc and even if you're only drawing a bust.
(for this,as with all drawing, the best advice is to observe real life, even before starting practicing drawing poses)
so, step 1: draw a line

the human body mostly moves through S an C shapes, an S shape is good to start with because we are usually starting with a core movement, so the torso is the main character here.
I said that the line of action is not necessary the spine, but it can happen to be similar or close to it as it is our core. just do not let that constrain you.
step 2: head, rib cage and pelvis
using the first line we're placing these three along it and marking what direction they're facing with those cross lines.
you can already see the movement.
step 3: secondary lines of action

be loose and go with the flow! Remember: ACTION FIRST, STRUCTURE SECOND! that means that the anatomy comes after the movement you are trying to depict. build the structure on top of the action.
(of course that does not mean anatomy is less important, they work in tandem, and a better learning of anatomy gives you also a better grasp on portraying movement)
step 4: legs, aka more Lines of action


the line of action is not necessarily a curve, it can also be a straight, and creating a visual contrast using both types makes the pose more interesting.
Of course there isn't a single way to do the same thing
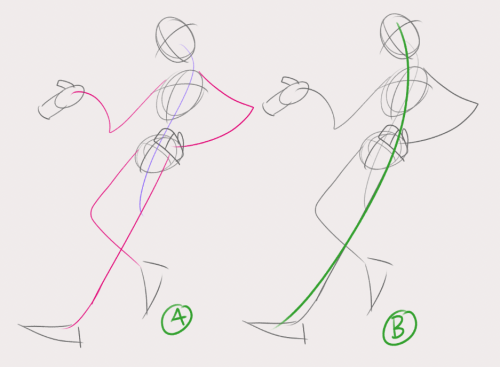
a single line of action (B) would have also worked to start with!
Here's 2 examples of more dynamic poses I drew:

with more dynamic and extreme poses the main line of action is more often a C shape as the body compresses. (objects can have lines of action too! notice donnie's bo and mikey's nunchaku)
As I said, learning anatomy goes hand in hand with practicing poses and lines of action, as you will notice how the single parts of the body move and the way they all have their own intrinsic movement.
To start is useful to take some pictures of people/animals and just draw the lines of action on top. Start with just one line of action and after you've practiced a bit, move on to photos of more complex poses and find the secondary lines.
☆ I hope this can be useful! ☆
☆ ko-fi ☆ | ☆ patreon ☆ | ☆ instagram ☆