Ficbinding - Tumblr Posts


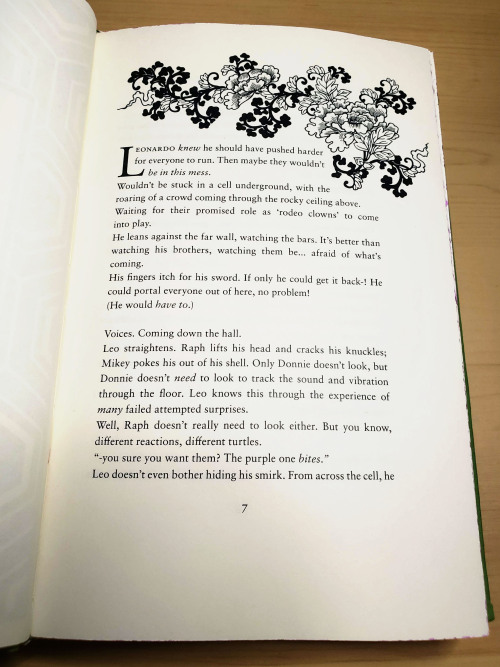
Tied Together Through Thorns and Ribbons by @beastenraged
Thank you so much beastenraged for giving permission for a fanbinding! If anyone wants a fun BaronJitsu fanfic to read, pleeeeeease check this one out! I had a great time reading it while slacking at work lol.
Learned a lot doing this bind. For one, iron-on foil is the devil's material even though I do like how it looks. Probably going to just use it for short titles or something from now on though. Also learned how to sew my own headbands. It's actually not that hard to do, just time consuming. Also tried doing an oxford hollow for the first time, and it's... eh. I haven't really noticed it helping any but it hasn't negatively affected the book opening so *shrug*.
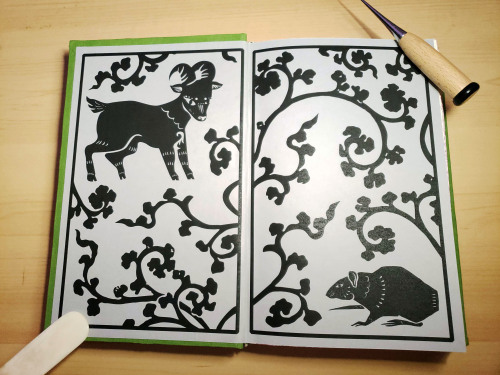
The goat and rat imagery were sourced from rawpixel while the flowers in the chapter header and the vines on the endpaper and cover were ripped from japanese patterns books on archive.org
As you've asked for asks!:
Do you have any quick-and-dirty book/fic binding methods a terrified-of-failure novice could use to bang something out to get over the first collywobbling step of Actually Doing The Thing? (this may be something I've been meaning to ask for ages)
yes! I absolutely do! in my opinion the best quick-and-dirty bookbinding method is a no-glue pamphlet: you don't have to mess with glue or measuring or cutting anything, all you need is your text, some paper, a needle and thread. you can use the same needle to punch holes if you don't have an awl.
this is going to be a little long but that's because I'm going to write out some fairly detailed instructions for an A5 sized pamphlet. If you don't want detailed instructions and think you can glean the necessary info from photos, just skip to the photos! I've also linked tutorials.
for preparing the text to printing, in whatever software you use (word, libreoffice, gdocs, whatever) make sure your document is set to page size A5. make it look readable. then save as/export that document as a straight-paged PDF. now go to the bookbinder JS tool (https://momijizukamori.github.io/bookbinder-js/), and upload the PDF. source manipulation: none printer paper size: A4 display unit (you can ignore, or choose cm if it gives you anxiety that it automatically displays points) printer type: select single-sided or duplex accordingly* rotate paper: ignore flip on long side: check if you are printing duplex and if your duplex printer flips the paper on the long side page layout: tick folio page scaling: original page positioning: centered ignore the rest flyfleaf: ignore signature format tick: standard signatures. in the length drop down, this depends on the type of pamphlet you are doing. for folio i generally find 4-5 pages per signature a comfortable thickness. if you have 6 whole A4 pages you can still do that as a single signature or you can split it into two signatures 3 pages each. wacky small layouts: ignore this signature info click the generate preview button to see what your PDF looks like imposed! I love this step especially when I'm doing quarto (A6) or octavo (A7) sized books generate output - click this to generate an imposed PDF
for A6 and A7 sized books the instructions are much the same, except for these you make sure the page size is A6 or A7 in your software, and then you choose quarto or octavo instead of folio. for signature length drop down I keep signature length to 1 for octavos typically and 2 for quartos, as this still refers to sheets of paper, and for octavo 1 sheet of A4 paper will turn into 4 smaller sheets in one signature once folded and cut.
*if you don't have a duplex printer you will have to manually turn the paper to print on the other side. I cannot be arsed with this so I bought a printer capable of duplex printing (I didn't have a printer anyway). if you already have a printer check what it can do as you might be surprised and go from there.
now to the pamphlets! you don't need a cover - I have one for the long stitch pamphlet but for the saddle stitch one I didn't bother and just made sure the first page had a title on it. you can always take a different piece of paper and print a cover on or or just use coloured cardstock and create a simple cover, but a cover is not necessary unless you're doing a long stitch pamphlet. all you need to do is to punch holes and start sewing. there are a few different stitch types below, I wouldn't say any of them are more difficult or easier than others, but they do look different so...pick one you like the look of and go from there?

pamphlet stitch (uneven number of holes) I haven't ever done a pamphlet stitch but here's a tutorial for how to do it: https://www.starpointestudio.com/simple-pamphlet-stitch-book-step-by-step/
saddle stitch (uneven number of holes) I realised that what I was thinking of as a pamphlet stitch is actually saddle stitch, as in this A7 pamphlet:

here's a tutorial for how to sew saddle stitch: https://www.bookbindingworkshopsg.com/saddle-stitch-bookbinding-tutorial/ here's a video tutorial: https://www.youtube.com/watch?v=aWHkY5jOoqM (sealemon has a lot of bookbinding tutorials and I know many people who like her videos, I used her tutorial for coptic binding way back when I first made a book but I can't otherwise vouch for the quality as I haven't used her videos)
french link stitch (even number of holes) in this one I used french link stitch which I typically use for thicker textblocks that i'm not planning to use tapes with as the french link gives it some robustness, I used it here because I had never done it before and wanted to try it out. I am planning to take these stitches out and re-sew this pamphlet with a cover now that I've found a suitable piece of transformer fanart to use as a cover:

french link tutorial. it's quite long but it has a colour coded bit towards the end that shows how the thread is supposed to link which i find very helpful to visualise: https://www.handmadebooksandjournals.com/bindings/french-link-stitch-binding/
here's a video tutoral from DAS bookbinding (he is my go to for techniques and he has the most soothing Australian accent as well, though fair warning not all of his videos are for beginners): https://www.youtube.com/watch?v=O4ZPdbaM-Ws
long stitch (even number of holes) for this one I used long stitch and I had a cover. this one is my favourite variation because I can make these pretty and simple covers and the stitch looks nice on the outside as well, so this one scratches the 'i want to make a book' itch for me.


here's a tutorial that also includes a how to on a cover that is different from my cover: https://lccprintmaking.myblog.arts.ac.uk/files/2020/06/Long-Stitch-Tutorial-A4.pdf DAS also has a video tutorial for long stitch but it's like three videos long, maybe watch it later :'D here's one I haven't watched but seems decent: https://www.youtube.com/watch?v=XnignTL_wDQ
you can use saddle stitch for this kind of pamphlet as well, that's what I did for dozens of ships and hundreds of souls (https://ashmouthbooks.tumblr.com/post/681587080267202560).
I hope this helped!!
Guess who just completed their first Linked Universe Bookbinding project! 💙


Made myself an anthology of all my favourite Wild-centric fics that were just too short to be a book on their own.
I wanted to model the cover off the Champion's Tunic so I ended up finding this gorgeous bright blue bookcloth and decorated it with white HTV, then found some blue and white headbands to match (not quite ready to try making my own just yet).
I hope people like this because I've got a big Linked Universe Bookbinding project I plan to announce soon, so stay tuned for that!
(Also please don't ask what fics I included, I feel guilty because I wasn't able to make authors copies and I don't want anyone to feel disappointed)
GIA THAT BOOK IS SO PRETTY AND I HAVE SEVERAL QUESTIONS
Did you print it yourself? The paper quality is so pretty!!
Had you ever done something like this before? How long were you working on this?
Did you draw or write anything yourself for this? Or include any art?
How did you choose the order of the pieces? Did you organize them in any way? That looks like a lot of fics! Probably!
THAT IS VERY PRETTY AND COOL AND IMPRESSIVE AND HAS SO MUCH LOVE POURED INTO IT
SORRY FOR ALL THE SCREAMING IT SEEMS APPROPRIATE
Hello friend! I don't mind the screaming at all, it shows your enthusiasm which I absolutely love!
Did I print it myself?:
Yes I did! I took the text from AO3 and then typeset it into a more suitable book format in Word. It's printed on 90gsm archival short grain paper so it feels like the paper you'd find in a limited edition/deluxe version of a book. Very nice and smooth!
Have I done something like this before/How long did it take?:
I've made a few books before but all of them have either been practice books or gifts for others. This is the first one I've made for myself! This particular book took several evenings to typeset, but once that was done, printing, sewing, gluing making the cover, applying the cover design etc took about a day and a half? Which isn't too bad but I was doing it in 43°C/110°F weather so it was a little taxing...
Did I draw or write anything for myself:
No, not this time! This was all just a collection of my favourite fics that others have written. Though keep an eye on some of the future projects I have planned! 😉
How did I organise the fics?:
There are 11 fics in total in this book, ranging anywhere from just over 1k words to about 30k. I put 7 shorter one shot fics at the front of the book, and then the 4 longer, multi-chapter fics towards the back, but other than that there wasn't much rhyme or reason to the order.
I'm really glad you like it! I've got some more projects that I will reveal soon, so keep an eye out for those too! 💙
What method do you use for sewing the pages together? Also what's your process for making the covers (fucking gorgeous btw holy shit I'm in awe)?
Hello friend!
Depending on the size of the book, I'll use a simple kettle stitch for thinner books, and a French link stitch alongside linen tape for extra support when binding heavier books. Hot tip, used waxed thread to prevent tangles and to help prevent tears in your paper!
For the cover, I'm assuming you mean the design, which is Heat Transfer Vinyl that is cut with a Cricut and ironed on. For this particular project, I was using Siser Easyweed in white. My biggest tip for making the cover I can give is to apply the designs BEFORE you glue the text block in, because if you make a mistake, worst case scenario is you just gotta redo the cover. If it's glued in however, it is much, much harder to fix, and worst case scenario is you have to start the entire project from scratch.
I hope that helps! I'm always happy to answer questions if you have any more!

As promised! I wrote about the illegal fanbinding that's led to writers deleting their works recently, how that connects to the current pull-to-publish wave, and what happens when the rapidly expanding sphere of fic readers starts to get disconnected from *fandom*:
The ever-increasing reach of fanfiction has inched the practice away from text-written-in-community to a more traditional author-reader relationship—and the context collapse that’s come with viral works being treated like any other romance novel has spurred clashes between different types of readers with different sets of expectations. In the past few years, fic authors across all corners of fandom have increasingly complained about shifting attitudes from readers who treat them like any other content creator, demanding the next chapter as you might demand your favorite influencer’s next video. But unlike on creative platforms like TikTok and YouTube, the fic writer doesn’t get revenue from their new installment.
We'll also talk about this in some capacity on the next episode of @fansplaining! (In contrast with today's episode, on the non-monetized, gift-economy practices of many fanbinders, whose hobby is also imperiled by the people selling and buying fic.)
Back in October last year, I started reading This is an Adjuration by @not-freyja.
By the time I had made it to chapter 5, I had already started typesetting this story as I read because I knew this would be one of those stories that I needed to have on my shelf.
When I finally caught up to the story at chapter 31, I begged the author to let me bind this when it was finished.
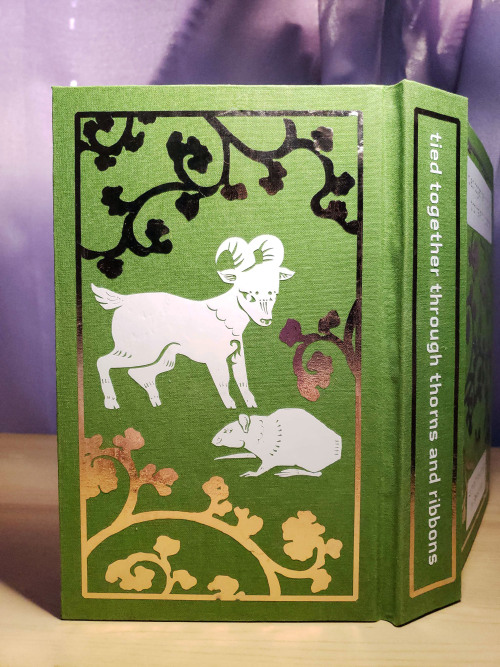
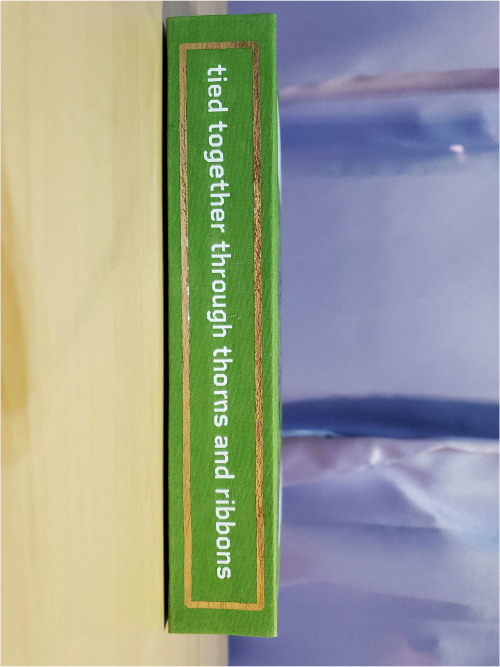
Nearly a year later, and what is probably the most important bind of my life is finally finished. Check out these glamour shots, and if you want to hear more about the actual binding process and about how this fic actually changed my life, see below.


So funny story, before I get into the technical side of this bind, but this fic actually changed my life. Not as in I was greatly emotionally moved by the story, though don't get me wrong I absolutely was, but genuinely this fic introduced me to some of the best people I have ever had to privilege of knowing (Hello Class, you know who you are 🩷), and also, it introduced me to Freyja, the incredibly talented author, who, as I type this, is curled up in bed next to me fast asleep after flying half way around the world to go on a two week long date with me.
Moral of the story folks is comment on the fics you like. You might accidentally meet the love of your life on, and I can't believe I'm saying this, AO3.
Anyways, about the bind!
This bind was a challenge from day 1. I had to do the typeset for this 300k word fic 4 times, and had to split it across 2 volumes. This was the longest fic I have ever attempted to bind, and it was so thick I couldn't get it in the paper trimmer.
To make this book as durable as possible, I attempted a few techniques. I secured it with 3 tapes, I made an Oxford hollow, I rounded the spine, I made a slipcase and I used 2.3mm boards where normally I use 1.8mm.
The slipcase is covered with embossed faux leather, buckram and plain ribbon, and lined with gold satin fabric. I've never made a slipcase before so this was an experience.
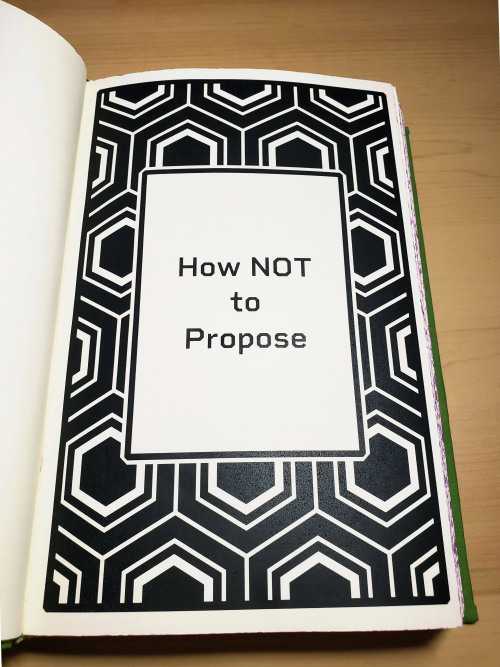
The books are covered with an emerald green silk finish bookcloth which really gave the books the luxury they deserved. I foiled custom end papers as well as every chapter title page using heat reactive transfer foil on toner ink (never again I am never doing that again omg it took days). Huge thank you to @la-sera for letting me use her artwork which helped inspire this fic!
The grey flashback chapters I had to use HTV for the border decoration and I'm very happy with how that turned out because it was so easy and straight forward, unfortunately it just wasn't viable for the whole book.
It feels weird to finally have these books done. They have my blood, sweat, tears and my heart poured into them, and I've been working on them for so long that it's odd to actually have them finished. I'm so proud of this bind, and feel like I've grown so much as a fanbinder by making these.
Anyways, if anyone has any questions about the process, please don't hesitate to ask!
(and if you are an Linked Universe fan and haven't read Adjuration yet, this is your sign!)
Tiny Book? Tiny Book. Pt1.
Idk yall I just felt like writing a little how-to of how-I-do my tiny A9 books! So if you've ever been interested, I hope this will be helpful. This will be neither a beginner typesetting nor beginner bookbinding tutorial; as I go through my process I will only be showing my process and providing a few tips, assuming you already have the basics understood. We can worry about the rougher technical skills in another post.
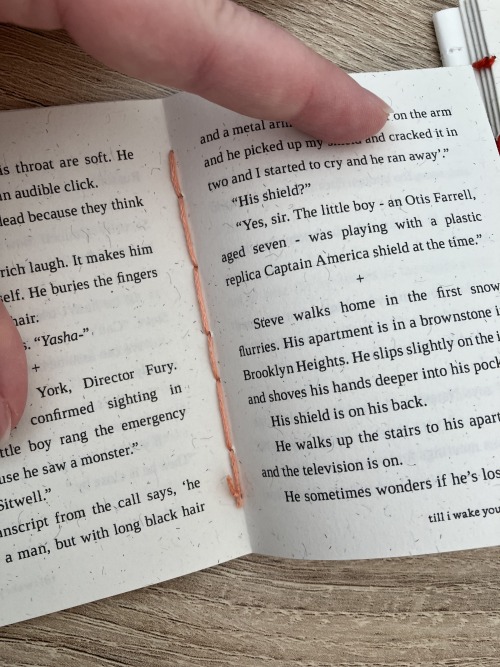
Also keep in mind that this guide includes images of fic I've bound, and you're zooming into these fics at your own discretion. I am not responsible if you read something yucky. I know you have a lot of options out there but thank you for flying No-Name Publishing.
Tiny books part 2; Tiny books part 3


Just like with regular ficbinding, there are layers, and they are:
1 - Typesetting and Imposing 2 - Printing 3 - Cutting, Folding, and Sewing 4 - Gluing, Rounding/Backing, Endbands 5 - Building the Case and casing in 6 - BOOK
In this part we will be focusing on steps 1 and 2. Please feel free to skip to the area you're interested in most.
1 - Typesetting and Imposing
Okay, so this area has some nuances that you don't have to consider so closely with typesetting for more traditionally sized books. To me, these tiny books are not about readability, they are about novelty. As such, I do not prioritize readability. Instead, I try to achieve something that is closer to scale. That said, neither do I want these illegible. But we'll begin from the top.
You want to make a tiny book, but you're wondering, what would be an appropriate word count for a tiny book? Tiny books are the perfect medium for the ficlettes, the shorties, the one-shots. They are also perfect for the mid-sized, 10-15-20k fics, in my opinion. Here we can see,

On the left we have a fic that is exactly 12,771 words, typeset on a 1.5" x 2" (37 × 52 mm) document, with .3" margins, 6pt Garamond font, and 5pt line spacing. This book is only approaching 1/2" (13mm) wide, and only took 5 sheets of Letter paper to print. On the right we have a fic that is exactly 1,939 words, typeset to the same specifications. This book is only 4-5mm wide, and took only 1 sheet of Letter paper.
In my opinion this format of book begins getting unruly around the 300-page mark. However, making any combination of margins, fonts size, and line spacing will yield different page results for different word counts. For example:


Like the above, in each of these examples I typeset in Garamond font @ 6pt size and 5pt line spacing. Typesetting on an A9 page, this is about as small as I felt comfortable sizing my font while still being legible. But notice the rivers between the words--the rivers of white space bisecting the lines, due to the Justified alignment battling the admittedly tiny work surface. At this scale, with the font at this size and alignment, those will be unavoidable. Over time I began disliking this in my own work, so I pursued a different method, which was typesetting on a quarter letter page (4.25" x 5.5" / 108mm x 140mm), and allowing my imposer to scale the PDF down.


Have you ever seen anything sexier. THIS looks like a tiny book. Little to no rivers, still legible (hand-wobble), and preserves the novelty feel that I desire from a tiny book. This method of scaling down (specifically from quarter letter to A9) does change the final shape of the book, from A9 to A9-ish in this case. Specifically, from 1.5"X2" (37 × 52 mm) to 1.625"X2" (41.3mmX52mm). You're achieving something closer to a square shape, which is delightful to hold. All this to say, you have some freedom with word count, with font size, with page size. I've done as many pages as 376 and as few as 17. The fantastic thing about tiny books--their structure will not be load-bearing, meaning--the only thing stopping you are your tastes.
Quickly, some more examples of features in a regularly sized typeset and their tiny counterpart after the imposer has scaled them down. First, scaling half-letter down to A9, a little-over 4X shrinkage:


And from B6 to B9, smaller by 3x:


You notice the compression of every element, and too how entirely unparcable the text in the first example is, sometimes not horrible, sometimes very. Make your decisions dependent on your tastes!
You have decided on the fic you'd like to bind into a tiny book. I will be using my own fic as the typesetting example, and I will be using Word 365 for PC. I'm sure many of my pointers during this process might not apply 1-to-1 if you are using a different word processing software, but hopefully you can adapt the concepts to your program of your choosing.
Kay, next you will do your typesetting. Since this is not a typesetting guide I'm trusting that you have your preferred methods, but I will go through my key steps for setting up a tiny typeset:
First, for every typeset I delete each default Style, create mine own, and dictate the document size. For this example I will be doing my preferred quarter letter method, setting the custom page size to 4.25" wide and 5.5" tall, and .5" page margins all around (except Gutter; leave 0"). On the Multiple pages dropdown I will select Mirror margins (however, as all my margins are the same size, this is redundant, though may not be the case for you). My body text style will be Cardo font @ 11pt size and Exactly 15pt line spacing, with a .2" first line indent and Justified alignment.


You can use whatever body font you like, I only encourage you to do many many test prints to refine your preferences. Your favorite font for half-letter books might not translate to tiny books. After ~30 tiny books I've found I like Cardo at this size and spacing. And if you're using A-paper sizes, consider doing quarter A4 instead of quarter letter, which is technically A6--4.1"X5.8", or 105mmX148mm. Follow your heart~~nyah 🐱♥
Now I will go to my fic and download the HTML file. I hugely prefer copying from the HTML file rather than the browser itself. It kind of standardizes any goofy formatting that might try to make its way over otherwise, while still preserving the italics and bolds, etc, and makes for an easier editing process. It was important I made my body Style in Word first, so that once I paste the text into my document that Style is automatically applied in one fell swoop (if not, you can change that in your Word settings. Advanced -> Cut, copy and paste -> Merge Formatting. It is a huge time saver.)
Now you've gone through your typesetting process, you have a liddle quarter letter Word document that you're happy with. Gets real close to you. Listen to me--listen, you're going to Export as PDF. Not Save As PDF. Not Print to PDF. Export. It's in--listen--it's in File, then Export, then Create PDF/XPS. You need to Export. Especially if you selected Bookfold instead of Mirror margins in your page settings because we need an unimposed PDF in order for this to work right and exporting to PDF is going to solve 99% of your pdf formatting woes with Word. Okay, I love you 👨❤️💋👨
Now, your EXPORTED pdf should look something like mine. Straight, unimposed.

Now what we're going to do is take this PDF back to my penthouse and freak it. Go to this link for the Renegade Bindery-created and -curated imposition tool. This has been will be is such an incredible FREE asset to you, maintained by a crew of intelligent, skilled Renegade Bindery members who understand the importance of community and accessibility. If you find someone hiding this link behind a paywall of any kind it is not with the creators' permission, so shame on them.
Anyway I will be assuming that you know what imposing your document means. If you've never used this site before, it's very straight forward, and here are my settings for making Tiny Books.


1 - Upload your unimposed exported pdf. 2 - ignore 3 - Select the paper size you will be printing on. This is not the FINAL size of the book, this is what paper you are printing on. These instructions are for Letter sized paper. Don't change any of the other settings right now, I will explain more about the Single-sided vs Duplex option in a bit. 4 - Skip aaalllll the way down to Signature Format. Under Wacky Small Layouts, click on the bubble next to Little. You'll notice there are a lot of options here. I encourage you to play with these settings later on as well, there are so many things you can make with this tool.
Once that's done, scroll down to the very bottom. You'll see the Signature Info area, telling you the results of your imposition. In the case of using the Little option we've selected, 1 sheet of our paper will make 40 book pages. 3-signature-sets of 3/3/4 folio configuration. That's a lot of pages per page.

Anyway for our document today it will cost us 2 sheets of Letter paper, and will make 6 signatures. Math says that's 80 pages. Now, you may be concerned because your typeset PDF is not formatted in a number equally divisible by 40. And why would it be. The imposer is doing that math for you in the background, organizing your pages regardless. In my case, my finished typeset is 62 pages, which means that from my second page, I will only be using my 3 folio segments, and discarding the 4 folio segment. This will make more sense later. Click the Generate button, and save the zipped folder wherever you want. Don't change the name of it.
Unzip that baby, and inside you'll notice 2 files--(filename).pdf_little_packed_backs, and .pdf_little_packed_fronts. Appropriately named as one file contains one side of the sheet that will be printed, and the other file the other side.

And when you open them up, they will look like:

2 - Printing
We are manually duplexing this bad boy, because working at this scale amplifies and compounds every millimeter of difference. Manual duplexing will keep printer skew to a minimum, as the printer will not have to perform gymnastics in order to print on the reverse side of your page. Here are some examples:


Two auto-duplexing examples of skew, one horizontal and one vertical, dependent on which direction my paper was loaded into the feeder. There is significant skew. Not a horrible issue on full-sized books but these will matter much more on our tiny books, the key issue being that we do not have much to work with in the margins department. Trimming 5-6-7mm of margins of your half-letter sized textblocks might not be much of an issue; however, here, in order to remove all the trim lines during the cutting process, you will be significantly impacting the margins of your tiny textblock.
Now here is an example of the skew from manual duplexing:

MUCH subtler. Your skew with manual duplexing will range from this--less than .5mm--to no skew at all, and you will have to cut off far less of each page to remove the trim lines, maintaining the consistency of appearance of your tiny, beautiful pages. This is why during step 3 of the imposing process we selected Single-sided (which is MANUAL duplexing), and not Duplex (which is AUTO duplexing) appropriately. This will result in you either getting two files for manual duplexing, or one auto duplexing file.
Your next consideration when it comes to printing your liddle book will be whether you want to use an inkjet printer or a laser printer. I've until recently only had a laser printer available to me. I can say after about 6 or 7 little books on an inkjet printer that I prefer the laser printing on tiny books. Here is an example of why:


On the left you have a tiny book printed from an inkjet printer printed on the highest quality setting, and on the right is a tiny book printed from a laser printer. These were both printed at the same scaling, same font size, same line spacing, everything. The inkjet printer, printing at this scale, introduces pretty glaring feathering on the letters, whereas the laser printer is crisp as can be. I've said before that to me tiny books are more for novelty rather than readability, however I do still want to make out the word I'm looking at, you know what I mean? For this reason I prefer printing my tiny books from a laser printer. Use what you got though, you'll get a tiny book regardless. Make sure you're flipping on the short edge with these tiny books too, and double check to make sure your page numbers line up. And when you're done you got...

BOOK(-adjacent).
Continue on to part duex.
holy gods i want a printed fic :[
Todays bind! Fools Gold, by @tigers1o1 !!

Personally, I absolutely adore the paper and bookcloth combination on this bind. I got the cloth a while back for free and I’ve been waiting for a chance to use it, and then my friend Cam got me this paper as a gift! It seemed way too perfect to not use!

This was a very exciting bind, because it gave me the opportunity to try something completely new, gilded edges!!
Although it didn’t turn out perfect, I’m still super proud of how clean it ended up. Plus, I personally think the flaws make it better :D


The typesetting here was very exciting for me. A few months ago Ty held a tattoo contest for the fic, and I couldn’t not use them when I saw the two finalist designs. So I went ahead and contacted the artists, and they both said I could use them!!
Title page design: @eldrigeonsss
Chapter header design: @sheeeeeeeepherd
Thank you both again for letting me use your beautiful work!
You can read the fic here: https://archiveofourown.org/works/42798252/chapters/107512251