Cosplay Prop - Tumblr Posts


I wanted to keep all my power cells interchangeable, so I had to match the magnets to my existing power cells. This was pretty easy - put the magnets on the existing power cell, then mark the top with sharpie


Then it was just a matter of supergluing the magnets in place with the sharpie mark facing up. Finally, I wiped off the sharpie with a kitchen towel and some IPA.

I then used the power cell to position the magnets in the magazine well - I sprayed it with superglue accelerator first, so the magnets glued almost instantly.
All that's left now is the weathering!

Once the painting was finished, everything got a coat of satin varnish to seal it before weathering. OR THAT WAS THE PLAN
Spoiler: It turns out I didn't use enough varnish...

...so when I tried to wipe away the excess oil paint I was using for weathering, I ended up taking the varnish off as well 🙃 In some places, when I used IPA I ended up taking the paint off down to the primer 🤦♂️🙃🤦♂️
By being gentle with the q-tips and kitchen towel (and some careful reapplication of paint where needed), I was able to get it to a presentable, if rather heavily engrimed, state. Before anything else went wrong, I gave the whole thing a much heavier coat of varnish and called it a day


All finished!
If you want to make your own, the .STL files are available for sale HERE


From L to R: Mk1 Power Cell; Mk2 Power Cell; Small Power Cell

The small power cell makes the laspistol easier to holster

Added Mk2 Power Cell and Small Power Cell to the 3D printable Laspistol files on sale HERE

New project time! (starting with a test fit using masking tape)

Because of the arch shaped overhang, the mag well needed sanding and filling to clean up the surface.

Because it's a test print, I didn't add any registration keys so to give time to get the alignment right, the pieces were glued together with epoxy.

Then the two halves got epoxied together

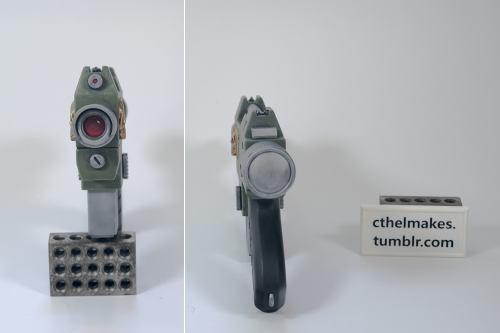
The ammo core is magnetised to let it be removable.

Even with the clamping and careful aligning, the gap between the two subassemblies needed filling

Then the filler got sanded, along with a rough sanding of the rest of the build

First coat of filler primer - time for the sanding to really begin! (yay....)

First sanding pass shows the places where the joints weren't quite filled properly...


...like the trigger guard or mag well. They get another pass of filler and sanding, before the whole thing gets another coat of filler primer.

Things are looking better, but there are still parts with obvious layer lines (the joys of FDM printers)

this time, obvious cracks got filler before sanding


After the filler (and everything else got sanded down, it was time for the last coat of filler primer. Unless...


...well that's a problem 🙃
Time to break out the superglue (I guess I should have added registration keys before doing the test print...)


After carefully glueing the two halves back together with superglue, there was still a crack.

The crack got another pass of filler, and since everything was going to get another coat of filler primer I took the opportunity to do some more filler on the detail at the back.


After filling comes even more sanding 🙃 Then another coat of filler primer (not photographed)

Finally - everything is ready for a coat of regular primer! (two coats of light grey primer with an airbrush)

I know this looks the same, but I promise it's a slightly different shade of grey (Vallejo off-white vs Vallejo grey primer)

The muzzle interior and the bottom of the mag well got painted black with a narrow brush


The gems got a coat of gloss black primer to try and fill any remaining grooves. Then, the recessed details got a coat of Administratum Grey to accentuate them, along with the join between the grip part and the main body.


After drybrushing with white to add edge highlights, everything that wasn't going to be white got a couple of coats of black with a paintbrush.

And that's how I created the Warhammer 40k/Star Wars Sequel trilogy crossover weapon no on asked for! (joking)


The gems got a basecoat of metallic red with a brush, before I remembered that blu tac can be used to mask weird shapes for airbrushing


After removing the masking, the gem mountings were tidied up with a brush before painting them gold (still using a brush)


The big gold areas were painted with an airbrush, then given some drybrush highlighting with the masking still in place.


The trigger and energy connector were painted gold with a brush, and the remaining black details got a drybrush highlight

The ammo core was nice and simple - drybrushed white highlights on the base and the actual core painted black.
And the painting is complete! On to sealing and weathering.


Since this is an Eldar weapon, I didn't want to do too much weathering - just some brown wash to lighten up the grooves on the handgrip and accentuate the detail on the top piece

A final coat of satin varnish, and it's ready for photographing.


All finished! If you want one of your own, the .STL files are available HERE for $5USD

Trying out masking fluid chipping using a resin cast I had lying around


Primed black and then all the metal areas undercoated silver for the chipping.


I know I want yellow and black hazard stripes on the forebody, but I'm not sure about the rest of the gun - hence, photoshop experiments.


Starting with the hazard stripes; also a test to see what the splattered masking fluid looks like once it's removed.


Side vents got and airbrushed blue glow, then I used artist's masking fluid to mask them off before airbrushing the main section metallic black.

Forebody & upper section airbrushed gunmetal

Masking removed!
I'm not sure I can recommend the artist's masking fluid - it's very fiddly to use.

Grips got painted brown with a brush and the screw heads picked out in gunmetal


Final paint details on the power cells, followed by drybrushing to add some contrast.

Coat of rattlecan varnish to seal everything

Oil paint weathering complete - once this dries it's basically done.


thing got camera shy
my sister had made this for me when the show cane out for my 14 th birthday becuse i was hyperfiaxted on the show, my sister is the best:)
DIY LoZ Sheikah Slate
Thought it's about time I shared the birthday gift I made for my bestie @tsukinoshinjiu! It's a custom Sheikah Slate! So I'm gonna share how I made it... (finished images at the bottom!)
First I started by looking at in-game references for it and getting a general feel of what it looks like, what pieces I'd need, and what the general shape would be like. I wanted it to be a special box of sorts, so they could hide little treasures or letters...


After getting the general feel of the colors and shapes I'd need as well as what would be sunken and what would pop out, I looked for some measurements I could base myself off of. Luckily I found a Reddit post of someone who'd already done the hard work for me.

I tweaked the sizes slightly (namely putting them in a measurement system I could actually understand) then opened up SketchUp to model it out and simulate my rough idea.
I really wanted to stay true to the rounded corners, so I went for a layered technique, using 3 mm wooden slates.
So I created a "base" piece, a "body" piece, and a "lid" piece. In the end, it ended up being 5 body pieces, 1 base, and 1 lid. (And no, I didn't have access to 6 mm wood, otherwise, I'd simply done 2 6mm pieces for the body instead) In total, the depth was roughly 2.2 cm


Once that was ready, I laid out a simple graphic for my cutter. In it you can see the measurements:
Height: 25,33 cm (~10 in.)
Width: 15,33 cm (6 in.)
Depth: 2.2 cm (0.8 in.)

(yes I named it 6mm, I mistyped dw about it) Once that was done, I looked at the front again and opened up Illustrator to make the vector path for the cutter. I had barely used Illustrator before so I had to learn while I was doing it *sweats* but I got it done, and here's what it looks like. I saved it as .eps (vector) so the cutter could read it.

Once that was done, all that was left was to wait for the cutter to be done with my pieces....

Then I immediately started painting and organizing! Decided to start with something small, so I chose the little triangles, I took them apart and painted each piece individually, then with some scotch tape I held them together and put them aside. Next I painted the main piece as well as the lid, body, and base. I glued the layers first then painted them, same with the rest. The handle was especially fun to do and I think it turned out especially pretty. Always working my way up to the smaller colors. Once all those pieces were painted I glued them in place.


The little lines really tested my pulse *sweats again* I don't think they're perfect, but I tried my best (the circle around the eye is especially scuffed)
Not pictured (because I forgor) I made little stops on the bottom of the lid so it could stay in place and be used as a box. I used some thick 2mm hard grey board to make 4 little rounded stops and glued them to the bottom of the lid. When I was done, I sprayed the entire thing in a shiny finisher!


The inside had a special engraving since I'd originally wanted to throw in the Korok Bookmark I'd made for them in there as a surprise, but since this gift had lagged behind for a while, the bookmark was sent ahead of time along with the other goodies I'd prepared for their bday.
Once it was all ready I threw in some other goodies inside and packaged it for the mail! They got it last week and the reaction was...

In the end, the slate arrived a little later than I had wanted, but it got there in one place and the unboxing video I got from them was priceless hehehe.
So yea, that was my adventure making a custom Sheikah Slate as a bday gift! If I eventually remake it, I'll try to make it look even closer to the original.
And if anyone would like to try their hand at making it, go ahead! If there's interest for the files I'll find a way to make them available as well.

Bye bye!
Day one of turning this

Into Mehrak (Kaveh’s toolbox) from Genshin Impact!

Started on figuring out how to evenly scale down Mehrak’s design to my own briefcase today (I’m maybe about a third of the way done with the math?). After I finish getting all the dimensions of the details to scale, I’ll draw them in Procreate and then I’m going to attempt to laser cut the shapes with the Glowforge machine at my workplace! I’ve never tried laser cutting smth so detailed or files from Procreate before so I’m excited to see how this project turns out :D
Math from today :P

My next step is going to be finishing the math (mostly figuring out the scale of the curved parts of the design lol) and then I’ll begin drawing out the details! Hoping to try laser cutting sometime next week!