Design Process - Tumblr Posts
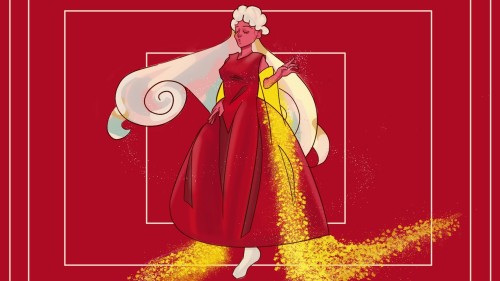
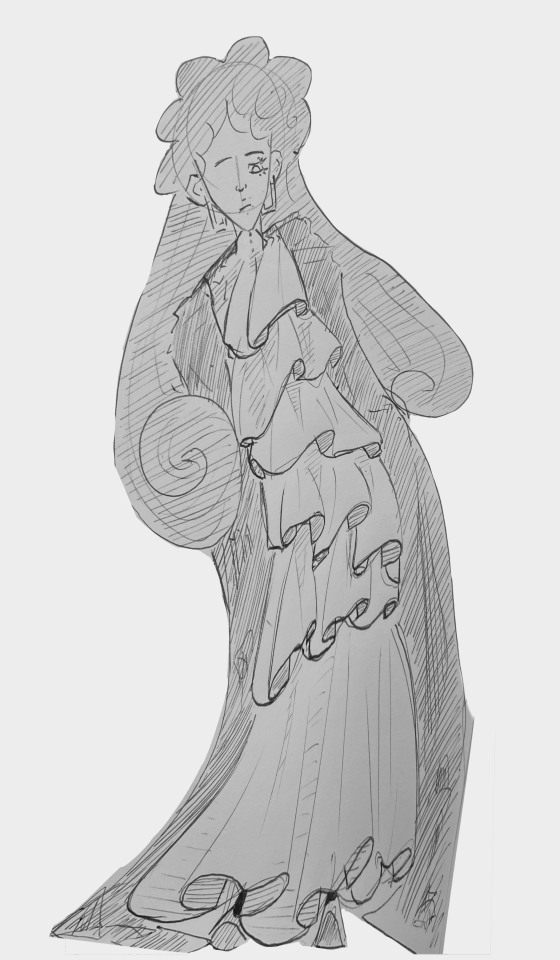
Redrawing an old character design!! I drew the red dress a few months ago, but one of the earlier thumbnails for that character had a dress with a ton of ruffles!! I still prefer the red dress more, but I wanted to try the ruffle dress again now that I had more practice and I liked how it turned out <3
Chandelier Saga Part 1: Conception
A bit over two months ago, I was contacted by someone with whom I used to work, who now works with The Possible Project, a non-profit youth entrepreneurship outreach program thing. They were having a huge fundraiser gala at the beginning of October, and wanted to commission a big hanging chandelier as a focal point for the banquet. They're getting ready to build themselves a maker space, complete with a laser cutter and other tools, so they wanted the piece to show off rapid fabrication in some way, probably by having the piece made largely of laser-cut wood.
I was given pretty free range, with the understanding that I would come in every week or two and show the kids in the program what I was doing, giving them a view at how one might go about making a big project, and getting input from them about the design. The goal was to be able to have them also help with assembly, if possible.
Since I don't especially want to take up too much vertical space on people's feeds, jump the break for the early stages of my design process:
The first thing I did was to stay up for a while one night when I was already kind of punchy and just spew ideas down onto a page. Most of them were laser-cut wood ideas, though a few of them I was less sure about how to actually make them.

Having done that, I crawled the internet for precedents, and gave my first talk to the kids about what sort of things are possible with the medium. When doing something new, I always think it's a good idea to look around and see what sorts of solutions other people have come up with. It's a way of getting some inspiration going, finding ideas that you can riff on, and also get a sense for what sorts of ideas people haven't much tackled yet. (In fact, a large part of why I started working with leather was that, while working at a laser-cutting shop, I was looking around for materials that lasered well but not many people were using. And I ended up with leather.) Here are some of my favorites. Actually, one sentence is not quite enough.
And then I started sketching, both digitally and physically:


There was a major consideration that steered my thinking at this point: size. They wanted the final piece to be just about as big as could be made while still fitting inside someone's car to travel to its final destination. The thing is, the laser cutters I have access to are only so big--18 by 32 inches, to be precise. So anything large has to be constructed of smaller pieces. At the same time, I was told that the heaviest the riggers would hang something for the event was 75 lbs. That meant the ideas that involved big planes of material were right out.
So I decided to try to make it as a surface built up from small units connected together, making a skin that was light and self-supporting, without needing all the pieces to be hung off of a structural skeleton. This also meant that I shouldn't need to construct large structural ribs up out of smaller parts, which I was glad about. I was thinking about going for something built like one of the concepts I prototyped in paper, but with a more expansive and amorphous shape, and possibly with a second layer of skin inside the outer one.
But, everyone loved liked the idea with the overlapping scales and light emanating out from inside. Including me. I was a bit hesitant because I was pretty sure it would take more careful geometry shenanigans and tweaking than the other ideas, and I had only so much time to work on it. But I went for it.
What followed were quite a few rounds of strenuous modeling in Rhino broken up with cutting and assembling prototypes. But I think that's enough for this post. Stay tuned for Part 2!
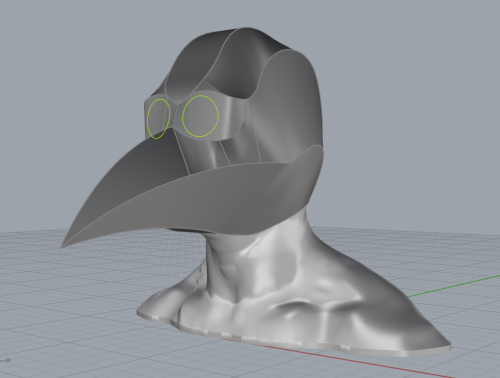
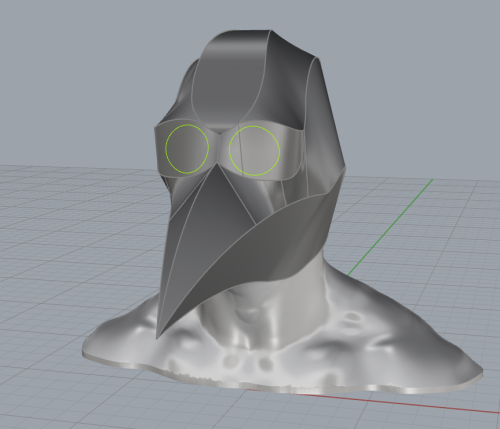
I was feeling crappy for a few days, and I decided I needed to design something fun, quick and simple. So instead I started working on this which has been on my list of ideas for a very long time. The challenge is to design something in 3D made up of panels that can be unrolled to flat surfaces. Then I insert stitching holes, futz with the edges for a while, and laser-cut it out of leather. The first head-thing I made with this technique was this crazy rainbow spiky helm, then I did this intricate wolf mask. This design built on experience from those projects. (As expected, it was neither quick nor simple, but it was fun!) This will be a plague doctor mask/hood. It'll cover the whole head, and will have laces in the back to snug it down. I'll probably cut some acrylic for the lenses, either red or mirrored if I can get it. And if I'm lucky with the guesses I made, it should fit over my glasses! Modeled in Rhino with lots of very finicky curves on surfaces, then lofting between them.


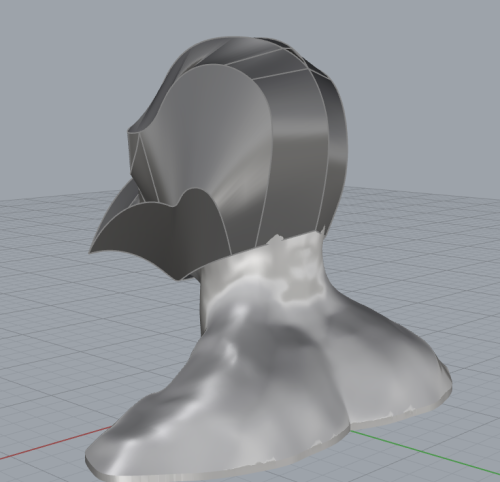
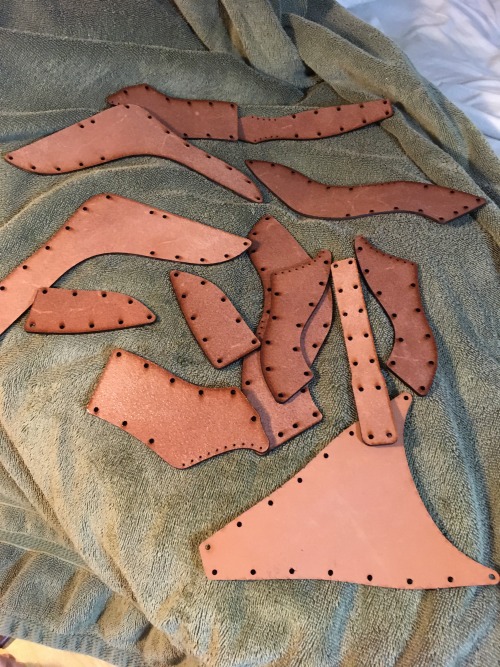
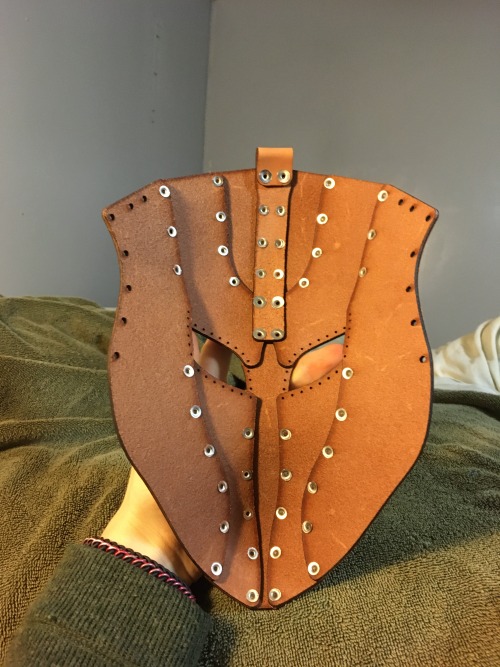
I’ve wanted to make a shark mask for some time. The question of why exactly is difficult to answer, but last night I sat down and pounded out a design for one. I did the design in 3D in Rhino, building on the experience of having done that plague doctor hood a couple months ago.
Here you can see the design in 3D, and all the pieces laid out and ready to laser cut. I’m going to attempt riveting it all together. The plague doctor hood was sewn together, which takes a really long time to assemble (like 8 hours of hand stitching), but is easy to design for and lay out and know that it’ll work. I’m less certain about the rivets working quite so smoothly, but we shall see. If it works, it’ll mean a vastly speedier assembly.
I’ll be laser-cutting this out in 8 hours! I should get to bed.
Suggest some mask ideas!
Some context: The place I go to rent time on the laser cutter recently switched how they charge. They used to charge per minute of cutting time, which was convenient because I could pop over when someone bought something off Etsy, cut it out quickly, pay for the 3 minutes of cutting time, and be out the door within 10 minutes.
But they switched to charging according to time that you’re on the machine. Which would be fine, since I’m pretty practiced and efficient, except that the minimum time they’re charging for is $50 per half hour on the cutter.
So in order to not bleed money, any time I’m there cutting something for an order I need to pad out the half hour with cutting extra copies of something else. So far I’ve been cutting blanks of the small mask designs I’ve had for a while.
But this is also a fine opportunity to make some new more small- to medium-sized designs! Recently my most popular design has been this jackal mask. I should make some more designs like that.
So what sorts of animals would people be excited to see in fancy leather mask form? Let me know!!!!?
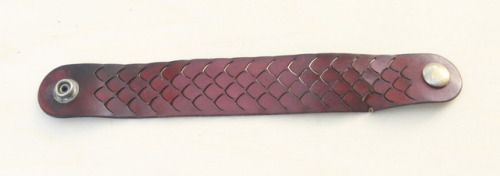
This was one of the very first leather bracelets I made, way back in 2013, and it finally broke! This is exciting for me, because I get to talk about how my products hold up over time!
This bracelet saw regular wear, though not daily, for almost 4 years. This was the prototype of this bracelet design. After I laid out and laser-cut this one, I looked at it hard and decided that it looked too fragile, with the bridges of leather between the cuts for the scales being too small. Basically, I was worried that it would break too easily. So for the design to sell I reduced it to 3 columns of scales, and increased the size of the gaps a little bit. But I wore this one myself to see how it would last.
And boy was I surprised! 4 years! Wow. And I was not careful with it. It finally gave in to a pretty darn forceful tug while pulling my hand free of some tight fabric.
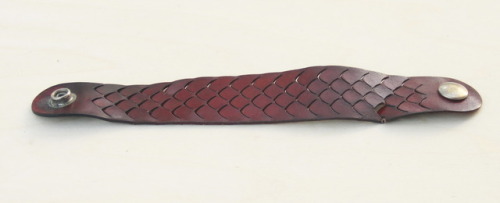
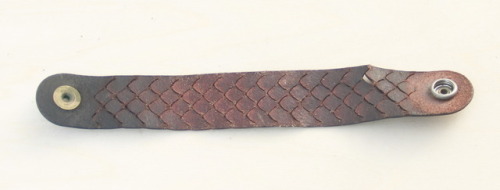
You can also see here how the leather ages over time. Grime and sweat from your hands will soak into it, which darkens the underside. You can see how the area near the snap, where the leather overlaps and doesn’t touch the skin, is a lot lighter. And oils and other stuff it comes in contact with will slowly affect the outer surface, giving it a bit of variation and patina. And after years of wear, the leather is now quite flexible, floppy even.
You can also see where the plating wore off of the snap. Basically all snaps I’ve found are nickel-plated brass, and eventually the plating wears off on the exposed surfaces. When the brass is exposed it does oxidize, and if it’s a hot sweaty day it can rub a bit of green copper oxide onto your wrist. It washes off easily, so no harm done. You can also see how it picked up more dirt on the bottom of the wrist/ends of the bracelet than on the center/top section. I’m not sure why that is, but it’s kind of interesting.
Anyway, I like being able to share how things wear over time. It’s not as sexy as fresh clean new merchandise, but I think it’s important.
And it kind of highlights societal weirdnesses around prices of Things that this piece of jewelry I sell for the price of a meal at a restaurant will hold up for so long.


I’m updating the design of my simple eyeglasses-compatible mask. For the original version (last photo), my goal had been approximately “as minimal as possible,” and I’d left a gap along the bottom where the nose goes. But while I kinda liked how that looked, it made it hard to form to shape reliably. The projecting bits never wanted to stay symmetric, and it took more tweaking than was reasonable.
So I connected across the middle, and expanded the vertical opening to give more space for the glasses to rest on the nose. It took a few iterations on proportion, but I think I’m happy with it now. It’s available over on my Etsy store, and I’ll update that listing with more photos as I make more copies of the mask.


Super-fast mask design! I had an idea this morning for a mask(-like item) for a character I was playing in a LARP today. The character was a librarian tree-person, in a magical library that was dying. So I made a forest of bare trees as a crown.
In 3 hours, from sketch through CAD-ing it up to lasering it out and dyeing it.
And I think the design was pretty good! I’ll clean it up a tiny bit and post it up for sale in a bit. Need to check if it’s feasible or worth it to try wet-forming the branches to give them some dimensionality.


Here’s some progress shots for a faceless robot-drone dragon mask I designed in the last couple days. Wasn’t trying to mimic any particular character/species, but I definitely did look at a bunch of Hacony/Qundium’s stuff when I was thinking about what sorts of shapes would work well in leather.
For a while I’ve wanted to try to do something along these lines but with a one-way mirror visor. But doing that requires heat-bending acrylic sheets after cutting them, and that’s really tricky to do right.
So instead I made a leather screen perforated with like 500 holes so you can see through it. (I was actually really happy with the pattern I worked out, I’ll have to get some photos to show that off when it’s done.) It looks like a sealed up gas mask, but the screen means it’s actually really breezy inside.
Next steps will be figuring out exactly where the straps will attach, then taking it apart and staining the tan leather. I’m thinking silver for most of it, with something contrasting for the horns and nose. These riveted leather masks always look super steampunk when they’re still tan, and sometimes that’s fun, but I think I’m gonna keep pushing the robot vibe here.


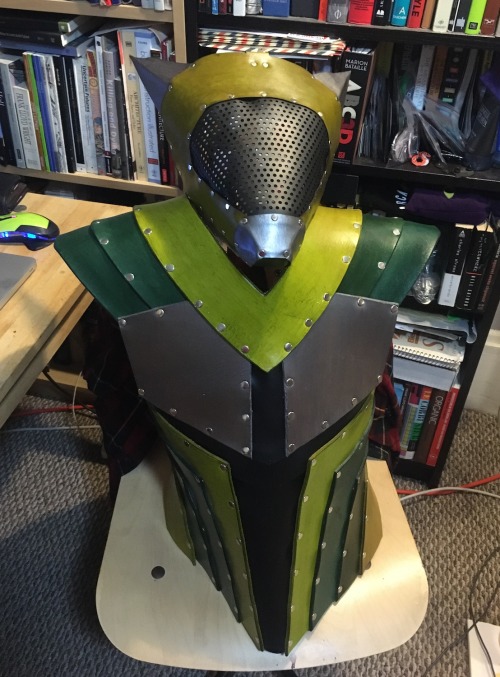
This leather torso armor has been my Big Project for the week while my normal-job boss is out of town. I made it to go with the robot/drone dragon mask I made earlier (which I still need to make a final post about, ugh).
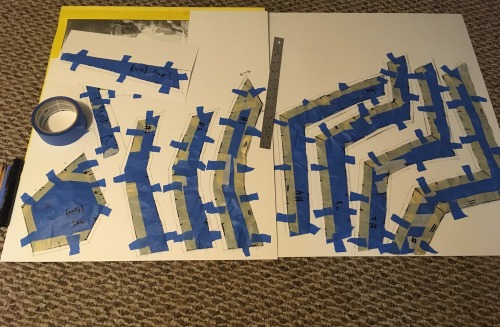
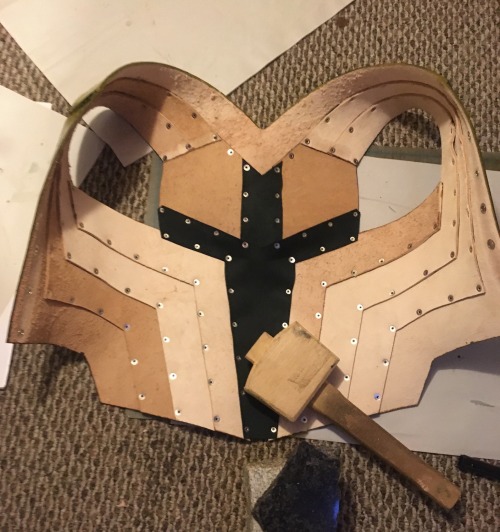
The mask I designed digitally, but this one was done entirely by hand. I’d had this duct tape dummy torso haunting my room since March (when I didn’t actually need to cut it up for my Magic Meat March costume), so I used it to make the pattern to ensure a good fit to my body.
This project took approximately 30 hours of work from sketch to completion. I made good time, and got photos of basically the whole process, so click the images for commentary if you want to follow along. I’d been aiming to have it done in time for Halloween, though I got some extra time because my local harass-the-townsfolk-in-costume group postponed our outing for a day due to rain.
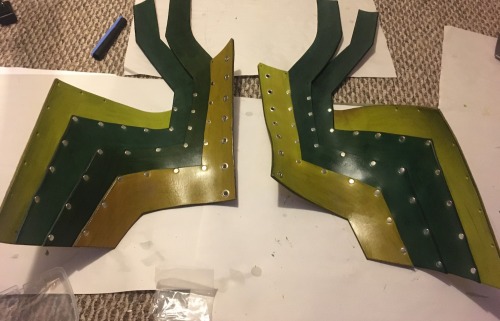
I was really happy to finally get to make a big armor piece like this. I’ve honestly been intimidated for years by the idea of making a breastplate, and was holding off until I’d built up confidence and skills on smaller pieces. And I think that paid off. While designing this project, I was able to foresee and deal with basically all the issues that would come up (mostly assembly issues of how pieces would fit together). And it meant that when it came time to assemble everything, I actually didn’t run into any problems. The final assembly came together flawlessly.
The design does have a bit of a quirk. I decided to prioritize the aesthetic over functionality a bit--I really wanted to maintain the bands of leather unbroken over the whole piece, so I put the closure in the back with corset-style laces instead of the more practical buckles-at-the-side option. Which means you have to undo the laces super wide and wriggle it over your head, and the shoulders really don’t want to let your arms through. It’s a bit awkward, to put it lightly. But honestly, for a personal project, that’s fine.
For now I think this project will stay mine. It’s very specifically fitted, and I don’t yet know how I’d make it to fit other people. It’s basically fitted like a whole-torso corset. But I’ll be mulling over more modular and adjustable armor design ideas.
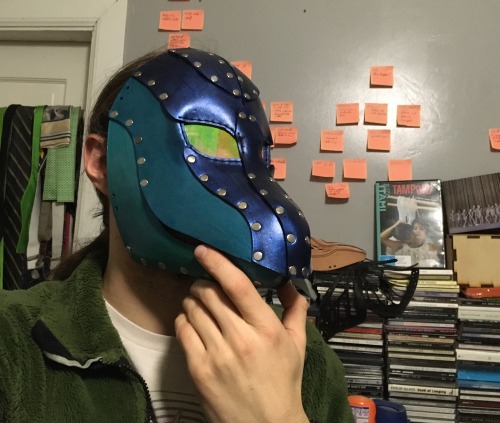


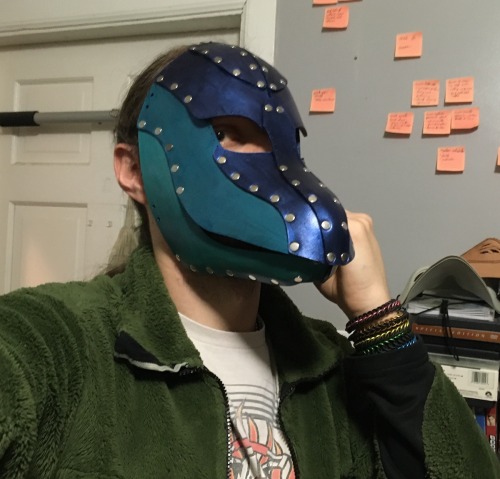
Progress shots of a new dragon mask! Showing the end result first. I really like how the whole thing came together.
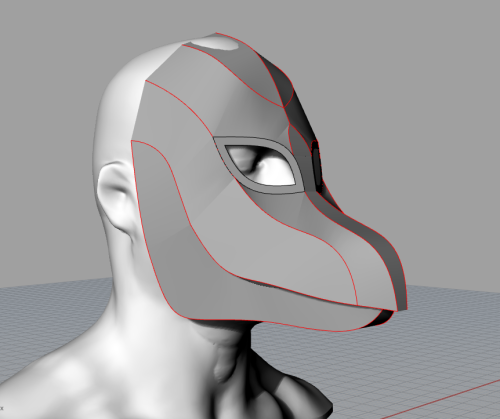
This was a modification/simplification of the full-head dragon mask I made a bit over a year ago. I shrunk it down so it was just a face mask, not whole head, with some adjustments and fixes to the shaping along the way. I pulled it in closer to the head relative to the big one, so it no longer has space to wear glasses, which is a bit of a bummer, but the proportions were just too weird when I tried to maintain that. I laser-cut the pieces out of 6 oz vegetable-tanned leather, which is just a bit thicker than what I typically use, and had a really nice solidity to it.
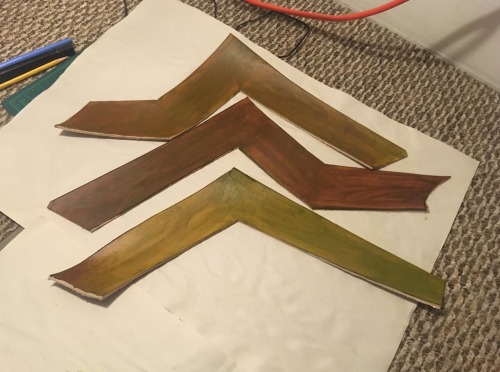
After much deliberation, I went with an iridescent blue finish for an aquatic look. It's a translucent acrylic paint, applied over 3 different base colors, though the middle one wasn't as differentiated as I'd hoped.
For the eyes I used an acrylic plastic with a subtle sheen of green, that reflects somewhat different colors depending on the angle of the light.
The last step will be to make the straps to buckle it on with.
Hello! I've been wanting to give dragon scalemaille a shot (mainly want to make my Dragonborn's tail) but I keep getting stumped on two things.
One: I was wondering if you may have any resources for inner tail support? The way you have yours set up is fantastic but I'm not exactly sure how you did itplus I dont want to copy you exactly ^^' I've seen the videos on how to weave them together but not any on the inside.
Two: For making it thinner near the tip of the tail, do you shrink the scale size at all or just use less scales and pull it closer together?
Thank you so much in advance!! -Kodiak
So the inner support on my tails is kind of complicated, but it grew reasonably straightforwardly from first principles and experiment. When I made my first tail, it was just a tapering hollow tube, and I realized immediately that it wanted nothing more than to fold flat. Which sucked.
The first edit of it was to just add a few straight chains bridging between opposite sides of the tube. I'd noticed that when worn, the tail flattened itself top-to-bottom, flat against the butt. I figured that having the sides of the tail held together would reduce how badly that happened. I added like 4 chains spread along the body of the tail, bridging from left side to right side, and I just adjusted their lengths to match the appropriate diameter at those points. (I think I actually did this with string first, then switched to using simple chains of rings because it would hold to consistent incremental lengths better.)
That worked OK at reducing the vertical squash factor, but it opened the door to the tail folding the other direction, flattening into a vertical eel tail shape. So I opened it up again and added in perpendicular chains, so that looking down into the tail you saw a line of + shaped braces.
Again, an improvement, but not enough to reliably keep the tail round. It still folded, but now at weird angles, and in the spaces between the cross braces. I needed (1) more directions of folding being resisted at each brace point, and (2) way more braces total.
More total braces is easy, you just got to add in more of them.
For maximizing the number of directions of radial bracing, this was approximately my thought process: Start with just joining each pair of opposite scales all along the circumference. That'll leave you with a whole lot of chains overlapping at the center point. So instead of a whole bunch of separate diameter chains, just have one center ring with a bunch of radii chains linked to it. That gives you a wheel-spoke arrangement, which is fine. But what if you joined all of those spokes to their neighbors, to make more of a disc? Then it could resist squashing forces that were not purely diametrical. OK now how do I make that disc structure more efficiently?
The particular structure I came up with is basically a Japanese weave structure constructed concentrically. I know that phrase probably conveys no meaning to anyone other than myself. The specifics of that structure are also so tedious to enumerate that I basically just decided to call them a trade secret. But I think by going through through the basic goals and thought process, anyone else with some patience and determination could figure out an equivalent workable solution.
For the thin tip, I just reduce the number of scales. The tip of my tails is a few rows with just 2 scales in them. These really want to fold flat, and adding in cross-braces to fix that in that tiny constrained space is a bitch even for me, so I'd probably recommend just starting with 3 scales in a row. It would be cool to try blending it to smaller scales at the tip, but splicing together weaves of different sizes is really hard to do gracefully.


Decided to subtly improve this codpiece design. I decided it was a bit too flat, and needed to curve to hug the hips better, and it needed a bit bigger of a bulge for obvious reasons. Updated version first, previous iteration second.
I’d originally designed this one physically, though. I’d traced the pattern geometry into CAD to laser cut, but it turns out that (as best I can tell) reconstructing a 3D form from its flattened geometry is an unsolved problem. So what I thought would be a quick edit turned into rebuilding it from the ground up.
I’m pretty happy with the update, but I think I got only about halfway to where I wanted it. Gotta pump the curvature up a bit more again still. Should be faster to make the tweaks next time though.
4 oz vegetable-tanned leather, designed by me, cut with a laser, then dyed gold and assembled by hand.
Okay
So i'm doing the rest of the clan designs in batches and im looking at what all i still have to do and my god. Around 33 left to make bio's/designs for then i think i will make like clan group pictures and drag myself back to hell.
Thank god its summer, plus friend is helping me think up designs.


Just a couple of quick sketches testing out the colored pencils my kiddo got for her birthday! These aren't blended or anything, and they're on copy paper, but I kind of like the sketched look to them. One of them has already been converted and put into a pattern available on my Zazzle and Red Bubble store fronts! I explain a little of my process on my blog here!
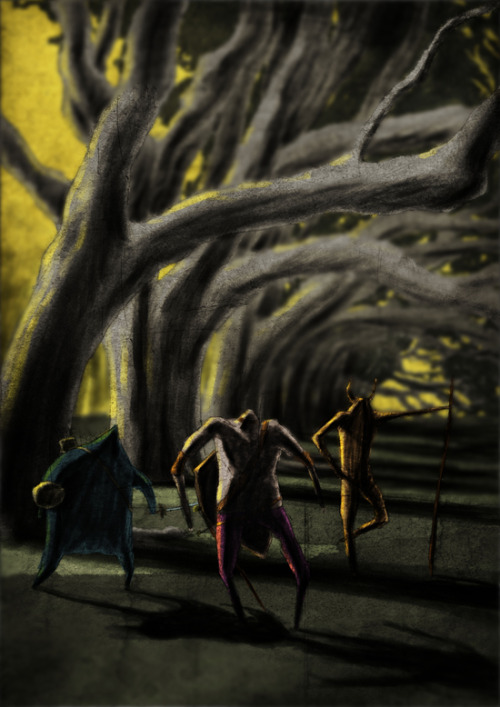
Some concept art. Into the woods


Wuyun was the center of a very big worldbuilding project where I wanted to design a new planet within Quantum Magic centered around asian culture and dark matter. I ended up basic Wuyun primarily on Chinese culture.