
Mr. and Mrs. Little often discussed Stuart quietly between themselves when he wasn’t around, for they had never quite recovered from the shock and surprise of having a mouse in the family. He was so very tiny and presented so many problems to his parents.
85 posts
Sorry If This Has Been Asked Before But How Do You Make Your Gradients Look So Good?
sorry if this has been asked before but how do you make your gradients look so good?
Hi Anon! First of all thank you so much 🫶
I like to use gradient maps (which I've explained here) or gradient fills + gradient tool. I'll drop a little tutorial under the cut:

GRADIENT FILL
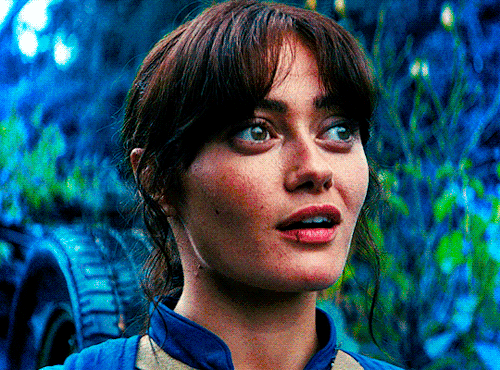
I'll be using this gif which I've already sharpened and coloured:

First of all let's make the background pop so I'm going to add a gradient fill (Layer -> New fill layer -> Gradient) with these settings (I'm using this colour #0099ff):

Now it's the time to play with the blending settings! Depending on your scene some will look better than others but I usually switch between Soft Light, Overlay, Color or Hue. 90% of the time I use soft light but this scene looked much better using overlay:
As you can see the background looks more blue and vibrant but it's not too much you know.
GRADIENT TOOL
Now it's time to use the gradient tool to give this gif a hazy look. I haven't seen many gifmakers talk about this tool but it's soooo useful and it takes gradients to a whole new level.
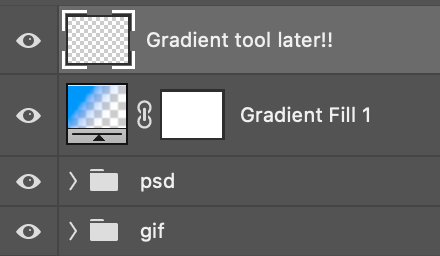
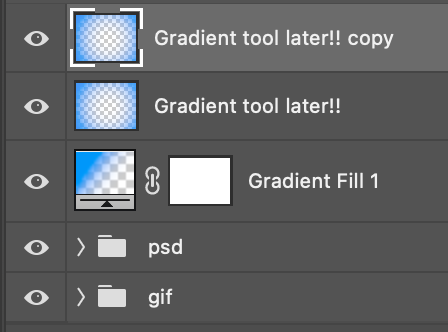
Before using this tool we'll need to add a new layer above the gradient fill, like this:
(HELP I just realised I typed “later” instead of “layer” 🤡 but let’s ignore that)
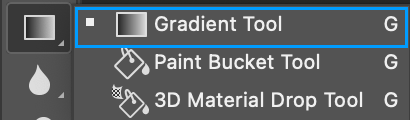
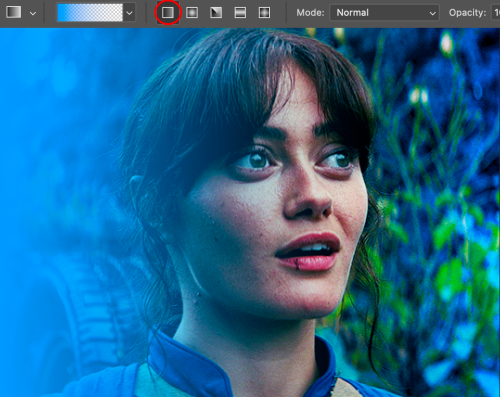
You can choose the gradient tool by pressing 'G' and then clicking here:
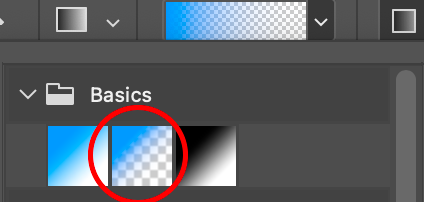
Make sure your gradient goes from any colour to a transparent background.
Okay so next to this gradient settings we have five different styles and each one will create a different shape. Depending on the scene I'll use the first, second or fourth one. Here are how they look:
1. Linear gradient
2. Radial gradient + Reverse (if you don't click this you'll end up with a blue circle above your gif)
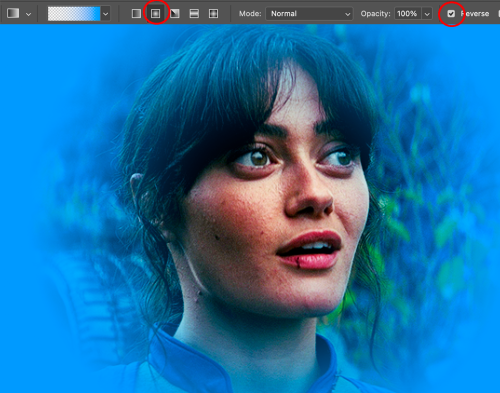
3. Reflected gradient + Reverse

This time I'm going to use the radial gradient so to draw it start by clicking on the centre of the gif and drag the line (the farther you drag it the less intense the gradient looks):
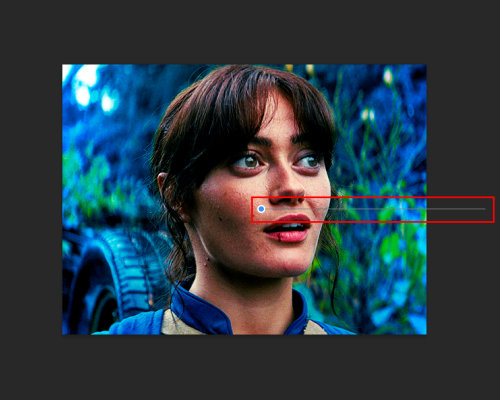
And this is the gradient:

And here comes the fun part again, playing with the blending setting and the opacity! Before doing anything I duplicate my gradient layer because I always use more than one so this is how your layers should look like:
Let's go to the first gradient tool layer and again try different blending modes: soft light, overlay, hue... Most of the time I'll use 'Soft layer' and I'll leave the opacity at 100%.
For the second layer choose 'Screen' and don't worry if your gif looks too bright because we're going to fix this by decreasing the opacity. Anything between 20-60% should look good but it depends if you want a more vibrant or more natural effect. I ended up using 40% and this is the result:

And we're done!!! As you can see the result looks much different from our first gif and it only takes a couple of layers!
Honestly the best advice I can give you is to play with the opacity and blending mode of the different gradient layers because depending on the scene some will look better than others!
-
 blackbeautylana liked this · 1 year ago
 -
 archrrbree liked this · 1 year ago
 -
 lovecolors reblogged this · 1 year ago
 -
 sapphirebluejewel liked this · 1 year ago
 -
 corffiser liked this · 1 year ago
 -
 withered-rose-with-thorns reblogged this · 1 year ago
 -
 ananastus liked this · 1 year ago
 -
 hellryme reblogged this · 1 year ago
 -
 jhack09 reblogged this · 1 year ago
 -
 girlwonder-writes liked this · 1 year ago
 -
 eatenalive liked this · 1 year ago
 -
 annacolemans liked this · 1 year ago
 -
 carnoburger liked this · 1 year ago
 -
 sims4jason liked this · 1 year ago
 -
 bradamant-e liked this · 1 year ago
 -
 andersonfilms liked this · 1 year ago
 -
hellryme liked this · 1 year ago
-
 eloiscbridgerton reblogged this · 1 year ago
 -
eloiscbridgerton liked this · 1 year ago
-
 fractalkiss liked this · 1 year ago
 -
 love-filter reblogged this · 1 year ago
 -
 soaringornithopter reblogged this · 1 year ago
 -
 imm0rtal-idi0t liked this · 1 year ago
 -
 v1mpyr liked this · 1 year ago
 -
 shotakazehaya reblogged this · 1 year ago
 -
 lokharts reblogged this · 1 year ago
 -
 ofthehightower liked this · 1 year ago
 -
 kingcameacallin liked this · 1 year ago
 -
 jung-koookmain liked this · 1 year ago
 -
 thewebspinner liked this · 1 year ago
 -
 normalpsople liked this · 1 year ago
 -
 minorufavs liked this · 1 year ago
 -
 paintedmesgolden liked this · 1 year ago
 -
 coldasyou reblogged this · 1 year ago
 -
 feynriels reblogged this · 1 year ago
 -
 kadazzle liked this · 1 year ago
 -
 jesperfahxey reblogged this · 1 year ago
 -
 alexbrecks liked this · 1 year ago
 -
 trueloveistreacherous liked this · 1 year ago
 -
 ucielavadonia liked this · 1 year ago
 -
 aeroheaven liked this · 1 year ago
 -
 hennycc liked this · 1 year ago
 -
 leviathanwake reblogged this · 1 year ago
 -
 salvatore-forbes liked this · 1 year ago
 -
 larlarmojo liked this · 1 year ago
 -
 not-so-blue liked this · 1 year ago
 -
 superpupdanvers liked this · 1 year ago
 -
 matthew-macfadyens reblogged this · 1 year ago
More Posts from Thestuartlittle


DAYSLILY DELIVERY 💌 template #42: image search.
by clicking the source link, you will be redirected to a psd download of the template shown above (via google drive). as you can probably tell, this template is inspired by the google image search screen. this has been sitting in my cloud docs for so long so i hope everything makes sense! i added a layer to explain editing tips as well.
usage guidelines: read here.
fonts needed: roboto (google fonts).
if you like my work, consider donating to my dog’s surgery.
Motion Blur Gif Tutorial
Anon asked how I created the motion blur effect in the first gif in this Boba Fett gifset, so here’s a 5-step tutorial. It’s very, very easy but also very late/early and I suck at explaining things like this so I hope it’s clear!
What you’ll need:
Basic gif-making knowledge using the video timelines method (this won’t work with frame-by-frame animation)
I’m using CC 2020, but any version of Photoshop that has the timeline option will work
Tip: This effect works better on gifs with minimal movement
Keep reading


CELEBRATION PSD PACK / Apr. 23 🎇 — hiii everyone <3 i hit a milestone recently and i thought i’d post a small psd pack for funsies and by high demand (and by that i mean no one has asked me 🥸) so enjoy!!!
— just some things to remember: ALWAYS adjust the curves layer for the lighting in the gif / adjust the channel mixer layer to help with different tints like the green tint in the mingyu gif!
PSD PACK HERE. 😵💫
@emberoflife kind of (not really) requested a tutorial for how to merge two gifs together on photopea, and as this is something i’d been thinking about making anyway, i thought why not just do it? big shoutout to @bethmarchs again for teaching me how to do this in the first place… maybe lily should just be making these…
onward!
Keep reading

One last gift for my 4k celebration -- Here are 7 PSDs for download. I've also put together a gallery with the image previews.
Please like/reblog if using. You can make any changes you want, use as a base, etc. but Do not repost or claim as your own!
Download: [MEGA] Gallery for preview images: [PostImage] Also check out my previous set of PSDs and gif textures!
Under the cut is additional links to my posted gifs/edits made using these PSDs.
Horizon + Dawn PSDs: (x) Fe PSD: (x) Noir PSD set: (x)(x) Summit: (x)