
The Fall Guy? More Like The Pookie.

The Fall Guy? More like The Pookie.
I was made for lovin’ the Goss 😌
Tags
-
 artsy-moonwalker liked this · 10 months ago
 -
 taangledivy liked this · 11 months ago
 -
 oogaboogalololol liked this · 1 year ago
 -
 oceanblueglimmer liked this · 1 year ago
 -
 rainbowkarolina15 liked this · 1 year ago
 -
 martyboo12 liked this · 1 year ago
 -
 peachy-dream112358 liked this · 1 year ago
 -
 mrswquidward liked this · 1 year ago
 -
 kindsweetrose liked this · 1 year ago
 -
 elevenshour liked this · 1 year ago
 -
 rawrls liked this · 1 year ago
 -
 katie7164 liked this · 1 year ago
 -
 tropicmonster37 liked this · 1 year ago
 -
 pinknpoison liked this · 1 year ago
 -
 jayddiee liked this · 1 year ago
 -
 kr1tical-crypt1d reblogged this · 1 year ago
 -
kr1tical-crypt1d liked this · 1 year ago
-
 thegradesake liked this · 1 year ago
 -
 sluttytangerine liked this · 1 year ago
 -
 simplymakkari liked this · 1 year ago
 -
 bea-art4life liked this · 1 year ago
 -
 lukeglanton-2 liked this · 1 year ago
 -
 chihuahuamations liked this · 1 year ago
 -
 queerdeer3000 liked this · 1 year ago
 -
 zooweemamaismycatchphrase liked this · 1 year ago
 -
 toheavenwmydrms liked this · 1 year ago
 -
 hokuohime liked this · 1 year ago
 -
 afurucay liked this · 1 year ago
 -
 chiyeko-kurea liked this · 1 year ago
 -
 hollandmarrch reblogged this · 1 year ago
 -
 its-me-satine liked this · 1 year ago
 -
 courageisneverforgotten reblogged this · 1 year ago
 -
courageisneverforgotten liked this · 1 year ago
-
 ratatatlas liked this · 1 year ago
 -
 pegasister60 liked this · 1 year ago
 -
 sodetectivestarfish liked this · 1 year ago
 -
 wollymolly586921 liked this · 1 year ago
 -
 goslings-girlx reblogged this · 1 year ago
 -
goslings-girlx liked this · 1 year ago
-
 darylssunshine liked this · 1 year ago
 -
 merthurians-prat-and-idiot liked this · 1 year ago
 -
 too-many-fandoms-tbh liked this · 1 year ago
 -
 atsume-no-nettie reblogged this · 1 year ago
 -
 queenhelene reblogged this · 1 year ago
 -
queenhelene liked this · 1 year ago
-
 andie-thefangirl liked this · 1 year ago
 -
 victoriapaiva liked this · 1 year ago
 -
 arasnovakmd liked this · 1 year ago
 -
 trickbop liked this · 1 year ago
 -
 hola-signorared16 liked this · 1 year ago
More Posts from Retro-with-a-twist
1 year ago
Allow me to introduce my bestie, whose art is some of the most fun stuff you’ll ever look at!!


It's been a minute!! kinda got wrapped up with everything else, but had a few minutes to spare so l decided to paint a kiwi!!!
1 year ago
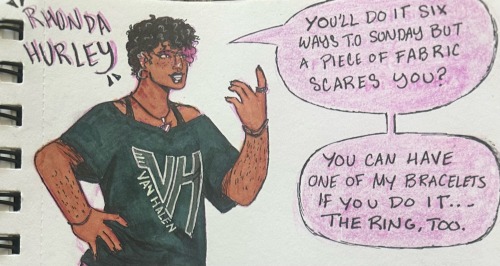
Rhonda Hurley, the unsung hero of the Supernatural Fandom.
(Uhhh be SUPER careful clicking “keep reading”)

If you know me irl, we are NEVER discussing this.
Anyway Supernatural has 100% altered my brain chemistry. Also, I feel like Dean had hair that sort of looked like Sam’s when he was in his late teens, sue me.
Tags :
1 year ago

Colt “Profesh” Seavers x Harry Styles?? Who’d have thunk it.
Tags :
1 year ago
1 year ago
