aka @rmgrey-author | Rowan Grey • writer • graphic artist • mix maker • tutorial maker • ABSOLUTE STEREK TRASH • multiship af
441 posts
COLOR TUTORIAL #1
COLOR TUTORIAL #1
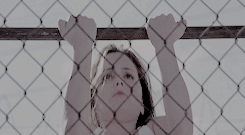
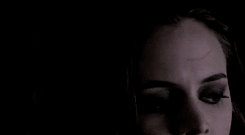
Color Porn Lydia.
Another tutorial, this time with a lot of contrasting and color, featuring a Crying Banshee. This will be part one of a two or three part theme I’m trying to establish. Mostly working with color porn and contrasting.
I am using Photoshop CS5, and this is not a beginner tutorial, but it isn’t too hard either.
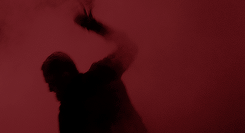
I will be showing you how to turn this:

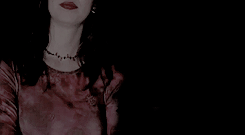
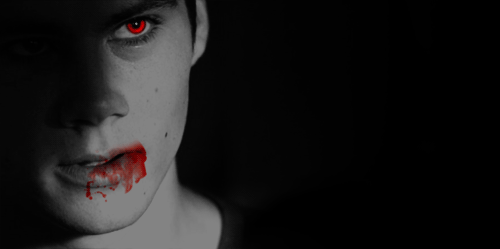
into this:

First start with a duplication of the background layer, then resize and crop how you want. My cap is 500x280. Next add a black and white gradient map and set the blend mode to soft light. Duplicate the layer and set the opacity to 45%. Now some lighting. Levels, curves and levels again; these are the settings I used.


Then a gradient map,

black, #000000; pink, #f10055. Set it to darken and make a layer mask to color the background. The mask will end up looking like this.


After that layer you want to hold CTRL and click into the black and white box for the curves layer, so that it selects only the parts of the face you highlighted with curves. Then make a levels adjustment.

Next you want to make a new layer, empty and select a small round brush, soft. Then a nice pink color, close to the color that you used for the background, so we can color the lips. I used this color #e40559. Then change the blend mode to multiply and change the opacity to 34%.
This screenshot has a lot of tight subtle emotion and fear, and I did want to focus on that, so I made another curves layer; output 140, input 114 and then mask it so the layer is hidden. Use a white brush to paint over the tear and some on her eyelids. Erase and blend as needed. Here is my finished mask.

Then another curves for her eyes. This one should be output, 106; input, 135. Then mask and use a soft round brush again. This was my end mask.

This is where the cap should be right now.

More curves. This time we mask it for the irises; the first curves should be output, 142; input, 100.


That’s the eyes right now. Next I added a simple selective color, just focusing on black (+5).
Take a soft brush, black; and make a new layer. Color only the left side of the cap, like so:

Gradient fill next, just to add to the shading on the left:

Now another solid color, pink same color as the background. Mask it and use a soft brush to blend it over the background and onto some of Lydia’s hair. The blend mode is color and the opacity 25%.

Add a selective color again, +5 black. Then another, for red adjustments.


Next is a vibrance layer, masked for the face.

Vibrance +28, saturation +14.
Next a gradient fill, now this one will focus on adding even more color to the right hand side. #000000, #e09696.

And focus it on the right, this was my mask.

Blend mode hard light, 38% opacity.

This should be masked for only the hair. Just to adjust and bring Lydia’s gorgeous strawberry blonde hair out of the pink background. Next another magenta selective color.

This is how it looks so far.

I added two textures, very subtle and sharpened after. Texture 1, set that to lighten and 24% opacity. Texture 2, this one I did screen at 16% opacity. Lastly, you press CTRL, ALT, SHIFT+E to stamp the image. Which just means you create a layer on top of everything that blends all the layers but also keeps the originals. Then filter>sharpen>smart sharpen; amount 500, radius 0.3, more accurate and remove gaussian blur.

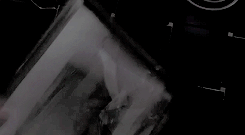
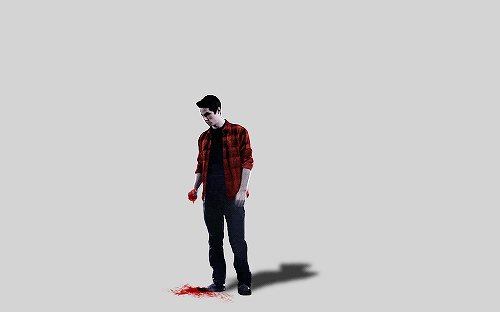
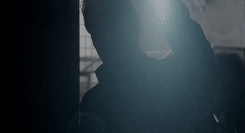
Here’s a second example of another screencap using pretty much the same methods:

DOWNLOAD THE PSD HERE.
-
 theultracharmingladynoire liked this · 3 years ago
 -
 peachesandmints reblogged this · 3 years ago
 -
 saltzstar reblogged this · 4 years ago
 -
 margificons reblogged this · 4 years ago
 -
 alltoowsll liked this · 4 years ago
 -
 achilleius liked this · 4 years ago
 -
 fuck-you-i-am-spiderman liked this · 4 years ago
 -
 gangtaes liked this · 4 years ago
 -
 benvisnabrina liked this · 5 years ago
 -
 cantfightfatetoo liked this · 5 years ago
 -
 psblogtips reblogged this · 5 years ago
 -
 woozapooza reblogged this · 5 years ago
 -
 mary-crawleys liked this · 5 years ago
 -
 luminies liked this · 5 years ago
 -
 fashionistazayn reblogged this · 5 years ago
 -
 drunkxabi liked this · 6 years ago
 -
 tveditxs reblogged this · 6 years ago
 -
 pohnine reblogged this · 6 years ago
 -
 padmeamdala liked this · 6 years ago
 -
fashionistazayn reblogged this · 6 years ago
-
 tittensindtoll liked this · 6 years ago
 -
 photoshopstyn reblogged this · 6 years ago
 -
 samurais-archive reblogged this · 7 years ago
 -
 lattefairy liked this · 7 years ago
 -
 redwidows-archive reblogged this · 7 years ago
 -
 jaehyuuunns reblogged this · 7 years ago
 -
jaehyuuunns liked this · 7 years ago
-
 elizabehtholsen liked this · 7 years ago
 -
 jayloxoxo liked this · 7 years ago
 -
 lexiesrecources reblogged this · 7 years ago
 -
 quirkyresources liked this · 8 years ago
 -
 jongdaesbigtoe liked this · 8 years ago
 -
 mosguitoland reblogged this · 8 years ago
 -
 amendswithshadows reblogged this · 8 years ago
 -
 myphotoshopstuff reblogged this · 8 years ago
 -
 caecilians liked this · 8 years ago
 -
 nastywitch liked this · 8 years ago
 -
 nekrofilth liked this · 8 years ago
 -
 glorybeat liked this · 8 years ago
 -
 nothingholic-s liked this · 8 years ago
More Posts from Lycaens


Favourite Character Meme ☆ Faith Lehane
Faith. Her name alone invokes a w e . Faith. A set of principles or beliefs upon which you’re willing to devote your life. The dark slayer. A lethal combination of beauty, power, and death. For years and years, or - to be more accurate - months, Faith fought on the side of good, terrorizing the evil community. But like so many tragic heroes, Faith was seduced by the lure of the dark side. She wrapped evil around her like a large, evil Mexican serape. She became a cold-blooded killer. Nobody was immune to her trail of destruction. Not friends, not family.
I went into the desert to forget about you. But the sand was the color of your hair. The desert sky was the color of your eyes. There was nowhere I could go that wouldn’t be you.
Jeffrey Eugenides, Middlesex (via larmoyante)


satan, he disguises himself as the angel of light. his servants are the false apostles of righteousness. they don’t deserve this. they don’t deserve paradise.