
They/them - AroaceLego MOCs and photography with a wide range of different characters and environments, every Wednesday (in theory-)
63 posts
Kaminos Citadel Challenge !
✨Kamino’s citadel challenge !✨
I am…very excited about this one. I’ve had this vision for a long time, and I’m so happy it’s ended up looking like that.
Now, there are a lot of things I’ll go into details along close ups under the cut; the only thing I’ll mention above is that I’m very grateful for TCW’s episode guides’ artworks, without which this would have been quite a hassle.

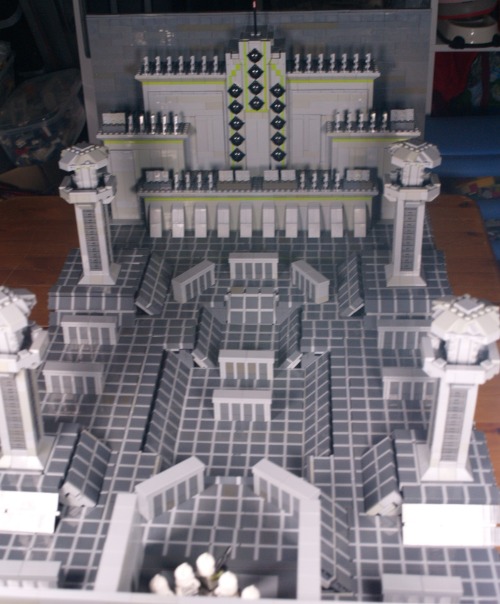
Okay ! Before diving into all the details and things, here is a view from above, to really display how big it is. Dimension-wise, the plank I built it on is around 110*70cm.

Now of course, the first detail which is noticeable is the floor, because, well, it’s everywhere.

This was probably the most challenging part of the build, because making a grid out of Lego is tough. Most of it is rows and rows of dark square, light lines, separated by 1*n tiles. It was the easiest way to get this pattern with as if it were just tiles; because this is one of the objectives I had here : most of this MOC is smooth, except for a few zones (usually voluntarily).
The fact I used this technic means that the floor in most place isn’t very stable, but it actually holds up pretty well because of some hidden connection points with the foundations underneath, which are mostly hidden under the cover blocks.

Here for instance, I’m using modified 1*2 bricks with a Technic hole : it hold the cover block, and it also attaches the floor to the foundation.
Of course, another problem I ran into were slopes. Much harder to get a smooth effect with the technic I’ve used, so it’s a bit wonky and unstable. Also, most them are not aligned properly, which is visible in the picture above (and some area have some really big misalignments because of a few problems I probably won’t bore anyone reading this with).
Now, since they’re also here, I can deal with the cover blocks. These were, among the details, the hardest to figure out, to get a good size while keeping some texture. Eventually I came up with this design, which, ironically enough, uses the same technic the floor uses, in a different orientation.
Another detail : the miradors :

This is one of the first elements I had in place, because I needed them to get a good sense of scale (and was made better by an existing concept art of a tower alone). Most of it does not have anything noteworthy, except for one illegal technic I used (can you spot it ?)
The pillar holding the roof of the mirador is using a technic I had in my toolbox for a long time, but had never had the occasion to use : if you take two 'brick' bricks and attach them perpendicularly on a snot brick, the small space separating the lines of 'bricks' align to let a 1*n tile in. It’s somewhat reliable (for an illegal technic) and an easy way to get octogonal shapes.
Now, before looking at the Citadel itself, let’s turn around for a minute.

This point of view obviously isn’t the intended one, but it’s still worth noting, if only for some composition.
Notice that the wall here is quite small (smaller than the miradors, even), and light gray; it’s in contrast with the towering dark gray wall on the other side, behind the citadel, which technically should give at least some impressions even to the people who never saw TCW.
Anyway, it’s also on this view that we can see most of my slope struggles, including the central one, which is the biggest I had to do.
And I can’t not mention the most important element :

What would be the challenge without a squad of clones to take it on ? These clones (4 privates and a sergent) are ready to fight ! Well. Kinda. I wish I could have actual cadets, but they are not part of the Lego universe (and the floor was enough of a fee, I can’t afford to get customs figures too). I wish I had the Dominos though. I have TBB Echo, and I plan to get my hands on Fives at some point, but they wouldn’t fit here, sadly, so instead I used some movie accurate clones (because all the others are used for a project I still haven’t posted..maybe later…)
Notably, I at some point tried to get the elevator to work - needless to say it was a disaster (it’s too close to the plate underneath to make something working).
Now, without further ado. The citadel.

I’m very proud of it. I got the proportions just right (I actually made some measurements to make sure of it), and there is just enough texture to not make it bland while leaving it as artificial. This alone took roughly 8-10h (which were all spent during an accidental all nighter, whoops), but it was worth it. It’s completely empty inside, and, in fact, the wall behind it isn’t full as well, anything behind the citadel is opened. The spikes are simple 1*3 angle plates illegally connected, and the walls’ small details were made with a bunch of modified 1*2 plates, there isn’t anything really special in it.
The only really complicated zone was the middle tower, because I had to put all the cannons while keeping it clean and smooth, and including the vertical lime lines. It was a fun challenge. And I included the 'flag' At the top, too, just a red transparent cone on a stick (there’s no need for more), which peeks above the gray wall (for composition and because of a lack of pieces).
Anyway, such a long project deserves one behind the scene photo :

Yes, my desk is messy (and include my mandatory tea cup).
On the left, you can see my remaining floor tiles, which have not been used yet; and just under the citadel, you might notice the foundations visible; it’s a checker of 2*2 tiles which gives my floor a good base to be fixed on. There are also some slopes which haven’t been placed yet (in front of the background miradors), and at this steps, there were no cover blocks or walls yet.
As far as my tools go, you might notice brick separators scattered all around my work environment (I never have enough of those), as well as a tablet in the bottom right hand corner (which i use to check and measure concept arts), and in the middle, the red triangle is an official (albeit old) Lego measurement tool which counts in stud, Lego bar holes and axe length.
Also visible, finally, is the bottom of the foundations, which are stacks of 1*2 bricks (each of the three floor layer is separated by a height of 3 bricks), which means that looking directly under it can lead to watching the dark basement of my build (which isn’t aesthetic…).
Anyway, if you read until here, thanks, I guess ? I still have a few TCW related stuff (a small one next week, some other in the foreseeable feature), so feel free to stick around and maybe leave a note, if you feel like it ? That’s it, bye !
-
 ghost-of-tk reblogged this · 1 year ago
 -
ghost-of-tk liked this · 1 year ago
-
 wanderingbasilisk reblogged this · 1 year ago
 -
 suburbanhearth liked this · 1 year ago
 -
 pitchsilent liked this · 1 year ago
 -
 thedeviladvocatesme reblogged this · 1 year ago
 -
 brickbybrickstucktogether reblogged this · 1 year ago
 -
 lbibliophile-sw reblogged this · 1 year ago
 -
 yoursrosie reblogged this · 1 year ago
 -
yoursrosie liked this · 1 year ago
-
 snorkin-sporks reblogged this · 1 year ago
 -
 mad-harmonics liked this · 1 year ago
 -
 alabyte liked this · 1 year ago
 -
 drafael-afol liked this · 1 year ago
 -
 mepper91 liked this · 1 year ago
 -
 bricktoygrapher liked this · 1 year ago
 -
 minimstories liked this · 1 year ago
 -
 bookwormbb liked this · 1 year ago
 -
 tubaluna liked this · 1 year ago
 -
 nyancat674 liked this · 1 year ago
 -
 justaflyintooka reblogged this · 1 year ago
 -
 sweetcharite liked this · 1 year ago
 -
 villagebysea reblogged this · 1 year ago
 -
 youareagoldfishnow reblogged this · 1 year ago
 -
youareagoldfishnow liked this · 1 year ago
-
 toesywoesy reblogged this · 1 year ago
 -
toesywoesy liked this · 1 year ago
-
 ladysongmaster liked this · 1 year ago
 -
 beauty-schooll liked this · 1 year ago
 -
 captianhoshicat reblogged this · 1 year ago
 -
captianhoshicat liked this · 1 year ago
-
 highgroundanimations liked this · 1 year ago
 -
 rachelamorph reblogged this · 1 year ago
 -
 brokenphoenix99 reblogged this · 1 year ago
 -
brokenphoenix99 liked this · 1 year ago
-
 aurathebardwife reblogged this · 1 year ago
 -
aurathebardwife liked this · 1 year ago
-
 casecypress liked this · 1 year ago
 -
 koresy liked this · 1 year ago
 -
 honeymon8 liked this · 1 year ago
 -
 madrewrites reblogged this · 1 year ago
 -
madrewrites liked this · 1 year ago
-
 thepunkispink liked this · 1 year ago
 -
 spacialshrimp liked this · 1 year ago
 -
 iwantsilmarils liked this · 1 year ago
 -
 tawdryrat liked this · 1 year ago
 -
 greatshieldmaiden14 liked this · 1 year ago
More Posts from Enteroctopusdarkysilis

✨Bionicle…Rahi ?✨
Yeah, I’m not sure what that one exactly is…But I like it.
I don’t currently have any other Rahi in stock (well, I do have one but it’s terribly ugly), however I do have one in the making, which might be ready for next week. Else, I have a few other things I might get at (including a fancy idea since it’s pride month, which I’m hoping to manage to pull off…). Of course, if you have ideas, I’d gladly hear them !
Aaanyway, rant aside, building details under the cut !

For once, legs are utterly simple, since they’re all made of a single blade piece. Nevertheless, I had to use feet somewhere, so you might notice that the entire spine is made of feet piled on top of each other. They are only connected near the tail by a single socket.
Speaking of the tail, it’s made of a weapon piece of Nuju Metru, but the connector was all twisted so I couldn’t use it as a proper weapon. Well, it gives some movement to the beast, so it’s a great thing still.
Similarly, the tongue/flame (I’m still unsure of which it is meant to be) is a partially broken Tahu sword. It’s not actually held securely, because it’s inserted in the technic pin connector of the dark red shoulder blade I’m using as the face of the beast. On each side of this piece are silver Bohrok eyes as teeth, which themselves are partially covered with limb armor pieces.
The main body is not actually very complex, because I found a quite large red technic piece which looks somewhat like a throne and acts as a great base (if anyone has any idea where this piece comes from, based on this very unclear description, I’d like to know where it comes from); and four small blades placed horizontally to make the body slightly rounder.
You will notice this Rahi can actually more or less fit in my shelf studio, which is quite remarkable, because it means I don’t have to set up a temporary studio all over again. Might have to do it for the next build, though.
Also, I actually started my spreadsheet for bionicle gens ! (It incredibly tedious..)
✨I made a carrd✨
A friend of mine said I could use it — they were right !
Essentially, I now have all of my published MOCs sorted by theme in a single place (as well as a few unpublished ones !)
Here it is : https://enteroctoups-darkysils.carrd.co/ !

It also feature some none-Lego photographs, too, feel free to take a look.
Small, unnecessary update bellow the cut :
I’m gonna have to remove the 'one post every Wednesday', for multiple reasons : firstly, I’m gonna start a long maths cursus which won’t leave me much time to build — or even to post; and, beside that, I’m running out of MOCs ! I still have a few, which I will probably work on and queue so that they appear semi-regularly. I received just earlier today part of the pieces I’ll need for my final(?) MOC. And it’s a big one. Well anyway, I’ll be off to work on it now ! Thanks for reading this far~


✨Brick separators !✨
Run, they have teeth now !
This is a silly project I did ages ago; given that I've officially been posting for a year straight each week (ignoring my disappearing space station post, ahem), I thought it would be nice to post that little guy whose view welcomes me every morning.
And, sure, it's not my finest work, by far, albeit I could go on a rant about the many fun technics I used (look at the horn !). But that's alright !Why ? Because the main goal of legos is not to build extravagant looking buildings, or ships, and landscapes. I don't even need to give a profound answer to what it's meant to be; everything is in the title :
"The name 'LEGO' is an abbreviation of the two Danish words “leg godt”, meaning “play well”. It's our name and it's our ideal." - Lego.com 'About Us' page
In the end, it's just a toy, and what you build with it is not important, as long as you had fun making it ! The pieces I enjoy the most are the one that come to me as a vision that I develop, and I appreciate them much better than some of my (arguably better) commissions I get (because, yes, that somehow happens), because commissions are not spontaneous.
The morale of the story, I guess, is that you don't have to hesitate if you want to build something, no matter how silly it is, no matter it's your first or hundredth moc; and you should be proud of it, no matter how it turns out, if you had fun with it.

✨Another custom vehicle !✨
It has eyes !
This horrendous prototype is a follow up to this post.
Now here is a video of how it works (using the same remote from the other post, that thing is universal !). I wish I had a way to display the good all-terrain capacities of this vehicle (other than wood and seashells...
Details beneath !
Side view :

There are plenty of things here to discuss. Firstly, the suspensions ! Three spring pistons : one of the 'new' models, two much older ones (System, can you believe it ?). At rest, the two small white discs in the middle don't touch the tread, but as soon as an object pass underneath, they get involved. The advantage of this system is that, with every part mobile, the obstacles can be passed easily. And I added rubber grips too.
These treads are powered by PF XL motors. Very very heavy and big, they have the same speed as other motors but much more torque. We're talking of Mindstrom-level torque; this means that In theory, I can add as much weight as I want and keep it at a more than decent page.
You can also see that I fixed two of the biggest flaws from my previous model : firstly the RC receivers have been turned to get signals from multiple angles. Secondly, to rotate the tower, I used a worm gearbox with a PF M to really slow it down; and the wires have been fixed to have a broader angular range.
The turret ? The turret !

These eyes are the best addition to this MOC.
You might notice that I have a servo and a PF M on the turret. This is because the weapon here is a harpoon with a cable. And it has a winch ! All of that with only four controls : two for treads, one for rotation, and one to fire/retract cable.
How ? Well I'm glad you asked. The firing works just like in the previous vehicle : the servo's arm presses on the spring-powered projectile and it flies, along with the cable connected to the other motor.
As for the retraction, it's slightly more complex : on the remote, I press the firing lever the other way around : this causes the servo's arm to go on the winch and it fits nicely, so that when the PF M rotates, the thread can't escape the winch (a video will be in the reblogs, because Tumblr doesn't want me to upload two videos at once...)
Major problems here are the following :
the PF M often detaches itself from the turret
the harpoon often get stuck on the treads
the thread is too short (yeah...)
I rarely, if ever, reblog things, but that’s just beautiful; Lego at its finest.
BESTIES BESTIES BESTIES

FOUND THIS SUCKER IN A LEGO STORE IN NYC
and the employees had pronoun pins as well!