
They/them - AroaceLego MOCs and photography with a wide range of different characters and environments, every Wednesday (in theory-)
63 posts
A Tangent About Hexagons
A tangent about hexagons
Because the project I’m working on brought it, I found it interesting, and I thought some people might need it.
So, as I’m working on a quite large project (hopefully done by next week, although I have doubts on that), and the base structure of it is more or less hexagonal. Anyway, here are some of my tips to get good hexagonal shapes.
The easiest way to do this is obviously with hinges and plates, like that :

While not necessarily accurate, it’s cheap and efficient, albeit squishy, and can be expanded to any size.
Instead, we can go the technical way, and use maths, by considering that a hexagon is the combination of 6 equilateral triangles. We end up with this :

Practically unbreakable, very stable, and can be made with as much technical bricks as possible, so it is easily expandable, but it’s harder to attach it to classic bricks.
So, none of these two designs are really good alone, whether on pure usability, or on durability. Alone, that is. Now, here is the fun part : thanks to the way Lego works…


…they work together ! And, with some modified 2*2 plates, they mostly hold to one another ! Isn’t that awesome ? What’s more is that, while I’m using 2*4 plates and a 7 holes technic bars, that also works with 2*6 and 11 holes bars, which is good.
Now, let’s apply this knowledge to make a solid prism with an hexagonal base :

By using a bunch of plate and two of these hexagonal bases, we get a hollow tube, which is solid through the hexagons, but can still break because of a diagonal force. To fix that, we need to add supports between the supports, like so :
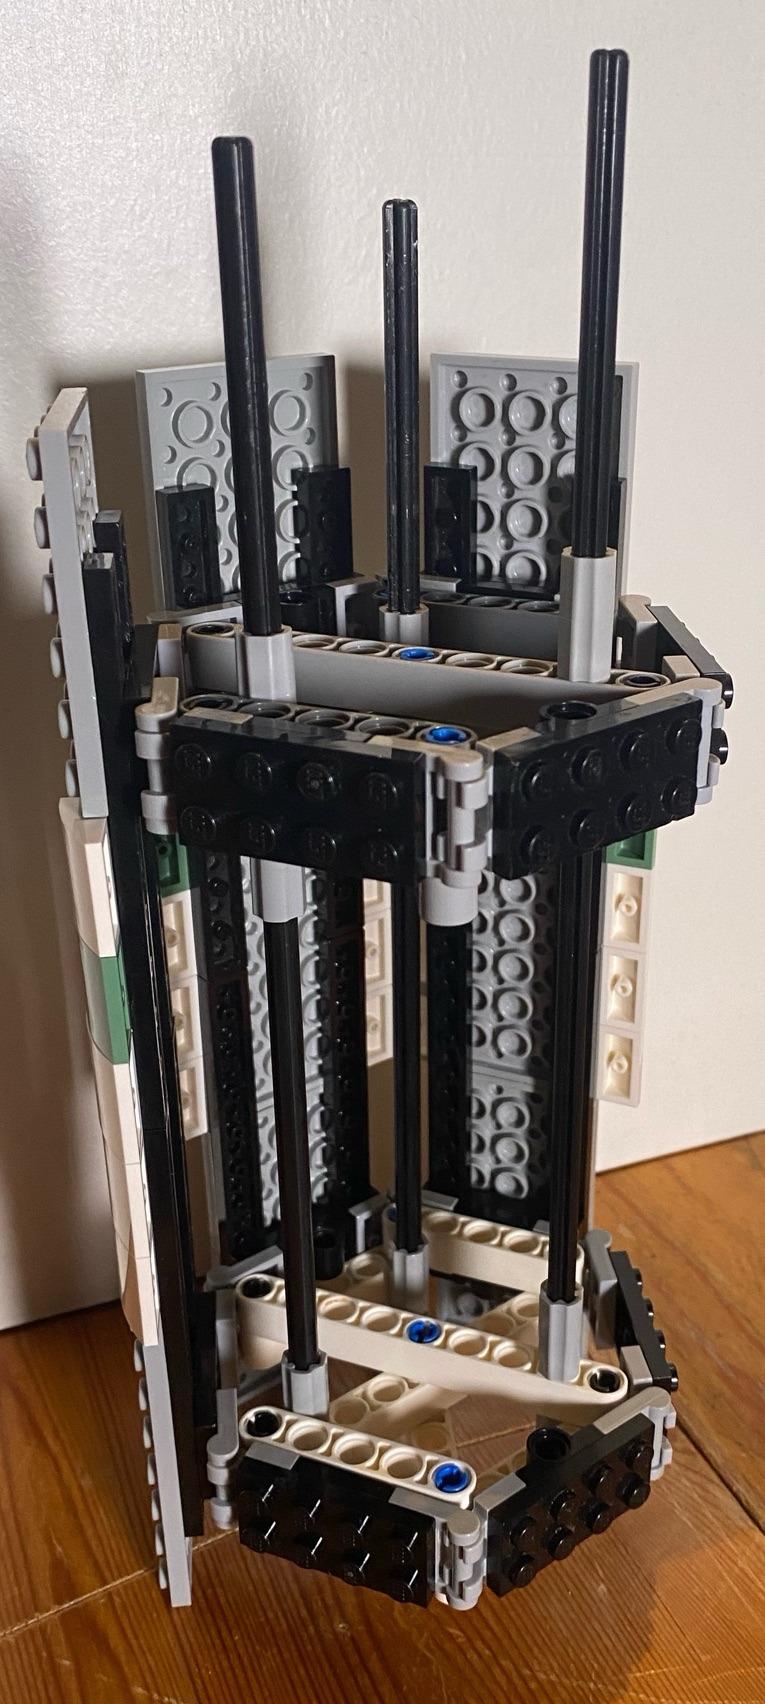
This also means that this design becomes stackable. Congrats, you made a long hexagon tube ! It can also be round, with the right modifications, notably with 2*2 curved tiles :

It fits perfectly, and it’s good to make solid near-circles !
Sorry for the photos’ quality !- They were taken quite late with my phone, and without proper lighting.
-
 mitchell-nihil liked this · 1 year ago
 -
 olivescales3 reblogged this · 1 year ago
 -
olivescales3 liked this · 1 year ago
More Posts from Enteroctopusdarkysilis
✨Trade Space Station !✨
[1/4] >Next>
Finally...More than 60 hours of work, I can present my masterpiece. I have been working and planning this project for a long time. Given the sheer amount of things to talk about, I will split all of my rambling in (at least) four posts : one about the concepts, ideas, and general aspect (you're here !); one about the technical side of things; one depicting how the project evolved (using pictures taken during the construction); and one dealing with all the smaller details, ships, and such.
Enough with planning, though. Explanations, other images and more explanations below the cut !
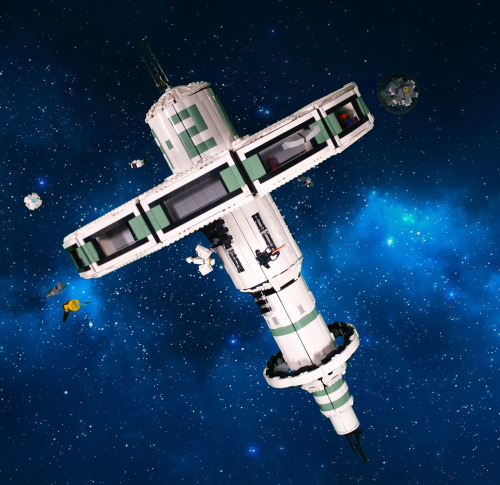
(less) edited picture of the build :

So. You might see, now that I got rid of all that pesky editing (or most of it) that there is a big arm holding the thing in place. It's easily a fifth of all the work of this build, because I absolutely wanted to hold this thing at an angle, and it's heavy, at around 15 kilograms (33 pounds). I'll talk about the technical difficulties of that in a later post, but it was important for it to be solid, because the station was the central piece of my second ever (very small) lego exhibition. AND it allowed me to meet the recruiter of a much larger exhibit. Long story short, in a month, I'm presenting this piece again (just before my exams, whoops-).
Anyway. Not only is it heavy, but it's also quite tall and wide. Around a meter at the highest point (tilted or not), while the diameter of the main ring is at around 0.75m. Quite a difficult thing to move around. Or is it ? Well, yes and no.

Here are all the main components (excluding the holding arm), when I move the piece around. Of course, all the ships are detachable (it allows me to move them around from one day to the other), but the dome carrying the antenna can also be removed, and then, the entire ring can be disconnected (that, too, was quite a challenge).
Removing the ring obviously makes it waaay easier to transport, because a single wooden plank can then be used (again, except for the arm, but that thing was made to be sturdy, so it can be transported with less care); and , once the dome is removed, I can just let the central cylinder stand upside-down (useful for storage). The only trouble I found with this system is that I once connected the ring the wrong way around, meaning everything in the small hangars was upside down. Quite an embarrassing moment.
Speaking of the hangars, I initially wanted to keep them all empty, to store ships inside, but it didn't really offer this piece the sparkle of life. Setting up these small decors inside most of them, with colors contrasting with the general theme of the build, was actually a really good addition.
The colour scheme as it is now is not exactly the one I had planned at the start of the project. I originally planned on using bright light orange (bricklink colour name) instead of sand green, but I found out that this colour was tough to find in large quantities, and I already had quite a bunch of the sand green, so this tragic decision was made. I think it would have offered a more vibrant colour to the build (resembling a Subnautica default palette, which I enjoy quite a lot), but in hindsight, the green works really well, appart from a small detail I'll expand on in a minute.
What's really funny for this project is that, when it started, I actually only wanted a nice way of showcasing all the little space ships that I tend to make whenever I have access to a small amount of cool pieces. Then came a long time where I only daydreamed about it and planned how I would want it to go, and only when I had a clear vision did I start the actual building process. So, taking all that into account, you can probably double the amount of time I spiritually spent on this project.
What I knew is that I wanted to get this huge ring held by beams to the station's body, which made the build both more interesting and more complicated that it would have been. But the challenge was appealing.
At first, the main body was completely flat and white, but I soon had to add texture, both because it was becoming ugly and because the 2*2 white curved slopes were starting to diminish fast. The first modifications I did were to add the sand green curved slopes instead to create stipes, then letters : the big A-2 you can easily spot. With the few bits of lore that I have created for this piece, you have to imagine that there are hundreds of these stations spread in the galaxy, which can be easily described through 3 criteria : the Letter, the Number, and the Colour. That would mean that, if you wanted to meet with someone at the exemplar I made, you would say something along the lines of 'Meet you at Sand Green A2'.
Texture-wise, the other element of the largest cylinder is the exposed bits of machinery, very classic in sci-fi, I know, but it does work well in this context. The second cylinder has much less textures, with only a few grates, and some 2*1 ingot pieces (because they look cool); but it also has its own, smaller ring (diameter slightly larger than the largest cylinder's).
Then come the smaller cylinders, which don't have much texture, except in their transition from one to another (barely visible in any of the pictures, but it exist).
Overall, I'm also really happy of how round it looks, given that circles are not my speciality.

Here is a completely unedited picture of the support arm (Lewa for scale), with a nice counterweight which might be necessary to hold the entire thing in place (it may not be, but I'm not trying to remove it. Bad idea.).
As you might notice, my studio is not a shelf anymore. I built something new from scratch with a green screen, because I thought it would make my editing job easier. And it would have, if I didn't use sand green in my build. Anyway, I'm keeping this for a few days, to snap some pictures of the MOCs which don't fit in my shelve (and are not green, meaning editing will be easier.
Here is the 'studio' from an outside point of view :

I know it's quite a mess outside of my clean perimeter, but I do as I can. You can see one light in the foreground, but there is also one (less visible in the background), symmetrical to the first one, and a third one behind and above the camera (outside of the picture).
You may also notice a lot of sorting boxes. Sorting pieces can greatly improve your productivity, if you label all your box correctly. Covered by the greenscreen is essentially a shelf full of these sorting boxes, labelled by colour and piece type, and it was really practical. Anyway. Thank you for reading until this point, I guess ? If you survived through all this rambling, you probably deserve something...
I mean- Have these pictures I took during the exhibition, I guess...


(You can notice that these are two different days because of the ships’ placement).


✨Custom Bionicle !✨
Today (and next week, too) was a good excuse to get these out of their shelf and showcase them (and wipe the dust away, too.
These are my custom/modified Toa Ru-Fahi, which are a reeeally fun project.
Other angles and details under the cut !
Before going any further, I can’t not link this post, because I made the name of these customs out of it, and also because it’s just so good of a work. Just check it out.
Atuaga Ru-Fahi


The most custom of the ones I’ve made for this series, even if some might spot some inspiration from Kongu Mahri. It turned out to be more silver than black, but it nonetheless remains the Earth Toa. I’m quite happy of how it turned out, with the red accents to fit the weapons, and its overall shape. The contours of the body made with tubes are also something I had never done before. One of the techniques I use to get a thicker effect is to superpose two 'limb' pieces on top of each other; but I also have multiple usage of bohrok hand pieces to get rounder effets, with some texture.
The cable going through the mask is connected directly to the shoulders, and it has a purpose which will be explained somewhere underneath. Also, the Kanohi is Norik’s great Pehkui, which is probably one of the coolest of my (extensive) collection.
Gali Ru-Fahi


Have you recognised her ? Probably, I gave her name. Gali’s always been one of my favourites, so I had to include her. More specifically, this one is a modified version of Gali Mistika, because that whole set was already pretty good as is. Here again, probably went overboard with the silver pieces, but oh well. The tubes are connected to the top of the Kanohi, because there were already holes there. With this one, I used arm pieces to get the torso’s shape. The shoulder plates I have not touched, because they’re a nice unique part. The back piece is a Rahkshi’s foot (in shape, because there’s sadly no dark blue Rahkshi).
The weapons are just a long axe covered by a tube, and the heads are stolen from another Gali (the new gen ones).
Lore-wise, I don’t really have anything for these, except that this Toa team is made out of Toa from different teams (chosen arbitrarily for their look) and are fighting is space (hence the breathing tubes, which is the element I keep on all these customs (only two here, but I promise two more next week). If anyone has any idea, I’m open. Considering what else I’ve on my shelves, the bad guys could be giant bugs, but that’s as far as my ideas go.
See you next week :}

✨Santa’s sleigh !✨
I showed last week the Christmas tree I made last year, now is time for what I did for 2023 !
Closeups and commentaries beneath the cut !
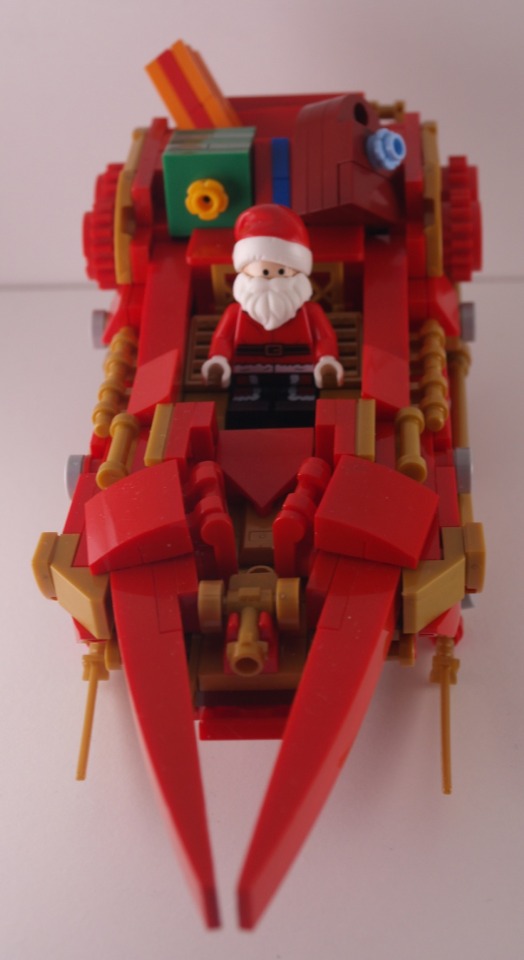
Sleigh closeups :


Reindeers closeups :


Santa :

SO. Had a lot of fun with that one. The sleigh doesn’t have much exciting parts, except the blades, which are actual blades (Ninjago sabers, to be precise). The back is filled with presents from top to bottom, so they can be rearranged to give a different look each time it’s put together.
The part connecting the sledge to the reindeers probably could use the help of an iron wire to keep its shape (a neath technique I’ve used for a flower in another one of my builds to make the bendable pieces stronger), and the threads between the reindeers is a very cheap finition, but in my defence, I was on a time limit.
Reindeer-wise, I’ve hesitated whether to give them all a red nose, but they didn’t look nearly as cute without. And the antlers, I must admit, are very unsteady, because they’re illegally connected, but this was the best way to keep a small overall shape.
Finally, the Santa minifig was probably, and surprisingly, one of the hardest parts of this MOC, because the parts I stole borrowed to other minifigs were spread in multiple places, and I didn’t have one of the official Santa minifigs. So most of the piece come from different Star Wars advent calendars (mostly Darth Vader and C-3PO).

✨Custom stone Toa !✨
Yay ! It’s so big there are shadows on the top of my shelf studio.
Also, we’re already at 4/6 for these, isn’t that crazy ? I think it is.
Details below the cut !
Front/back :


I had some kind of vision with this one. As I started messaging by around with pieces, my brain said 'scorpion'. So mandibles and tail (and that’s about where the scorpion resemblance ends). Of course, I had to keep an element of Pohatu, so his foot is the end of the tail (which is quite wobbly-).
I tried to vary shapes from what I had previously, so I made some big shoulder parts, which look okay and offer some interesting movements, but are pretty weird if you think about it too hard.
The body-legs connection is a bit thin, but it still kind of work with the overall design, so I left it that way (that, and I am running out of brown pieces…)
The weapon are simple sticks with harpoons (?), nothing too complicated, though it was meant to be a single stick originally, it was waaaay to long for the photos. Also, has anyone any idea of which set these harpoons (still '?') come from ? I can’t seem to find it, apparently.
Side shot :

As you may see, I’ve made all the limbs quite thick, because it fitted what I had in mind well, and I messed with a bunch of old pieces for the legs (mostly the sand pieces). There is also have a Bohrok’s body for each foot, because these work surprisingly well, and the middle segment of the leg is backward to give some hypothetical springiness to the legs. Also, Rahkshi feet as armor, that’s always a good recipe.
Head shot ! (Ah, that’s funny.)

Look at how dark that shot is ! If only I had taller shelves…
Anyway, the head is a mix of Rahkshi and Vahki heads, which mix well (there is also a gear underneath. Don’t ask me why. It just exists.)
All of that makes it looks like a V2 Rahkshi (when there is a single stick) which was pretty much on purpose.
On a side note, I’m pretty much done with my big project (which is good, I’m meant to expose it this weekend. Whoops, that’s suddenly very close.)
And, yes, I finally added the #moc, thank you for reminding me every time, I’ll add it from now on :}

✨Bionicle insect !✨
Yay, back to Bionicles MOCs !
I made fewer of these, but here is the first one (other images and additional details below the cut).
I’m still not entirely convinced of the edited photos, but given the size of these MOCs, I didn’t really have much choice but to do how I did. At least the ones with background give a few colours.
Anyway, photos of the left and underside !


This was really a fun one to work with, obviously largely inspired by the Visorak sets (I kept the head piece and the claws), but with more legs !
The claws are combined with feet to add some shape (the two pieces work quite well together) to the end of the legs, then I made of 4 joints articulations to give it a proper insect-like stance. The middle legs are slightly longer (using a long transparent blue piece, instead of the small dark one), which makes it less linear.
I kept the disc of the Visorak, held in place by…a broken Pirahka headpiece. Yes, I’m not exactly very original in my techniques, and I have a lot of these broken pieces. As you might see in the third picture, I have the secondary connectors of that piece attached to the belly of the beast, so to speak.
Although, speaking of techniques, the one I’m using for the 'tail' is not exactly recommendable. It’s a bit tough to see, but there is an elastic band attached to the foot used as a tail part on the third picture. It’s the only element which connects the end of the tail (shiny Visorak claw in second picture) to the rest of the body, which makes it wobbly but offers some interesting movements if needed.
Oh yeah, I also used Vakama’s disc launcher again, as mandibles this time. I originally tried to make a transparent blue disc (from all promotional sets) inside, but it doesn’t fit well enough).
I’m considering making another in another colour, but I’ll have to see if I even have enough ressources to do so~ Maybe green and silver, since these are pieces I have a bunch of, or black and silver…Only time will tell.