
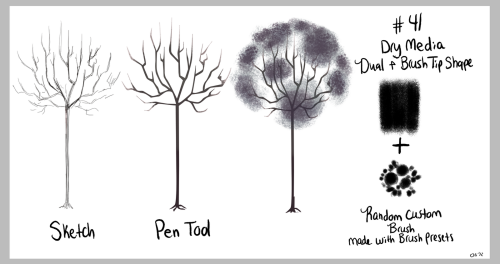
(tutorial)


(tutorial)
i just did a cool thing that i think would be useful if you’re like me and sometimes have a hard time picking colours / a colour scheme for an image
basically i just took a brush with moderate spacing, turned on colour dynamics and set all the hue/sat/brightness to a low (~10%-30%) jitter, picked a base colour, and drew a line down the side of the canvas
it’s sort of like when some people save colour swatches so they can keep their shading consistent, but more for playing around with different tones and lighting on a single surface. it’ll probably be pretty good for skin which is very multi-tonal by nature.
a lot of colours came out that i probably wouldn’t have picked manually, but they still looked pretty cool. and it saves a lot of time because now i have a broad range of colours without having to browse through my pantone swatches or open up the colour picker.
click for more tutorials
-
 thebiscuiteternal reblogged this · 10 months ago
 -
 aceracetothemoon liked this · 1 year ago
 -
 artking-4 reblogged this · 1 year ago
 -
 twadi-gurl reblogged this · 1 year ago
 -
 citrus-rhyme liked this · 1 year ago
 -
 neptt00n liked this · 1 year ago
 -
 0zero-two0 liked this · 2 years ago
 -
 heavymetalmutual liked this · 2 years ago
 -
 ngaikuuomelette liked this · 2 years ago
 -
 delevixvii liked this · 3 years ago
 -
 sactavia liked this · 3 years ago
 -
 fr00t-snacc liked this · 3 years ago
 -
 shimai liked this · 3 years ago
 -
 7-11thuniverse liked this · 3 years ago
 -
 oqchai liked this · 3 years ago
 -
 unadibujantemas-blog liked this · 3 years ago
 -
 nelson-riddle-me-this liked this · 3 years ago
 -
 curiously-fanning-out reblogged this · 3 years ago
 -
 raveniqhts liked this · 4 years ago
 -
 lammylampz liked this · 4 years ago
 -
 valiantzonkcopbear liked this · 4 years ago
 -
tofitwinksreposts liked this · 4 years ago
-
 cyanlily reblogged this · 4 years ago
 -
 ghosts-arting liked this · 4 years ago
 -
 virogo-stash liked this · 4 years ago
 -
 sarahsartrefs099 reblogged this · 4 years ago
 -
 sarami0995 liked this · 4 years ago
 -
 littleredasianhood reblogged this · 4 years ago
 -
littleredasianhood liked this · 4 years ago
-
 read-the-moon liked this · 4 years ago
 -
 konnyuu reblogged this · 4 years ago
 -
 artisium reblogged this · 4 years ago
 -
 pastelnightgale liked this · 4 years ago
 -
 shadowlink-44 liked this · 4 years ago
 -
 jacketfrog liked this · 4 years ago
 -
 ooohmyyyygooood liked this · 4 years ago
 -
 ask-the-queen-of-the-night liked this · 4 years ago
 -
 miss-m-winks liked this · 4 years ago
 -
 bowlinggwithmargo liked this · 4 years ago
 -
 loveallcute liked this · 4 years ago
 -
 spilleddreams liked this · 4 years ago
More Posts from Artisium
Quick art tip - child proportions
Ok this is a real quick one but let me show you how to get more-or-less accurate sizes for child characters. Kids are tricky to draw, they are - from toddler up to about teens people change radically almost every year so pinpointing character’s size during those years is pure hell.
What you need to do to make everything super easy for yourself is to check their Head Proportion. What makes kids look like - well, kids, is that their heads are proportionally large in comparison to their body.
Average adult is about 7,5 heads tall in comparison to their own body, however with children under 10 that number is just under 6 heads with about 1 head shorter the younger you go down to 3 heads as an infant.
Easiest way to figure the so-so head-height of a certain age is to find images of said age group and do a quick count on them

at which after you can replicate it in your own works - don’t mind if it’s not 1:1 with reference, finding images that are actually of the age you need is tricky and kids in general vary a lot so someone might be a lot taller than others. You have a bout 0,5 -1 heads of wiggle room before it starts to look way older.


Proportions are super important in art and i lovingly recommend everyone to figure out basics of them - it’s the easiest way to get notifically better with art. I could go on about proportions but let’s wrap this up. Need to note however that head proportion is not same as character height - a character can be 15 feet tall but still have head-height of 6, HH is simply a way to scale out the body.


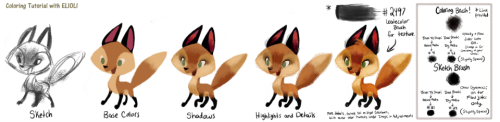

ELIOLI tutorials and processes
A Whole ‘Lotta Tutorials, Y'all.
We should mention that all of these were done in Photoshop CS3 and Paint Tool SAI!
This time, it’s all combined into one, if anyone were to reference these… if any at all!
Oh and sorry if you can’t read the first one too well (really old one), but you get the idea!


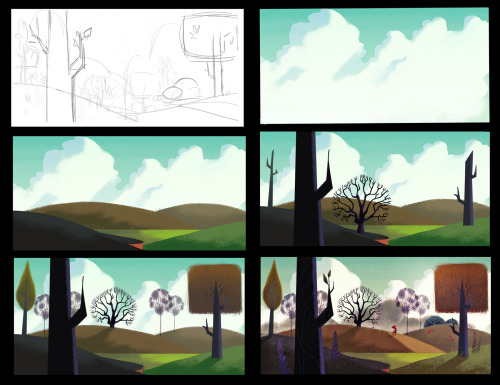
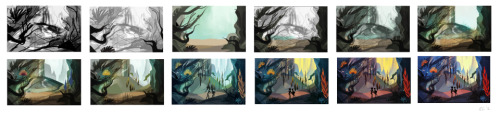
Drawing from films
Drawing from films is a ridiculously useful exercise. It’s not enough to watch films; it’s not enough to look at someone else’s drawings from films. If you want to be in story, there’s no excuse for not doing this.
The way this works: you draw tons of tiny little panels, tiny enough that you won’t be tempted to fuss about drawing details. You put on a movie - I recommend Raiders, E.T., or Jaws… but honestly if there’s some other movie you love enough to freeze frame the shit out of, do what works for you. It’s good to do this with a movie you already know by heart.
Hit play. Every time there’s a cut, you hit pause, draw the frame, and hit play til it cuts again. If there’s a pan or camera move, draw the first and last frames.
Note on movies: Spielberg is great for this because he’s both evocative and efficient. Michael Bay is good at what he does, but part of what he does is cut so often that you will be sorry you picked his movie to draw from. Haneke is magnificent at what he does, but cuts so little that you will wind up with three drawings of a chair. Peter Jackson… he’s great, but not efficient. If you love a Spielberg movie enough to spend a month with it, do yourself a favor and use Spielberg.
What to look for:
Foreground, middle ground, background: where is the character? What is the point of the shot? What is it showing? What’s being used as a framing device? How does that help tie this shot into the geography of the scene? Is the background flat, or a location that lends itself to depth?
Composition: How is the frame divided? What takes up most of the space? How are the angles and lines in the shot leading your eye?
Reusing setups, economy: Does the film keep coming back to the same shot? The way liveaction works, that means they set up the camera and filmed one long take from that angle. Sometimes this includes a camera move, recomposing one long take into what look like separate shots. If you pay attention, you can catch them.
Camera position, angle, height: Is the camera fixed at shoulder height? Eye height? Sitting on the floor? Angled up? Down? Is it shooting straight on towards a wall, or at an angle? Does it favor the floor or the ceiling?
Lenses: wide-angle lens or long lens? Basic rule of thumb: If the character is large in frame and you can still see plenty of their surroundings, the lens is wide and the character is very close to camera. If the character’s surroundings seem to dwarf them, the lens is long (zoomed in).
Lighting: Notice it, but don’t draw it. What in the scene is lit? How is this directing your eye? How many lights? Do they make sense in the scene, or do they just FEEL right?
This seems like a lot to keep in mind, and honestly, don’t worry about any of that. Draw 100 thumbnails at a time, pat yourself on the back, and you will start to notice these things as you go.
Don’t worry about the drawings, either. You can see from my drawings that these aren’t for show. They’re notes to yourself. They’re strictly for learning.
Now get out there and do a set! Tweet me at @lawnrocket and I’ll give you extra backpats for actually following through on it. Just be aware - your friends will look at you super weird when you start going off about how that one shot in Raiders was a pickup - it HAD to be - because it doesn’t make sense except for to string these other two shots together…

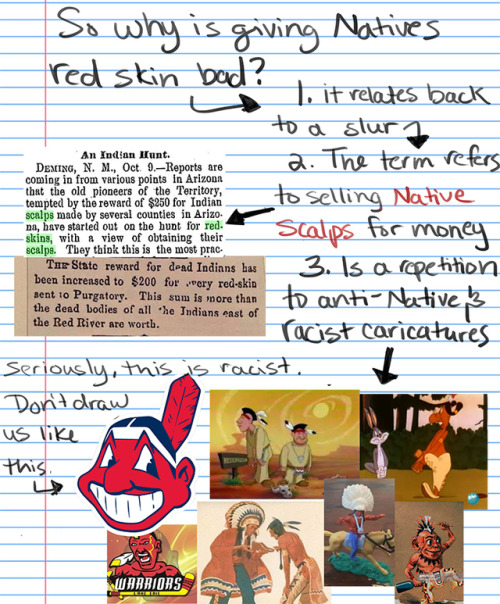
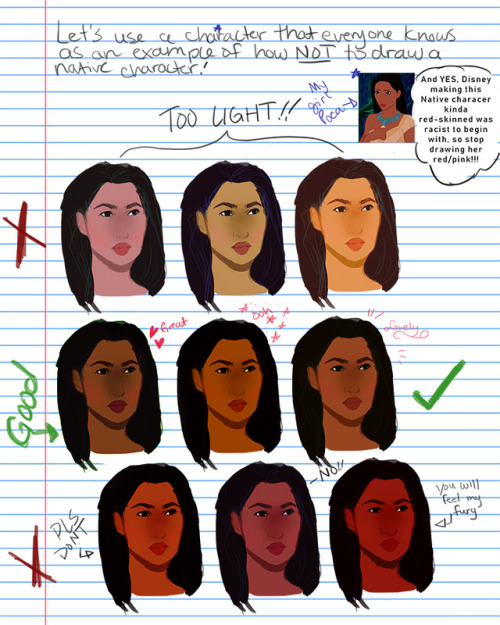
How I draw skin Part 2: DON”T DRAW NATIVE PEOPLE WITH RED SKIN!!!! A tutorial
For the first tutorial on how I draw skin, see the post here.
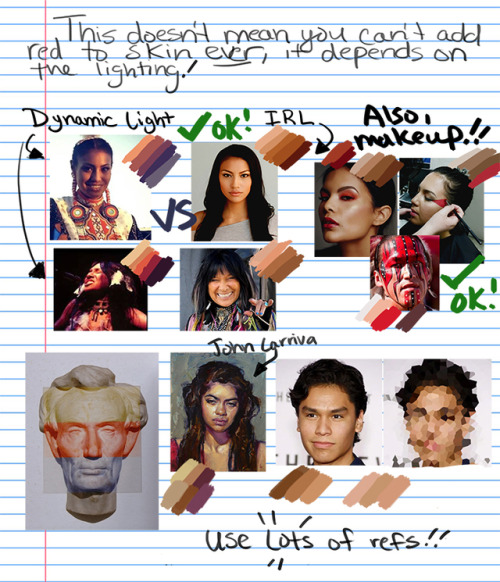
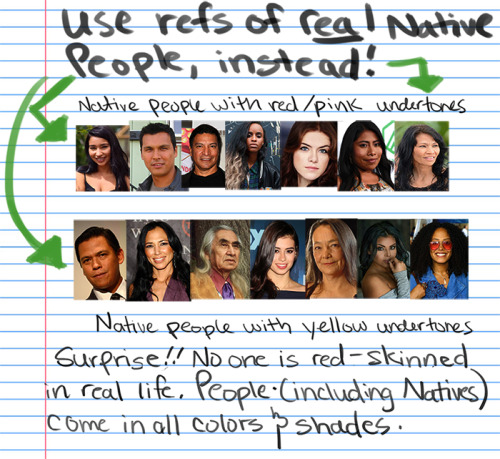
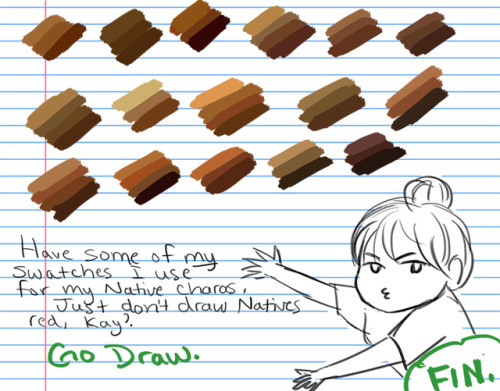
But seriously, I’ve seen too many drawings of Native characters with literal red/pink skin to count so just in case some of you are having troubles with drawing Native people, I’ve provided a guide for you. Please take my swatches if it helps!! and no more red skinned people, please <0<
Disclaimer: this tutorial is mainly about the artistic depictions of Indigenous Peoples in North America, where the slur and redskin caricature originated, but it would still be racist to draw other non-North/Central/South American Indigenous groups like this so…..don’t.