
it/its | 19 | Latest Obsession: 🥊🏞️ | Art Suggestions: Open | DA: ChosenCatGuns | I don't kin Sniper TF2 YOU do
696 posts
JIGEN
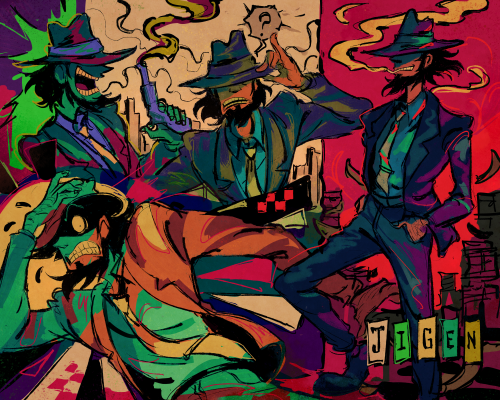
JIGEN
-
 nakabooboop liked this · 1 year ago
 -
 sarcasticghosts reblogged this · 1 year ago
 -
 jinmay6 liked this · 1 year ago
 -
 worship-longfurby reblogged this · 1 year ago
 -
worship-longfurby liked this · 1 year ago
-
 doumekiparker reblogged this · 1 year ago
 -
 jetsetclassic reblogged this · 1 year ago
 -
 nakaionaquette reblogged this · 1 year ago
 -
 sirhenrymotherfucker reblogged this · 1 year ago
 -
 drvvolk liked this · 1 year ago
 -
 swiatlocienie liked this · 1 year ago
 -
 sirenhighway liked this · 1 year ago
 -
 hanna873 liked this · 1 year ago
 -
 k0shatinka liked this · 1 year ago
 -
 nedyargh liked this · 1 year ago
 -
 fantasy-capsule liked this · 1 year ago
 -
 ifreakinglovetheriddler liked this · 1 year ago
 -
 theisopodyearns reblogged this · 1 year ago
 -
 monstefucker69 liked this · 1 year ago
 -
 11-lemons liked this · 1 year ago
 -
 literallyjessepinkman liked this · 1 year ago
 -
 a-gay-little-heist reblogged this · 1 year ago
 -
 radiostaticc liked this · 1 year ago
 -
 androm3da85 liked this · 1 year ago
 -
 karthedense reblogged this · 1 year ago
 -
karthedense liked this · 1 year ago
-
 flight-by-night liked this · 1 year ago
 -
 drama-cats2468 liked this · 1 year ago
 -
 cherrylime-zombie reblogged this · 1 year ago
 -
cherrylime-zombie liked this · 1 year ago
-
 syntax-horror liked this · 1 year ago
 -
 johnnystringbean reblogged this · 1 year ago
 -
 racer-xp reblogged this · 1 year ago
 -
 bad-person-1810 liked this · 1 year ago
 -
 babblingsleuth reblogged this · 1 year ago
 -
 grandmacookie69 liked this · 1 year ago
 -
 windienine liked this · 1 year ago
 -
 justplainsimon reblogged this · 1 year ago
 -
 detectivehole reblogged this · 1 year ago
 -
 meltybread reblogged this · 1 year ago
 -
 soggisquid liked this · 1 year ago
 -
 thehappybaker reblogged this · 1 year ago
 -
 rawmeatonstage liked this · 1 year ago
 -
 angelskittle reblogged this · 1 year ago
 -
 ross-stories liked this · 1 year ago
 -
thehappybaker liked this · 1 year ago
-
 aoihoshii99 liked this · 1 year ago
 -
 chukumubr liked this · 1 year ago
More Posts from Matt-theater

how do draw good
fill 14 sketch book
bad stuff is good stuff bc you made stuff
do you like sparkle???? draw sparkle
draw what make your heart do the smiley emote
member to drink lotsa agua or else bad time
d ont stress friend all is well
your art is hot like potato crisps
don’t let anyone piss on your good mood amigo
if they do
eat
them


...that your audience won't hate.
This is a method I started using when NFTs were on the rise - thieves would have to put actual work into getting rid of the mark - and one that I am now grateful for with the arrival of AI. Why? Because anyone who tries to train an AI on my work will end up with random, disruptive color blobs.
I can't say for sure it'll stop theft entirely, but it WILL make your images annoying for databases to incorporate, and add an extra layer of inconvenience for thieves. So as far as I'm concerned, that's a win/win.
I'll be showing the steps in CSP, but it should all be pretty easy to replicate in Photoshop.
Now: let's use the above image as our new signature file. I set mine to be 2500 x 1000 pixels when I'm just starting out.
Note that your text should not have a lot of anti-aliasing, so using a paint brush to start isn't going to work well with this method. Just use the standard G-Pen if you're doing this by hand, or, just use the text tool and whichever font you prefer.
Once that's done, take your magic wand tool, and select all the black. Here are the magic wand settings I'm using to make the selections:

All selected?

Good.
Now, find a brush with a scattering/tone scraping effect. I use one like this.

You can theoretically use any colors you want for this next part, but I'd recommend pastels as they tend to blend better.
Either way, let's add some color to the text.

Once that's finished,
You're going to want to go to Layer Property, and Border Effect

You'll be given an option of choosing color and thickness. Choose black, and go for at least a 5 in thickness. Adjust per your own preferences.

Now create a layer beneath your sig layer, and merge the sig down onto the blank layer.


This effectively 'locks in' the border effect, which is exactly what we want.
Hooray, you've finished your watermark!

Now let's place that bad boy into your finished piece.

You'll get the best mileage out of a mark if you can place it over a spot that isn't black of white, since you'll get better blending options that way. My preference is for Overlay.


From here, I'll adjust the opacity to around 20-25, depending on the image.

If you don't have a spot to use overlay, however, there's a couple other options. For white, there's Linear Burn, which imho doesn't look as good, but it still works in a pinch.

And for lots of black, you have Linear Light

Either way, you're in business!
As a note, I know it's a bummer for some people to "ruin" their work with watermarks, which is part of the reason I developed this mark in particular. Its disruption is about as minimal as I can make it while still being effective.
There's other methods, too, of course! But this is the one I use, and the one I can speak on. Hope it helps some of you!